缓存、Swagger、商品列表与详情展示
缓存、Swagger、商品列表与详情展示
目标
- 熟练掌握
Redis作为缓存的基本用法 - 为项目整合
Swagger/Knife4j在线接口文档 - 完成商品列表分页搜索接口
- 完成商品详情展示接口
- 扩展任务:调研
Spring Cache并尝试应用到项目中 - 扩展任务:搭建
Redis主从集群、哨兵或分片集群
上一篇我们已经完成了首页和分类导航的基础能力,这一篇继续沿着前台商城的实际使用链路往下走。
先通过 Redis 给分类树加缓存,再补上接口文档工具,最后完成商品列表与商品详情两个核心页面的数据接口。
1.Redis缓存
前言
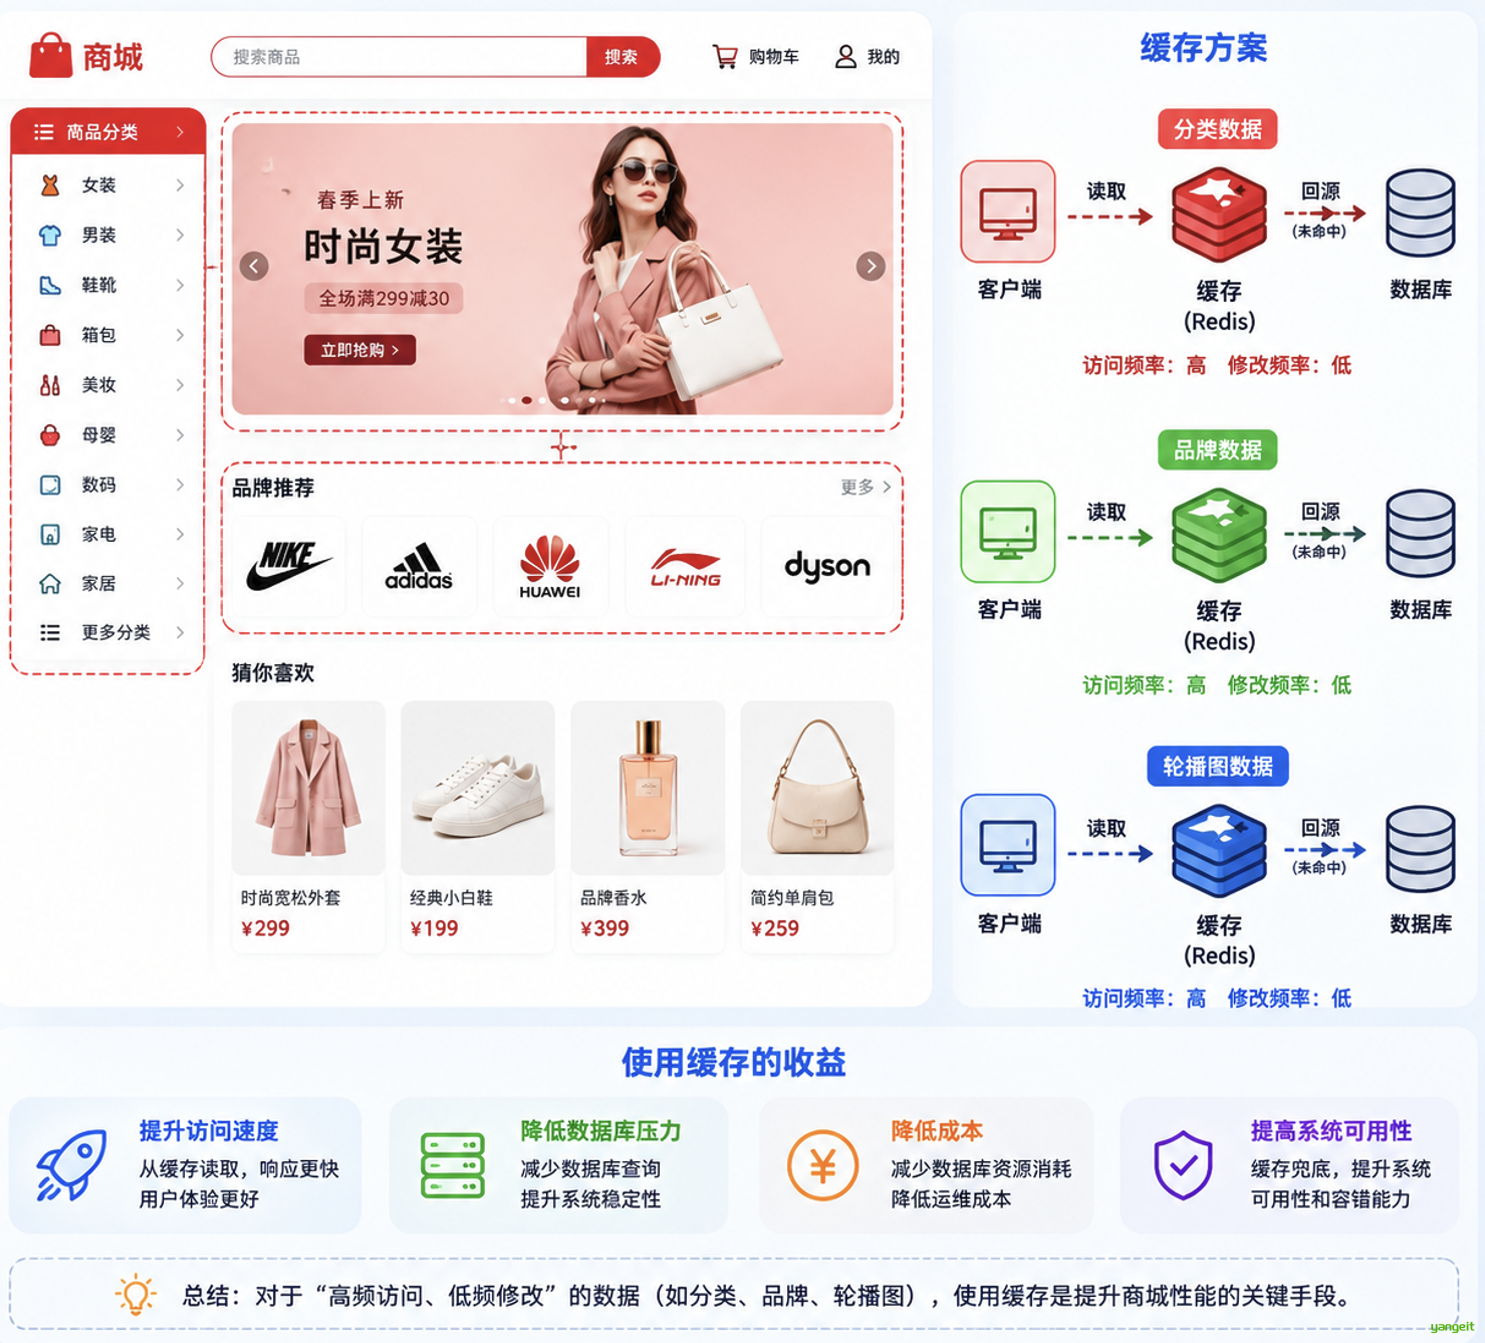
在商城场景中,分类、品牌、轮播图这类数据访问频率高,但修改频率通常不高,非常适合放到缓存中。
因此本节先拿分类树接口做缓存改造,这样也能顺带熟悉 Spring Data Redis 的基本使用方式。
1.1.Redis基础认识
Redis 的几个基本特点:
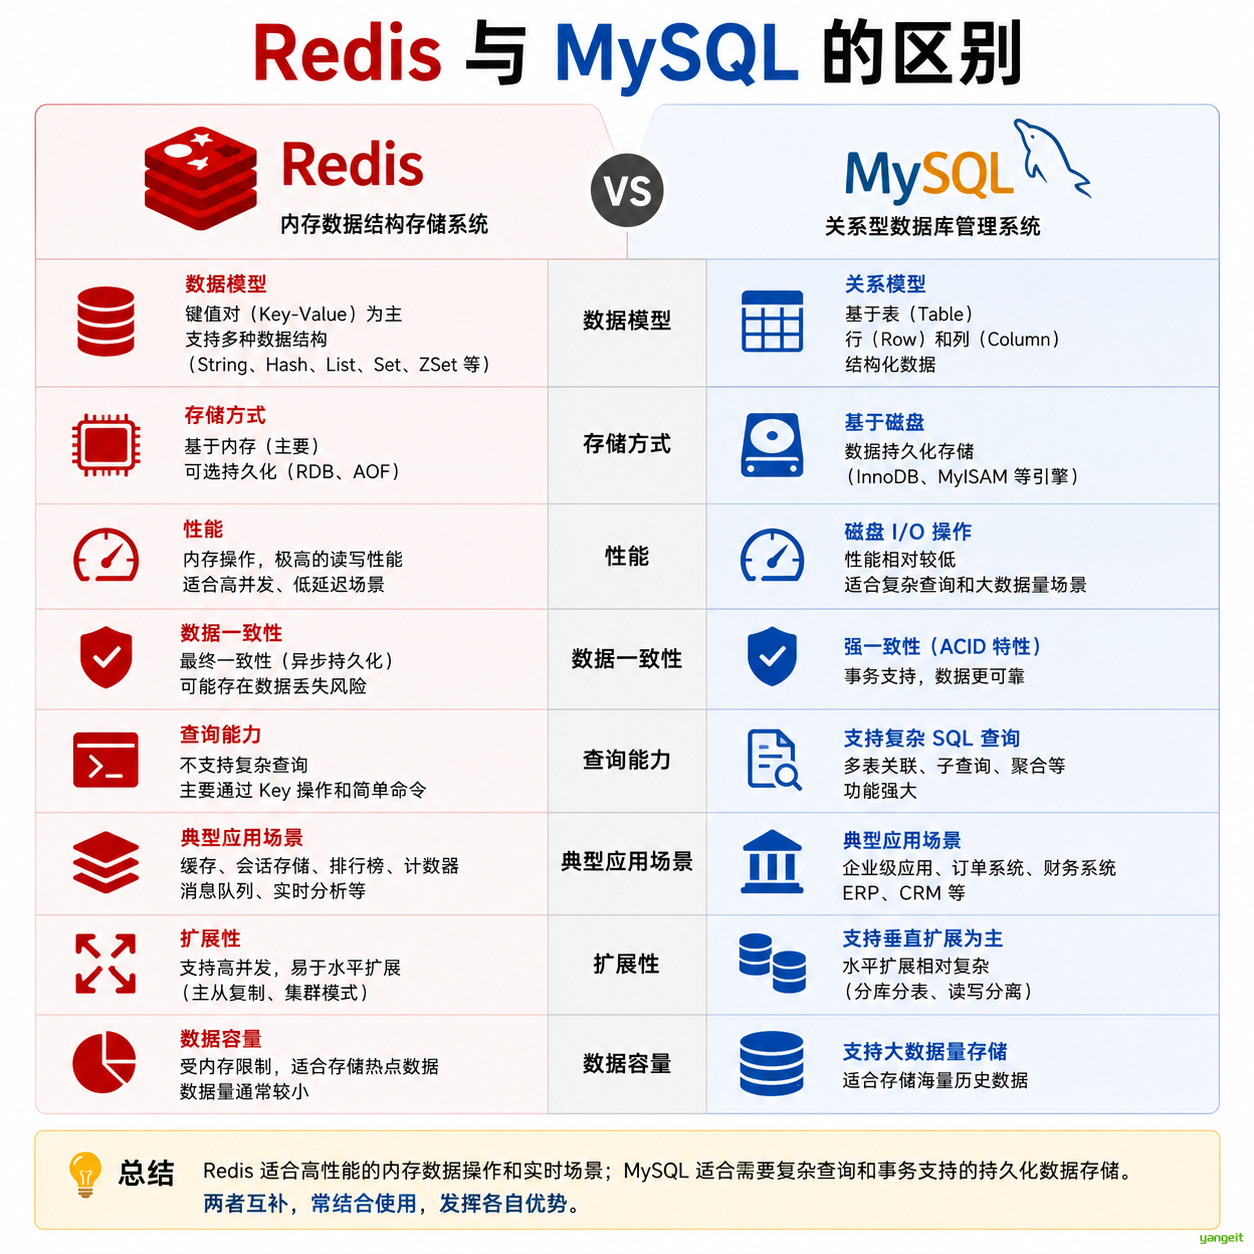
Redis是一款非关系型数据库Redis基于内存运行Redis具备持久化能力,例如RDB、AOF
哪些数据适合放入 Redis:
- 热点数据
- 不常变化的数据
分类数据一般情况下不会频繁修改,因此非常适合缓存起来,以提高页面加载速度。
Redis 与 MySQL 对比:
1.2.给分类树接口增加缓存
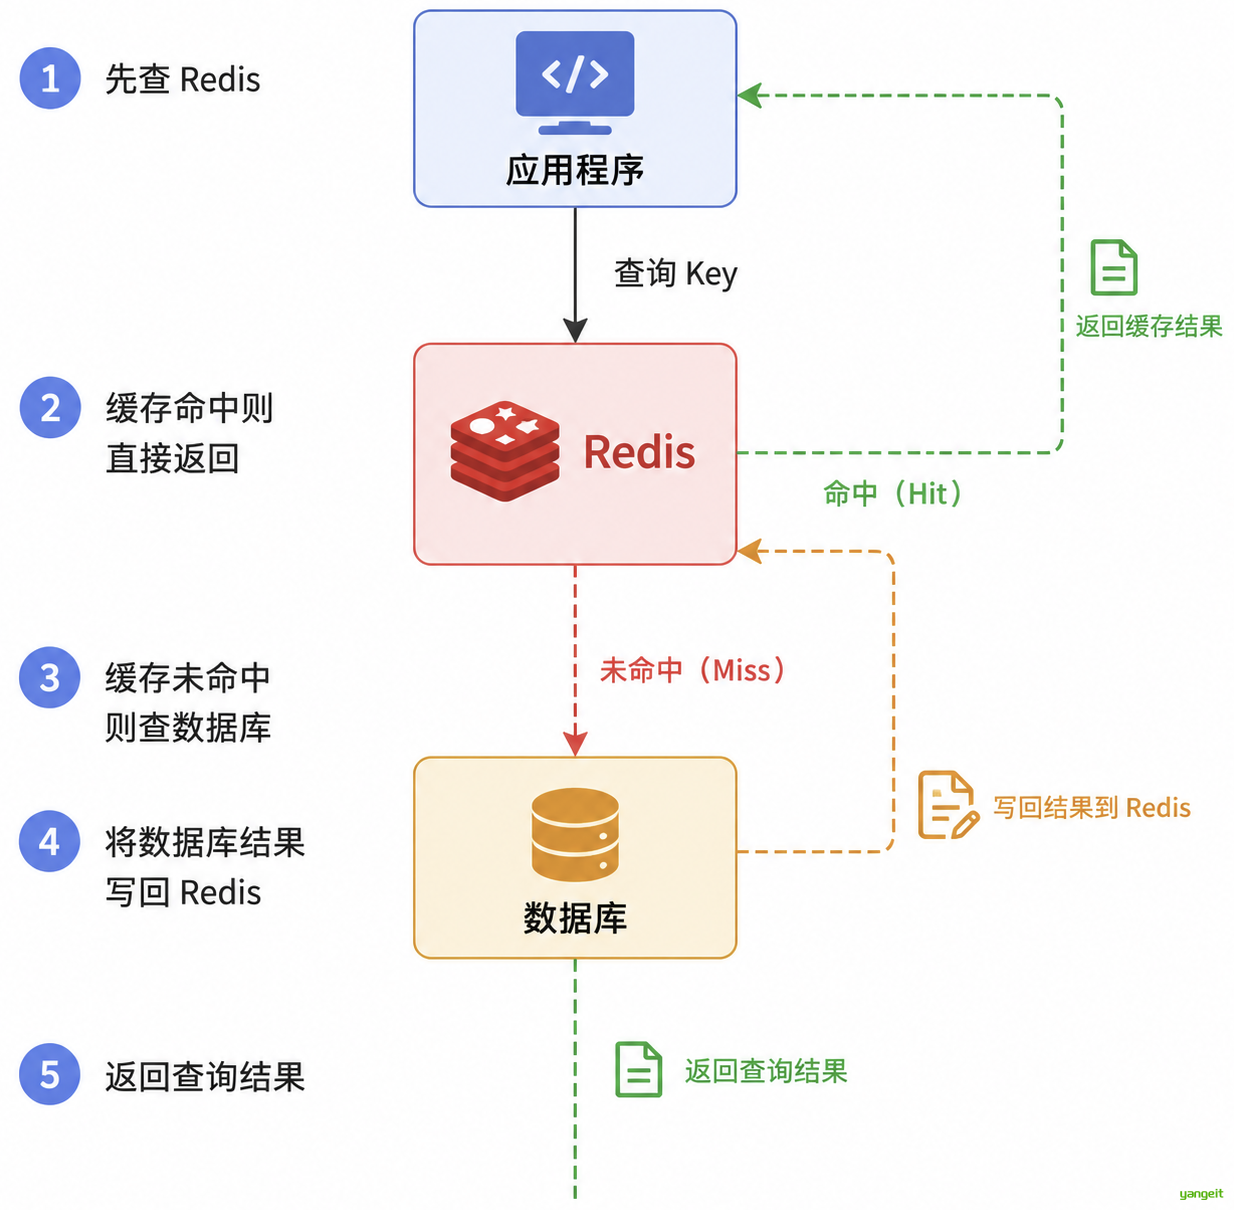
这里先改造首页常用的分类树接口。整体思路非常直接:
- 先查
Redis - 缓存命中则直接返回
- 缓存未命中则查数据库
- 将数据库结果写回
Redis - 返回查询结果
1.2.1.引入Redis依赖
在 zx-common 的 pom.xml 中添加依赖。前面的环境搭建中其实已经加过,这里只是再次确认:
<dependency>
    <groupId>org.springframework.boot</groupId>
    <artifactId>spring-boot-starter-data-redis</artifactId>
</dependency>
1.2.2.配置Redis连接信息
在 application.yml 中添加配置:
spring:
  data:
    redis:
      host: localhost
      port: 6379
1.2.3.改造CategoryServiceImpl
在ProductService模块下
对 CategoryServiceImpl 中的 findCategoryTree() 方法进行改造:
@Autowired
private RedisTemplate<String, String> redisTemplate;

@Override
public List<Category> findCategoryTree() {
    /*
        1. 先查询 Redis 缓存,如果有就直接返回
        2. 如果没有就查询数据库,并将结果写入 Redis
     */
    String categoryTreeJsonStr = redisTemplate.opsForValue().get("categoryTree");
    if (categoryTreeJsonStr != null && categoryTreeJsonStr.length() > 0) {
        List<Category> categoryList = JSON.parseArray(categoryTreeJsonStr, Category.class);
        log.info("走 Redis 缓存,分类数量:{}", categoryList.size());
        return categoryList;
    }
    // 走数据库查询
    List<Category> categoryListFromDB = getCategoryListFromDB();
    log.info("走数据库查询,分类数量:{}", categoryListFromDB.size());
    redisTemplate.opsForValue().set("categoryTree", JSON.toJSONString(categoryListFromDB));
    return categoryListFromDB;
}

@NotNull
private List<Category> getCategoryListFromDB() {
    List<Category> categoryList = lambdaQuery().list();

    List<Category> oneLevelList = categoryList.stream()
            .filter(category -> category.getParentId().longValue() == 0)
            .collect(Collectors.toList());

    oneLevelList.forEach(oneCategory -> {
        List<Category> twoLevelList = categoryList.stream()
                .filter(category -> category.getParentId().longValue() == oneCategory.getId().longValue())
                .collect(Collectors.toList());

        twoLevelList.forEach(twoCategory -> {
            List<Category> threeLevelList = categoryList.stream()
                    .filter(category -> category.getParentId().longValue() == twoCategory.getId().longValue())
                    .collect(Collectors.toList());
            twoCategory.setChildren(threeLevelList);
        });

        oneCategory.setChildren(twoLevelList);
    });
    return oneLevelList;
}
log.info 需要配置Slf4j注解
这里用的是最基础的“手动查缓存 + 手动写缓存”方式。
优点是逻辑清晰、便于理解;缺点是代码里会出现较明显的缓存模板代码。后面如果项目中类似场景越来越多,就使用SpringCache注解来简化。 如:
@Cacheable:查询缓存,如果缓存中有,则直接返回缓存数据;如果缓存中没有,则执行方法,并将方法结果写入缓存。 @CachePut:更新缓存,无论缓存中是否有,都执行方法,并将方法结果写入缓存。 @CacheEvict:删除缓存,可以指定删除某个缓存,也可以指定删除所有缓存。 自行学习 ❤️
1.2.4.测试
启动项目后连续访问分类树接口:
- 第一次访问时,数据会从
MySQL查询 - 第二次访问时,数据会直接从
Redis返回
c.z.p.service.impl.CategoryServiceImpl : 走 Redis 缓存,分类数量:10
这样就能明显看到缓存命中的效果。
注意
如果分类数据后续发生新增、修改、删除,就必须同步清理或更新 categoryTree 这份缓存。
否则前端看到的还是旧数据。
2.整合Swagger
接口逐渐变多之后,单纯靠口头描述或者 Apifox 手工维护都会越来越吃力。
这时就需要通过接口文档工具自动生成接口说明,既方便开发,也方便联调和测试。
前言
2.1.Swagger简介
Swagger是一种基于OpenAPI规范的接口文档生成工具- 它可以根据 Java 代码中的注解自动生成接口文档
- 同时还提供了可视化界面,方便在线调试接口
2.2.Knife4j
在实际项目中,很多团队并不会直接使用原生 Swagger UI,而是会选用体验更好的增强工具 Knife4j。
2.2.1.Knife4j简介
官方文档:https://doc.xiaominfo.com/
Knife4j 是基于 Swagger 构建的增强工具,常见特点如下:
- 提供更美观、易用的 UI 界面
- 支持更丰富的注解配置方式
- 具备更多扩展能力
- 与
Spring Boot集成较为方便

2.2.2.Knife4j使用
官方快速开始:https://doc.xiaominfo.com/docs/quick-start
接下来按照步骤完成整合。
2.2.2.1.导入依赖
在 product-service 中导入依赖。父工程中如果已经统一引入,也可以直接复用:
<dependency>
    <groupId>com.github.xiaoymin</groupId>
    <artifactId>knife4j-openapi3-jakarta-spring-boot-starter</artifactId>
    <version>4.4.0</version>
</dependency>
2.2.2.2.修改配置文件
在 application.yml 中增加如下配置:
springdoc:
  swagger-ui:
    path: /swagger-ui.html
    tags-sorter: alpha
    operations-sorter: alpha
  api-docs:
    path: /v3/api-docs
  group-configs:
    - group: 'default'
      paths-to-match: '/**'
      packages-to-scan: com.zx.product

knife4j:
  enable: true
  setting:
    language: zh_cn
其中:
springdoc负责OpenAPI文档生成knife4j.enable=true表示开启增强文档页
2.2.2.3.编写Knife4j配置类
在 zx-common 模块中添加配置类:
package com.zx.common;

import io.swagger.v3.oas.models.OpenAPI;
import io.swagger.v3.oas.models.info.Contact;
import io.swagger.v3.oas.models.info.Info;
import org.springdoc.core.models.GroupedOpenApi;
import org.springframework.context.annotation.Bean;
import org.springframework.context.annotation.Configuration;

@Configuration
public class Knife4jConfig {

    @Bean
    public GroupedOpenApi adminApi() {
        return GroupedOpenApi.builder()
                .group("用户端API")
                .pathsToMatch("/**")
                .build();
    }

    @Bean
    public OpenAPI customOpenAPI() {
        return new OpenAPI()
                .info(new Info()
                        .title("甄选API接口文档")
                        .version("1.0")
                        .description("甄选API接口文档")
                        .contact(new Contact().name("kdm")));
    }
}
2.2.2.4.使配置生效
如果是 Spring Boot 3.0 以上版本,在 zx-common 中配置:
resources/META-INF/spring/org.springframework.boot.autoconfigure.AutoConfiguration.imports
内容如下:
com.zx.common.FastJsonLongToStringConfiguration
com.zx.common.Knife4jConfig
如果是 Spring Boot 3.0 以下版本,则可以使用:
resources/META-INF/spring.factories
内容如下:
org.springframework.boot.autoconfigure.EnableAutoConfiguration=\
    com.zx.common.FastJsonLongToStringConfiguration,\
    com.zx.common.Knife4jConfig
2.2.2.5.给接口加注解
例如给 CategoryController 添加 @Tag 和 @Operation 注解:
package com.zx.product.controller;


import java.util.List;

@Tag(name = "分类相关接口")
@RestController
@RequestMapping("/api/product/category")
@CrossOrigin
public class CategoryController {

    @Autowired
    private CategoryService categoryService;

    @Operation(summary = "查询分类树")
    @GetMapping("/findCategoryTree")
    public Result<List<Category>> findCategoryTree() {
        List<Category> list = categoryService.findCategoryTree();
        return Result.build(list, ResultCodeEnum.SUCCESS);
    }
}
IndexController 也可以补充首页相关注解:
package com.zx.product.controller;

@RestController
@RequestMapping("/api/product")
@Tag(name = "首页")
public class IndexController {

    @Autowired
    private ProductService productService;

    @Operation(summary = "首页接口")
    @GetMapping("/index")
    @CrossOrigin(origins = "*")
    public Result<IndexVo> findIndexData() {
        IndexVo vo = productService.findIndexData();
        return Result.build(vo, ResultCodeEnum.SUCCESS);
    }
}
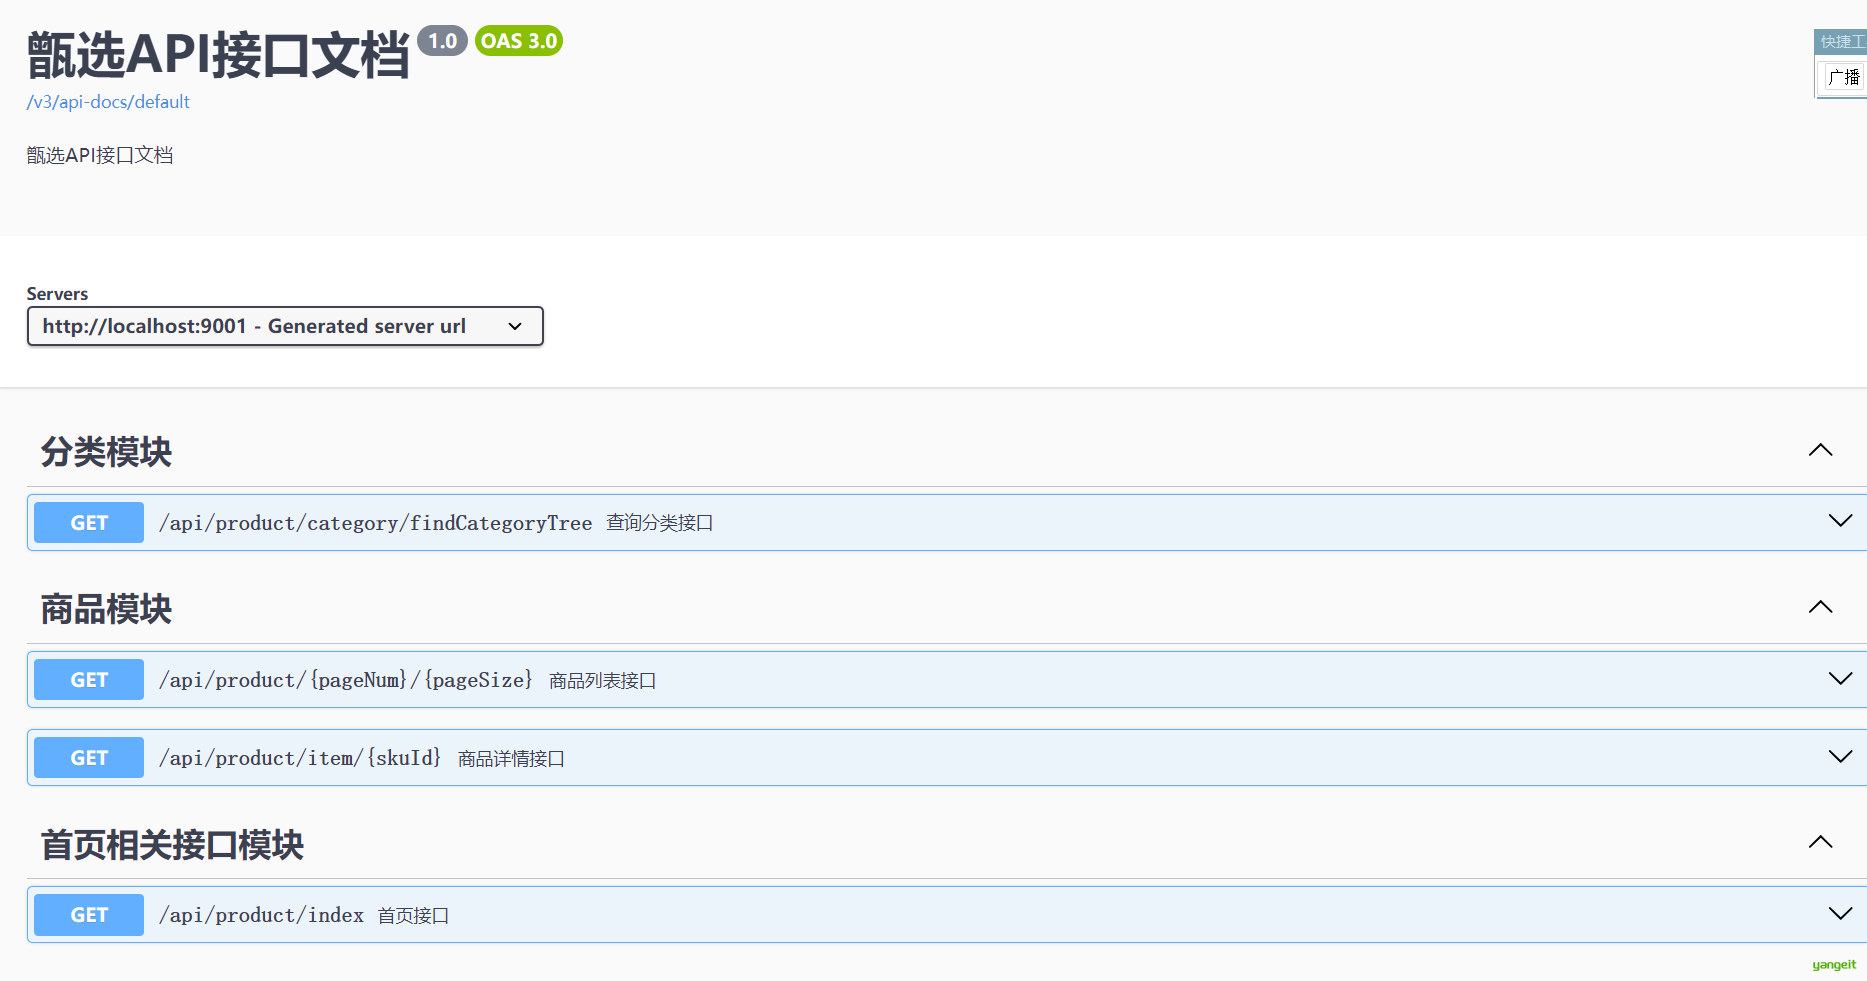
启动项目后,就可以访问 Knife4j 自动生成的接口文档:
http://localhost:9001/doc.html
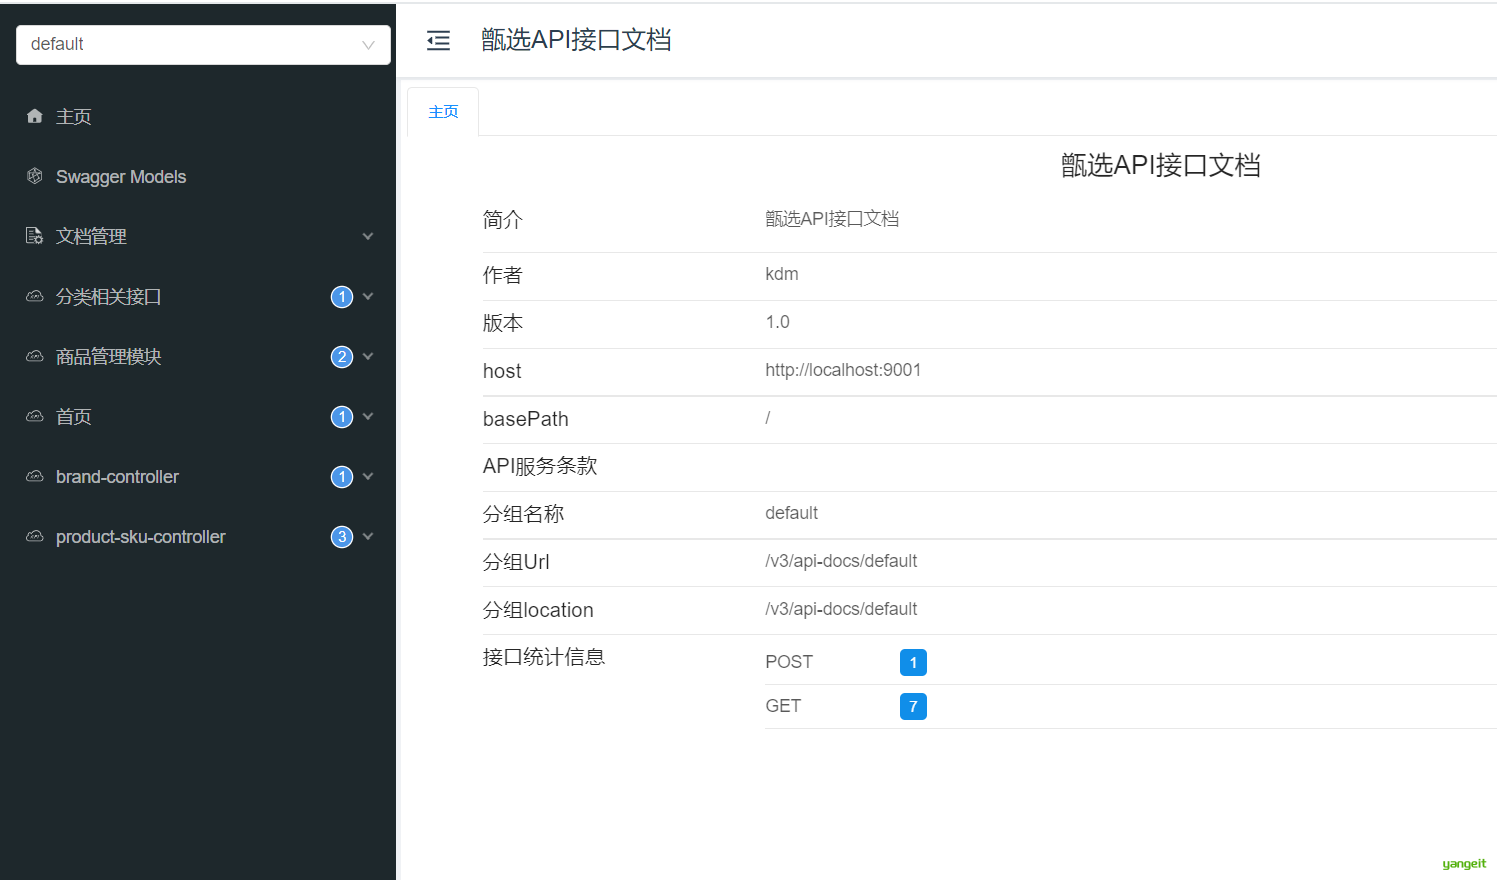
2.2.3.常见注解
Knife4j 常见注解如下:
@Tag:用在 Controller 类上,对控制器进行说明
@Operation:用在接口方法上,对接口进行描述
@Parameters:用在接口方法上,对参数进行描述
@Schema:用在实体类或属性上,对模型进行说明
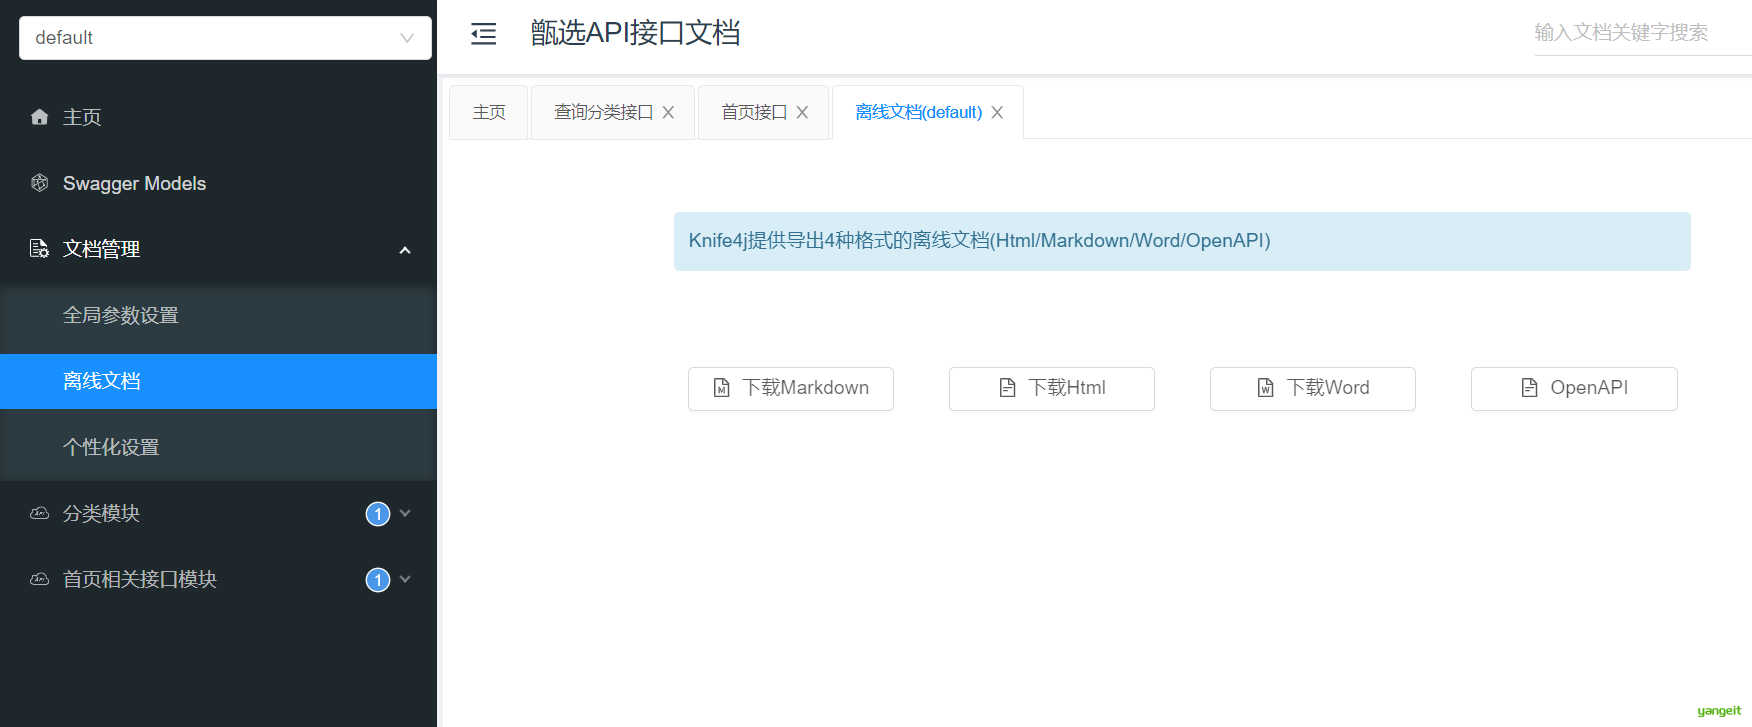
2.3.导出离线文档
除了在线调试,Knife4j 也支持导出离线文档,便于归档或交付。
3.商品列表
完成了首页之后,用户下一步最常进入的页面就是商品列表页。
这个页面的重点在于“筛选条件多、排序条件多、并且要支持分页”,因此非常适合拿来练习条件查询接口设计。
前言
3.1.需求说明
进入商品列表通常有四个入口:
- 点击首页一级分类
- 点击首页关键字搜索
- 进入分类频道后点击三级分类
- 点击首页畅销商品,按销量排序展示
搜索条件包括:
- 关键字
- 一级分类
- 二级分类
- 三级分类
- 品牌
排序规则包括:
- 销量降序:
order = 1 - 价格升序:
order = 2 - 价格降序:
order = 3
业务限制条件包括:
- 商品必须是上架状态
- 商品审核状态必须通过
- 商品删除标记必须可用
效果如下:
要完成这个页面,通常至少需要两个接口:
- 查询全部品牌
- 商品列表分页搜索
本节重点先放在商品列表搜索接口上。
3.2.需求分析
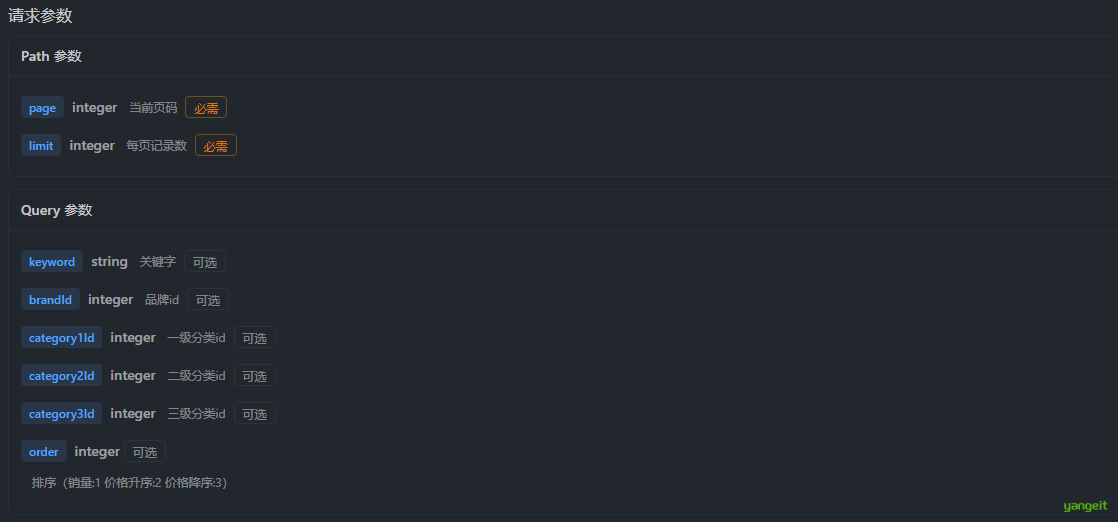
查看接口文档,请求方式如下:
get /api/product/{page}/{limit}
请求参数如下图所示:
响应结果示例:
{
    "code": 200,
    "message": "成功",
    "data": {
        "total": 6,
        "list": [
            {
                "id": 1,
                "createTime": "2023-05-25 22:21:07",
                "skuCode": "1_0",
                "skuName": "小米 红米Note10 5G手机 颜色:白色 内存:8G",
                "productId": 1,
                "thumbImg": "http://139.198.127.41:9000/spzx/20230525/665832167-5_u_1 (1).jpg",
                "salePrice": 1999.00,
                "marketPrice": 2019.00,
                "costPrice": 1599.00,
                "stockNum": 99,
                "saleNum": 1,
                "skuSpec": "颜色:白色,内存:8G",
                "weight": "1.00",
                "volume": "1.00",
                "status": null,
                "skuSpecList": null
            }
        ],
        "pageNum": 1,
        "pageSize": 10
    }
}
这类接口的核心,不是简单分页,而是“多条件组合分页查询”。
3.3.接口开发:方式一MyBatis
第一种方式使用传统 MyBatis + XML 动态 SQL,优点是条件拼装过程非常直观。
3.3.1.ProductSkuDto
先定义前端查询参数对象:
@Data
@Schema(description = "商品列表搜索条件实体类")
public class ProductSkuDto {

    @Schema(description = "关键字")
    private String keyword;

    @Schema(description = "品牌id")
    private Long brandId;

    @Schema(description = "一级分类id")
    private Long category1Id;

    @Schema(description = "二级分类id")
    private Long category2Id;

    @Schema(description = "三级分类id")
    private Long category3Id;

    @Schema(description = "排序(综合排序:1 价格升序:2 价格降序:3)")
    private Integer order = 1;
}
3.3.2.ProductController
表现层代码如下:
package com.zx.product.controller;

import com.github.pagehelper.PageInfo;
import com.zx.domain.dto.h5.ProductSkuDto;
import com.zx.domain.entity.product.ProductSku;
import com.zx.domain.vo.common.Result;
import com.zx.domain.vo.common.ResultCodeEnum;
import com.zx.product.service.ProductService;
import io.swagger.v3.oas.annotations.Operation;
import io.swagger.v3.oas.annotations.tags.Tag;
import org.springframework.beans.factory.annotation.Autowired;
import org.springframework.web.bind.annotation.CrossOrigin;
import org.springframework.web.bind.annotation.GetMapping;
import org.springframework.web.bind.annotation.PathVariable;
import org.springframework.web.bind.annotation.RequestMapping;
import org.springframework.web.bind.annotation.RestController;

@RestController
@RequestMapping("/api/product")
@Tag(name = "商品管理模块")
public class ProductController {

    @Autowired
    private ProductService productService;

    @Operation(summary = "商品列表接口")
    @GetMapping("/{pageNum}/{pageSize}")
    @CrossOrigin
    public Result<PageInfo<ProductSku>> findByPage(@PathVariable Integer pageNum,
                                                   @PathVariable Integer pageSize,
                                                   ProductSkuDto dto) {
        PageInfo<ProductSku> pageInfo = productService.findByPage(pageNum, pageSize, dto);
        return Result.build(pageInfo, ResultCodeEnum.SUCCESS);
    }
}
3.3.3.ProductService
业务层接口和实现如下:
PageInfo<ProductSku> findByPage(Integer page, Integer limit, ProductSkuDto productSkuDto);

@Override
public PageInfo<ProductSku> findByPage(Integer page, Integer limit, ProductSkuDto productSkuDto) {
    PageHelper.startPage(page, limit);
    List<ProductSku> productSkuList = productSkuMapper.findByPage(productSkuDto);
    return new PageInfo<>(productSkuList);
}
3.3.4.ProductSkuMapper
持久层接口:
List<ProductSku> findByPage(ProductSkuDto productSkuDto);
3.3.5.ProductSkuMapper.xml
对应的动态 SQL:
<select id="findByPage" resultMap="productSkuMap">
   select
   sku.id, sku.sku_code, sku.sku_name, sku.product_id, sku.thumb_img,
   sku.sale_price, sku.market_price, sku.cost_price, sku.stock_num,
   sku.sale_num, sku.sku_spec, sku.weight, sku.volume, sku.status,
   sku.create_time, sku.update_time, sku.is_deleted
   from product_sku sku
   left join product p on p.id = sku.product_id
   <where>
      <if test="keyword != null and keyword != ''">
         and sku.sku_name like CONCAT('%', #{keyword}, '%')
      </if>
      <if test="brandId != null">
         and p.brand_id = #{brandId}
      </if>
      <if test="category1Id != null">
         and p.category1_id = #{category1Id}
      </if>
      <if test="category2Id != null">
         and p.category2_id = #{category2Id}
      </if>
      <if test="category3Id != null">
         and p.category3_id = #{category3Id}
      </if>
      and p.status = 1
      and p.audit_status = 1
      and sku.is_deleted = 0
      and p.is_deleted = 0
   </where>
   <if test="order == 1">
      order by sku.sale_num desc
   </if>
   <if test="order == 2">
      order by sku.sale_price asc
   </if>
   <if test="order == 3">
      order by sku.sale_price desc
   </if>
</select>
这个写法最大的好处是所有筛选条件都在 SQL 中一眼可见,比较适合复杂报表型查询。
3.4.接口开发:方式二MyBatis Plus
第二种方式使用 MyBatis Plus 来实现,代码量会少一些,但前提是你已经比较熟悉链式条件构造。
3.4.1.ProductController
控制层与上面保持一致:
@RestController
@RequestMapping("/api/product")
@Tag(name = "商品管理模块")
public class ProductController {

    @Autowired
    private ProductService productService;

    @Operation(summary = "商品列表接口")
    @GetMapping("/{pageNum}/{pageSize}")
    @CrossOrigin
    public Result<PageInfo<ProductSku>> findByPage(@PathVariable Integer pageNum,
                                                   @PathVariable Integer pageSize,
                                                   ProductSkuDto dto) {
        PageInfo<ProductSku> pageInfo = productService.findByPage(pageNum, pageSize, dto);
        return Result.build(pageInfo, ResultCodeEnum.SUCCESS);
    }
}
3.4.2.ProductService
public interface ProductService extends IService<Product> {

    PageInfo<ProductSku> findByPage(Integer pageNum, Integer pageSize, ProductSkuDto dto);
}
3.4.3.ProductServiceImpl
@Override
public PageInfo<ProductSku> findByPage(Integer pageNum, Integer pageSize, ProductSkuDto dto) {
    /*
        SPU:商品信息
        1. 根据前端传递的分类、品牌、关键字,先筛出符合条件的 SPU
        2. 取出这些 SPU 的 id
        3. 根据商品 id 集合查询对应的 SKU 列表
        4. 增加排序和分页条件
        5. 封装返回结果
     */
    List<Product> productList = lambdaQuery()
            .eq(dto.getCategory1Id() != null, Product::getCategory1Id, dto.getCategory1Id())
            .eq(dto.getCategory2Id() != null, Product::getCategory2Id, dto.getCategory2Id())
            .eq(dto.getCategory3Id() != null, Product::getCategory3Id, dto.getCategory3Id())
            .like(StringUtils.isNotBlank(dto.getKeyword()), Product::getName, dto.getKeyword())
            .eq(dto.getBrandId() != null, Product::getBrandId, dto.getBrandId()) //品牌
            .eq(Product::getStatus, 1) //上架
            .eq(Product::getAuditStatus, 1)//审核通过
            .eq(BaseEntity::getIsDeleted, false)//未删除
            .list();
    //判断集合是否为空
    if (productList.isEmpty()) {
        return PageInfo.of(new ArrayList<>());
    }

    // 取出这些 SPU 的 id
    List<Long> pids = productList.stream()
            .map(BaseEntity::getId)
            .collect(Collectors.toList());

    // 2. 根据商品 id 集合查询对应的 SKU 列表
    Page<ProductSku> productSkuPage = new Page<>(pageNum, pageSize);
    Page<ProductSku> skuPage = productSkuService.lambdaQuery()
            .in(ProductSku::getProductId, pids) //根据商品id查询
            //排序规则
            .orderByDesc(dto.getOrder() == 1, ProductSku::getSaleNum)
            .orderByAsc(dto.getOrder() == 2, ProductSku::getSalePrice)
            .orderByDesc(dto.getOrder() == 3, ProductSku::getSalePrice)
            .page(productSkuPage);

    return PageInfo.of(skuPage.getRecords());
}
这套思路本质上是“先查 SPU,再查 SKU”。
如果只是教学演示,这样写完全够用;但如果数据量继续变大,是否要分两步查、是否要改成联表查询,就需要根据实际性能进一步评估。
另外,PageInfo.of(skuPage.getRecords()) 更适合演示查询结果封装。如果项目需要完整页码、总数等分页元数据,通常更推荐直接返回 MyBatis Plus 的 Page 对象,或者自定义统一分页返回结构。
4.商品详情
前言
商品详情页比商品列表更复杂,因为它需要的不是单一表数据,而是多个维度的数据聚合。
因此这一节的核心不是查询技巧,而是“如何把多个来源的数据一次性封装给前端”。
4.1.需求分析
当用户点击某个商品时,详情页通常需要返回以下数据:
- 商品的基本信息
- 当前
SKU的基本信息 - 商品轮播图
- 商品详情图片
- 商品规格信息
- 当前商品所有规格与
SKU的对应关系
效果如下:
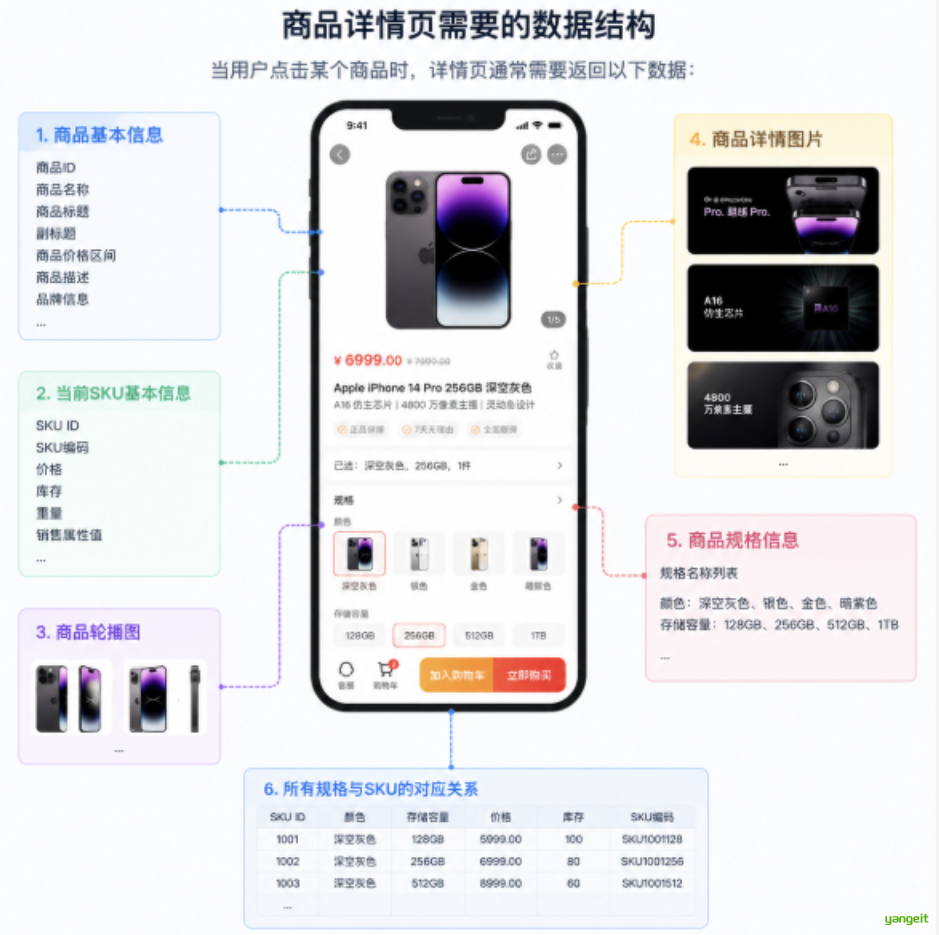
接口文档如下:
get /api/product/item/{skuId}
返回结果:
{
    "code": 200,
    "message": "成功",
    "data": {
        "productSku": {},
        "product": {},
        "specValueList": [],
        "detailsImageUrlList": [],
        "skuSpecValueMap": {},
        "sliderUrlList": []
    }
}
可以看到,这里返回的已经不是一张表的数据,而是一个专门给详情页准备的聚合对象。
4.2.接口开发:方式一MyBatis
操作模块:product-service
4.2.1.ProductItemVo
先定义详情页返回对象:
@Data
@Schema(description = "商品详情对象")
public class ProductItemVo {

   @Schema(description = "商品sku信息")
   private ProductSku productSku;

   @Schema(description = "商品信息")
   private Product product;

   @Schema(description = "商品轮播图列表")
   private List<String> sliderUrlList;

   @Schema(description = "商品详情图片列表")
   private List<String> detailsImageUrlList;

   @Schema(description = "商品规格信息")
   private JSONArray specValueList;

   @Schema(description = "商品规格对应商品skuId信息")
   private Map<String, Object> skuSpecValueMap;
}
4.2.2.ProductController
@Operation(summary = "商品详情")
@GetMapping("/item/{skuId}")
@CrossOrigin
public Result<ProductItemVo> item(@PathVariable Long skuId) {
    ProductItemVo productItemVo = productService.item(skuId);
    return Result.build(productItemVo, ResultCodeEnum.SUCCESS);
}
4.2.3.ProductService和实现类
业务接口:
ProductItemVo item(Long skuId);
业务实现:
@Autowired
private ProductMapper productMapper;

@Autowired
private ProductDetailsMapper productDetailsMapper;

@Override
public ProductItemVo item(Long skuId) {
    // 1. 查询当前 sku 信息
    ProductSku productSku = productSkuMapper.getById(skuId);

    // 2. 查询当前商品 spu 信息
    Product product = productMapper.getById(productSku.getProductId());

    // 3. 查询同一个商品下的全部 sku,建立规格值与 skuId 的映射关系
    List<ProductSku> productSkuList = productSkuMapper.findByProductId(productSku.getProductId());
    Map<String, Object> skuSpecValueMap = new HashMap<>();
    productSkuList.forEach(item -> skuSpecValueMap.put(item.getSkuSpec(), item.getId()));

    // 4. 查询商品详情图信息
    ProductDetails productDetails = productDetailsMapper.getByProductId(productSku.getProductId());

    ProductItemVo productItemVo = new ProductItemVo();
    productItemVo.setProductSku(productSku);
    productItemVo.setProduct(product);
    productItemVo.setDetailsImageUrlList(Arrays.asList(productDetails.getImageUrls().split(",")));
    productItemVo.setSliderUrlList(Arrays.asList(product.getSliderUrls().split(",")));
    productItemVo.setSpecValueList(JSON.parseArray(product.getSpecValue()));
    productItemVo.setSkuSpecValueMap(skuSpecValueMap);
    return productItemVo;
}
4.2.4.根据skuId获取ProductSku
ProductSkuMapper
ProductSku getById(Long id);
ProductSkuMapper.xml
<select id="getById" resultMap="productSkuMap">
   select <include refid="columns" />
   from product_sku
   where id = #{id}
</select>
4.2.5.根据商品id获取Product
ProductMapper
@Mapper
public interface ProductMapper {

    Product getById(Long id);
}
ProductMapper.xml
<?xml version="1.0" encoding="UTF-8" ?>
<!DOCTYPE mapper PUBLIC "-//mybatis.org//DTD Mapper 2.0//EN" "http://mybatis.org/dtd/mybatis-3-mapper.dtd">

<mapper namespace="com.zx.product.mapper.ProductMapper">

    <resultMap id="productMap" type="com.zx.domain.entity.product.Product">
    </resultMap>

    <sql id="columns">
        id, name, brand_id, category1_id, category2_id, category3_id, unit_name,
        slider_urls, spec_value, status, audit_status, audit_message,
        create_time, update_time, is_deleted
    </sql>

    <select id="getById" resultMap="productMap">
        select <include refid="columns" />
        from product
        where id = #{id}
    </select>

</mapper>
4.2.6.根据商品id获取ProductSku列表
ProductSkuMapper
List<ProductSku> findByProductId(Long productId);
ProductSkuMapper.xml
<select id="findByProductId" resultMap="productSkuMap">
   select <include refid="columns" />
   from product_sku
   where product_id = #{productId}
</select>
4.2.7.根据商品id获取ProductDetails
ProductDetailsMapper
@Mapper
public interface ProductDetailsMapper {

    ProductDetails getByProductId(Long productId);
}
ProductDetailsMapper.xml
<?xml version="1.0" encoding="UTF-8" ?>
<!DOCTYPE mapper PUBLIC "-//mybatis.org//DTD Mapper 2.0//EN" "http://mybatis.org/dtd/mybatis-3-mapper.dtd">

<mapper namespace="com.zx.product.mapper.ProductDetailsMapper">

   <resultMap id="productDetailsMap" type="com.zx.domain.entity.product.ProductDetails">
   </resultMap>

   <sql id="columns">
      id, product_id, image_urls, create_time, update_time, is_deleted
   </sql>

   <select id="getByProductId" resultMap="productDetailsMap">
      select <include refid="columns" />
      from product_details
      where product_id = #{productId}
   </select>
</mapper>
4.3.接口开发:方式二MyBatis Plus 👈
如果使用 MyBatis Plus,同样可以完成详情页数据聚合,写法会更偏向服务层组合查询。
4.3.1.ProductController
@Operation(summary = "商品详情")
@GetMapping("/item/{skuId}")
@CrossOrigin
public Result<ProductItemVo> item(@PathVariable Long skuId) {
    ProductItemVo productItemVo = productService.item(skuId);
    return Result.build(productItemVo, ResultCodeEnum.SUCCESS);
}
4.3.2.ProductService
ProductItemVo item(Long skuId);
4.3.3.ProductServiceImpl
@Override
public ProductItemVo item(Long skuId) {
    /*
        1. 根据 skuId 查询 sku
        2. 根据 sku 中的 productId 查询 spu
        3. 解析轮播图
        4. 根据 spuId 查询详情图
        5. 解析规格值
        6. 查询当前 spu 下所有 sku,并组装规格与 skuId 的映射
        7. 封装并返回
     */
    ProductSku sku = productSkuService.getById(skuId);

    Product spu = getById(sku.getProductId());

    List<String> sliderUrlList = Arrays.asList(spu.getSliderUrls().split(","));

    ProductDetails details = productDetailsService.lambdaQuery()
            .eq(ProductDetails::getProductId, spu.getId())
            .one();
    List<String> detailsImageUrlList = Arrays.asList(details.getImageUrls().split(","));

    JSONArray specValueList = JSON.parseArray(spu.getSpecValue());

    List<ProductSku> productSkuList = productSkuService.lambdaQuery()
            .eq(ProductSku::getProductId, spu.getId())
            .list();
    Map<String, Object> skuSpecValueMap = new HashMap<>();
    productSkuList.forEach(productSku -> skuSpecValueMap.put(productSku.getSkuSpec(), productSku.getId()));

    ProductItemVo productItemVo = new ProductItemVo(
            sku,
            spu,
            sliderUrlList,
            detailsImageUrlList,
            specValueList,
            skuSpecValueMap
    );
    return productItemVo;
}
这段代码的关键在于“以 skuId 为入口,一层层把详情页所需的关联数据拼出来”。
本质上,详情页接口就是一个典型的数据聚合接口。
5.小结
这一篇完成了四件很关键的事情:
- 使用
Redis为分类树接口增加缓存 - 使用
Swagger/Knife4j为项目补齐在线接口文档能力 - 完成商品列表分页搜索接口
- 完成商品详情聚合接口
从这一篇开始,项目已经不只是“能跑”,而是逐步具备了真实商城前台的核心查询能力。
后面继续往购物车、下单、支付等模块推进时,整体开发思路也会与本篇类似:先分析页面需要什么数据,再设计聚合接口,最后逐步补齐性能和工程化能力。
接下来结合Sentinel和Jmeter完成测试。商品列表接口 Sentinel 与 JMeter快速入门