Part 11 搭建AI智能助手
Part 11 搭建AI智能助手
1. DeepSeek
1.1 SpringAI+DeepSeek 开胃小菜
SpringAI+DeepSeek
开发一个和Deepseek聊天的页面,使用SpringAI+Deepseek 
代码操作
官网:https://spring.io/projects/spring-ai
1. 创建一个Maven项目,并且导入以下依赖
<?xml version="1.0" encoding="UTF-8"?>
<project xmlns="http://maven.apache.org/POM/4.0.0"
         xmlns:xsi="http://www.w3.org/2001/XMLSchema-instance"
         xsi:schemaLocation="http://maven.apache.org/POM/4.0.0 http://maven.apache.org/xsd/maven-4.0.0.xsd">
    <modelVersion>4.0.0</modelVersion>

    <groupId>cn.yangeit</groupId>
    <artifactId>ai-deepseek</artifactId>
    <version>1.0-SNAPSHOT</version>
    <parent>
        <groupId>org.springframework.boot</groupId>
        <artifactId>spring-boot-starter-parent</artifactId>
        <version>3.4.2</version>
        <relativePath/>
    </parent>

    <properties>
        <maven.compiler.source>17</maven.compiler.source>
        <maven.compiler.target>17</maven.compiler.target>
        <project.build.sourceEncoding>UTF-8</project.build.sourceEncoding>
    </properties>

    <dependencies>
        <dependency>
            <groupId>org.springframework.ai</groupId>
            <artifactId>spring-ai-openai-spring-boot-starter</artifactId>
            <version>1.0.0-M6</version>
        </dependency>
        <dependency>
            <groupId>org.springframework.boot</groupId>
            <artifactId>spring-boot-starter-web</artifactId>
        </dependency>
         <dependency>
            <groupId>org.springframework.boot</groupId>
            <artifactId>spring-boot-starter-test</artifactId>
            <scope>test</scope>
        </dependency>
        <!-- lombok的依赖,能免除get和set方法 -->
        <dependency>
            <groupId>org.projectlombok</groupId>
            <artifactId>lombok</artifactId>
            <version>1.18.28</version>
        </dependency>
    </dependencies>
</project>
2. 创建配置文件application.yml,并添加以下内容(含有API Key)并创建启动类
#服务端口

server:
  port: 8089
# 服务名
spring:
  ai:
    openai:
      base-url: https://api.deepseek.com
      # DeepSeek的OpenAI式端点
      api-key: sk-7用自己的
      chat.options:
        model: deepseek-chat  # 指定DeepSeek的模型名称 或者chat reasoner
@SpringBootApplication
public class DeepSeekApplication {
    public static void main(String[] args) {
        SpringApplication.run(DeepSeekApplication.class,args);
        System.out.println("启动成功");
    }
}
3. 创建一个AIConfig配置配类,给AI设定角色
@Configuration
public class AiConfig {

    @Bean
    ChatClient chatClient(ChatClient.Builder builder) {
        return builder
                .defaultSystem("你现在不是 deepseek 了," +
                        "你是一名学识渊博的诗人,擅长唐诗宋词")
                .build();

    }

}
4. 创建一个Controller类,并添加一个GET请求处理方法,用于接收用户输入并调用DeepSeek API
@RestController
@RequestMapping("/ai")
@Slf4j
public class DeepSeekController {

	@Autowired
	ChatClient chatClient;

	@GetMapping("/chat")
	public String generate(@RequestParam(value = "message") String message) {
		log.info("Generating response");
		  // 调用 ChatClient 的 prompt 方法生成响应
		  // 1. prompt(message): 创建一个包含用户输入消息的 Prompt 对象
		  // 2. call(): 调用 ChatClient 与 AI 模型交互以获取响应
		  // 3. content(): 提取响应的内容部分
		return chatClient.prompt().user(message).call().content();
	}

	/**
	 * @description: 流式响应
	 **/
	@GetMapping(value = "/chat2",
			produces = "application/json;charset=utf-8")
	public Flux<String> generation02(@RequestParam String message){
		Flux<String> output = chatClient.prompt()
				.user(message)
				.stream()
				.content();
		return output;
	}
}
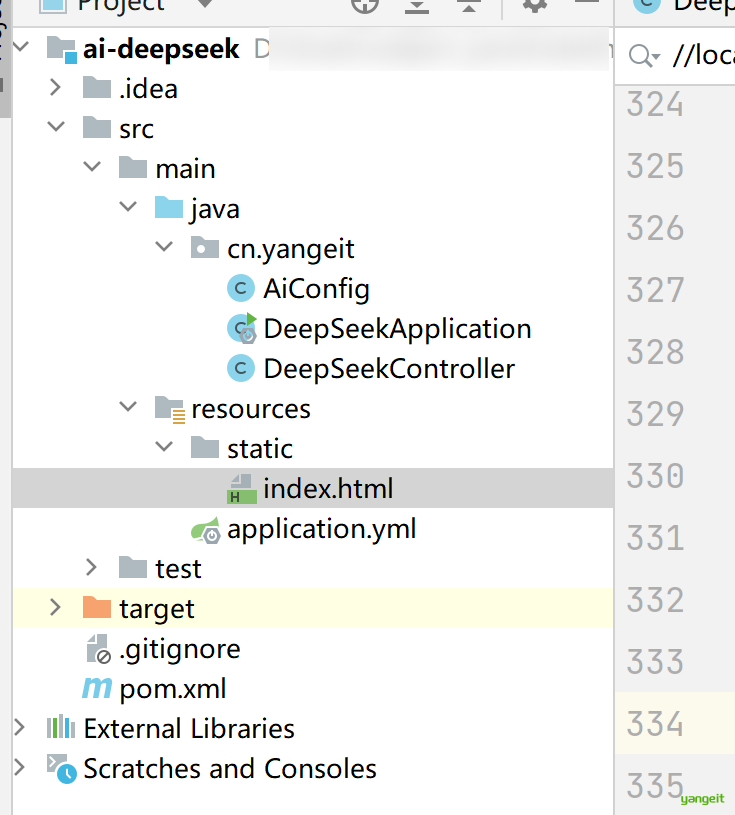
1. 在resources下创建static文件夹,并创建一个index.html文件,用于展示聊天界面
完成代码输入后,启动项目,访问:localhost:8089 进入对话页面
<!DOCTYPE html>
<html lang="zh-CN">
<head>
    <meta charset="UTF-8">
    <meta name="viewport" content="width=device-width, initial-scale=1.0">
    <title>Deepseek 聊天</title>
    <style>
        :root {
            --primary-color: #4f46e5;
            --bg-color: #121212; /* 深色背景 */
            --card-color: #1e1e1e; /* 深色卡片 */
            --text-color: #ffffff; /* 白色文字 */
            --border-color: #333333; /* 较深的边框 */
        }

        /* 明暗模式切换 */
        [data-theme="light"] {
            --bg-color: #f9fafb;
            --card-color: #ffffff;
            --text-color: #111827;
            --border-color: #e5e7eb;
        }

        body {
            font-family: 'Segoe UI', 'PingFang SC', 'Microsoft YaHei', sans-serif;
            background-color: var(--bg-color);
            color: var(--text-color);
            margin: 0;
            padding: 0;
            display: flex;
            flex-direction: column;
            height: 100vh;
            transition: background-color 0.3s, color 0.3s;
        }

        .container {
            max-width: 800px;
            margin: 0 auto;
            padding: 20px;
            flex: 1;
            display: flex;
            flex-direction: column;
            width: 100%;
        }

        .header {
            text-align: center;
            margin-bottom: 20px;
        }

        .header h1 {
            color: var(--primary-color);
            margin-bottom: 8px;
        }

        .header p {
            color: #6b7280;
            margin-top: 0;
        }

        .chat-container {
            flex: 1;
            display: flex;
            flex-direction: column;
            background-color: var(--card-color);
            border-radius: 12px;
            box-shadow: 0 4px 6px -1px rgba(0, 0, 0, 0.1);
            overflow: hidden;
        }

        .messages {
            flex: 1;
            padding: 20px;
            overflow-y: auto;
            display: flex;
            flex-direction: column;
            gap: 16px;
            transition: opacity 0.3s;
        }

        .message {
            max-width: 80%;
            padding: 12px 16px;
            border-radius: 12px;
            line-height: 1.5;
            opacity: 0;
            animation: fadeIn 0.5s forwards;
        }

        @keyframes fadeIn {
            from {
                opacity: 0;
                transform: translateY(10px);
            }
            to {
                opacity: 1;
                transform: translateY(0);
            }
        }

        .user-message {
            align-self: flex-end;
            background-color: var(--primary-color);
            color: white;
            border-bottom-right-radius: 4px;
        }

        .ai-message {
            align-self: flex-start;
            background-color: #333333; /* 更深的背景色 */
            color: var(--text-color);
            border-bottom-left-radius: 4px;
        }

        .input-area {
            display: flex;
            padding: 16px;
            border-top: 1px solid var(--border-color);
            background-color: var(--card-color);
        }

        .input-area input {
            flex: 1;
            padding: 12px 16px;
            border: 1px solid var(--border-color);
            border-radius: 8px;
            font-size: 16px;
            outline: none;
            transition: border-color 0.2s;
        }

        .input-area input:focus {
            border-color: var(--primary-color);
        }

        .input-area button {
            margin-left: 12px;
            padding: 12px 24px;
            background-color: var(--primary-color);
            color: white;
            border: none;
            border-radius: 8px;
            cursor: pointer;
            font-size: 16px;
            font-weight: 500;
            transition: background-color 0.2s;
        }

        .input-area button:hover {
            background-color: #4338ca;
        }

        .input-area button:disabled {
            background-color: #9ca3af;
            cursor: not-allowed;
        }

        .typing-indicator {
            display: inline-block;
            padding: 8px 16px;
            background-color: #333333;
            border-radius: 12px;
            color: #6b7280;
            font-size: 14px;
        }

        .typing-dots {
            display: inline-flex;
            align-items: center;
        }

        .typing-dots span {
            width: 6px;
            height: 6px;
            margin: 0 2px;
            background-color: #9ca3af;
            border-radius: 50%;
            display: inline-block;
            animation: typing 1.4s infinite both;
        }

        .typing-dots span:nth-child(2) {
            animation-delay: 0.2s;
        }

        .typing-dots span:nth-child(3) {
            animation-delay: 0.4s;
        }

        @keyframes typing {
            0% {
                opacity: 0.4;
                transform: translateY(0);
            }
            50% {
                opacity: 1;
                transform: translateY(-4px);
            }
            100% {
                opacity: 0.4;
                transform: translateY(0);
            }
        }

        /* 明暗模式切换按钮 */
        .theme-toggle {
            position: absolute;
            top: 20px;
            right: 20px;
            cursor: pointer;
            font-size: 18px;
            color: var(--primary-color);
        }
    </style>
</head>
<body>
<div class="container">
    <div class="header">
        <h1>Deepseek Chat</h1>
        <p>与AI进行流畅的对话体验</p>
    </div>

    <div class="chat-container">
        <div class="messages" id="messages">
            <!-- 消息将在这里动态添加 -->
        </div>

        <div class="input-area">
            <input type="text" id="userInput" placeholder="输入消息..." autocomplete="off">
            <button id="sendButton">发送</button>
        </div>
    </div>

    <!-- 明暗模式切换按钮 -->
    <div class="theme-toggle" onclick="toggleTheme()">🌙</div>
</div>

<script>
    document.addEventListener('DOMContentLoaded', function() {
        const messagesContainer = document.getElementById('messages');
        const userInput = document.getElementById('userInput');
        const sendButton = document.getElementById('sendButton');

        // 切换明暗模式
        function toggleTheme() {
            const currentTheme = document.documentElement.getAttribute('data-theme');
            const newTheme = currentTheme === 'dark' ? 'light' : 'dark';
            document.documentElement.setAttribute('data-theme', newTheme);
            localStorage.setItem('theme', newTheme);
        }

        // 加载用户偏好主题
        const savedTheme = localStorage.getItem('theme') || 'dark';
        document.documentElement.setAttribute('data-theme', savedTheme);

        // 添加用户消息到聊天界面
        function addUserMessage(text) {
            const messageDiv = document.createElement('div');
            messageDiv.className = 'message user-message';
            messageDiv.textContent = text;
            messagesContainer.appendChild(messageDiv);
            scrollToBottom();
        }

        // 添加AI消息到聊天界面
        function addAiMessage(text) {
            const messageDiv = document.createElement('div');
            messageDiv.className = 'message ai-message';
            messageDiv.textContent = text;
            messagesContainer.appendChild(messageDiv);
            scrollToBottom();
        }

        // 显示AI正在输入的指示器
        function showTypingIndicator() {
            const typingDiv = document.createElement('div');
            typingDiv.id = 'typingIndicator';
            typingDiv.className = 'typing-indicator';
            typingDiv.innerHTML = `
                    <div class="typing-dots">
                        <span></span>
                        <span></span>
                        <span></span>
                    </div>
                    Deepseek 正在输入...
                `;
            messagesContainer.appendChild(typingDiv);
            scrollToBottom();
        }

        // 隐藏AI正在输入的指示器
        function hideTypingIndicator() {
            const typingIndicator = document.getElementById('typingIndicator');
            if (typingIndicator) {
                typingIndicator.remove();
            }
        }

        // 滚动到聊天底部
        function scrollToBottom() {
            messagesContainer.scrollTop = messagesContainer.scrollHeight;
        }

        // 发送消息到后端并处理响应
        async function sendMessage() {
            const message = userInput.value.trim();
            if (!message) return;

            // 添加用户消息并清空输入框
            addUserMessage(message);
            userInput.value = '';

            // 显示AI正在输入
            showTypingIndicator();

            try {
                // 使用Fetch API发送请求
                const url = `http://localhost:8089/ai/chat?message=${encodeURIComponent(message)}`;
                const response = await fetch(url, {
                    method: 'GET',
                    headers: {
                        'Accept': 'application/json, text/plain'
                    }
                });

                if (!response.ok) {
                    throw new Error('网络响应错误');
                }

                // 克隆响应对象以避免重复读取
                const responseClone = response.clone();

                // 尝试解析JSON,如果失败则直接读取文本
                let data;
                try {
                    data = await response.json();
                } catch (e) {
                    // 如果解析JSON失败,尝试读取纯文本
                    data = { response: await responseClone.text() };
                }

                hideTypingIndicator();
                addAiMessage(data.response); // 假设后端返回的JSON中有response字段

            } catch (error) {
                console.error('Error:', error);
                hideTypingIndicator();
                addAiMessage('抱歉,发生了一些错误。请稍后再试。');
            }
        }

        // 发送按钮点击事件
        sendButton.addEventListener('click', sendMessage);

        // 输入框回车事件
        userInput.addEventListener('keypress', function(e) {
            if (e.key === 'Enter') {
                sendMessage();
            }
        });

        // 初始焦点在输入框
        userInput.focus();

        // 从本地存储加载聊天历史
        const chatHistory = JSON.parse(localStorage.getItem('chatHistory') || '[]');
        chatHistory.forEach(msg => {
            if (msg.type === 'user') {
                addUserMessage(msg.text);
            } else {
                addAiMessage(msg.text);
            }
        });

        // 保存聊天历史
        function saveChatHistory() {
            const messages = Array.from(messagesContainer.children).map(msg => ({
                type: msg.classList.contains('user-message') ? 'user' : 'ai',
                text: msg.textContent
            }));
            localStorage.setItem('chatHistory', JSON.stringify(messages));
        }

        // 监听消息添加事件以保存历史
        messagesContainer.addEventListener('DOMNodeInserted', saveChatHistory);
    });
</script>
</body>
</html>
总结
课堂作业
- SpringAI至少需要JDK版本是多少? 🎤
- SpringAI是大模型吗? 他的作用是什么?
2. 通义千问
1.1. 通义千问
前言
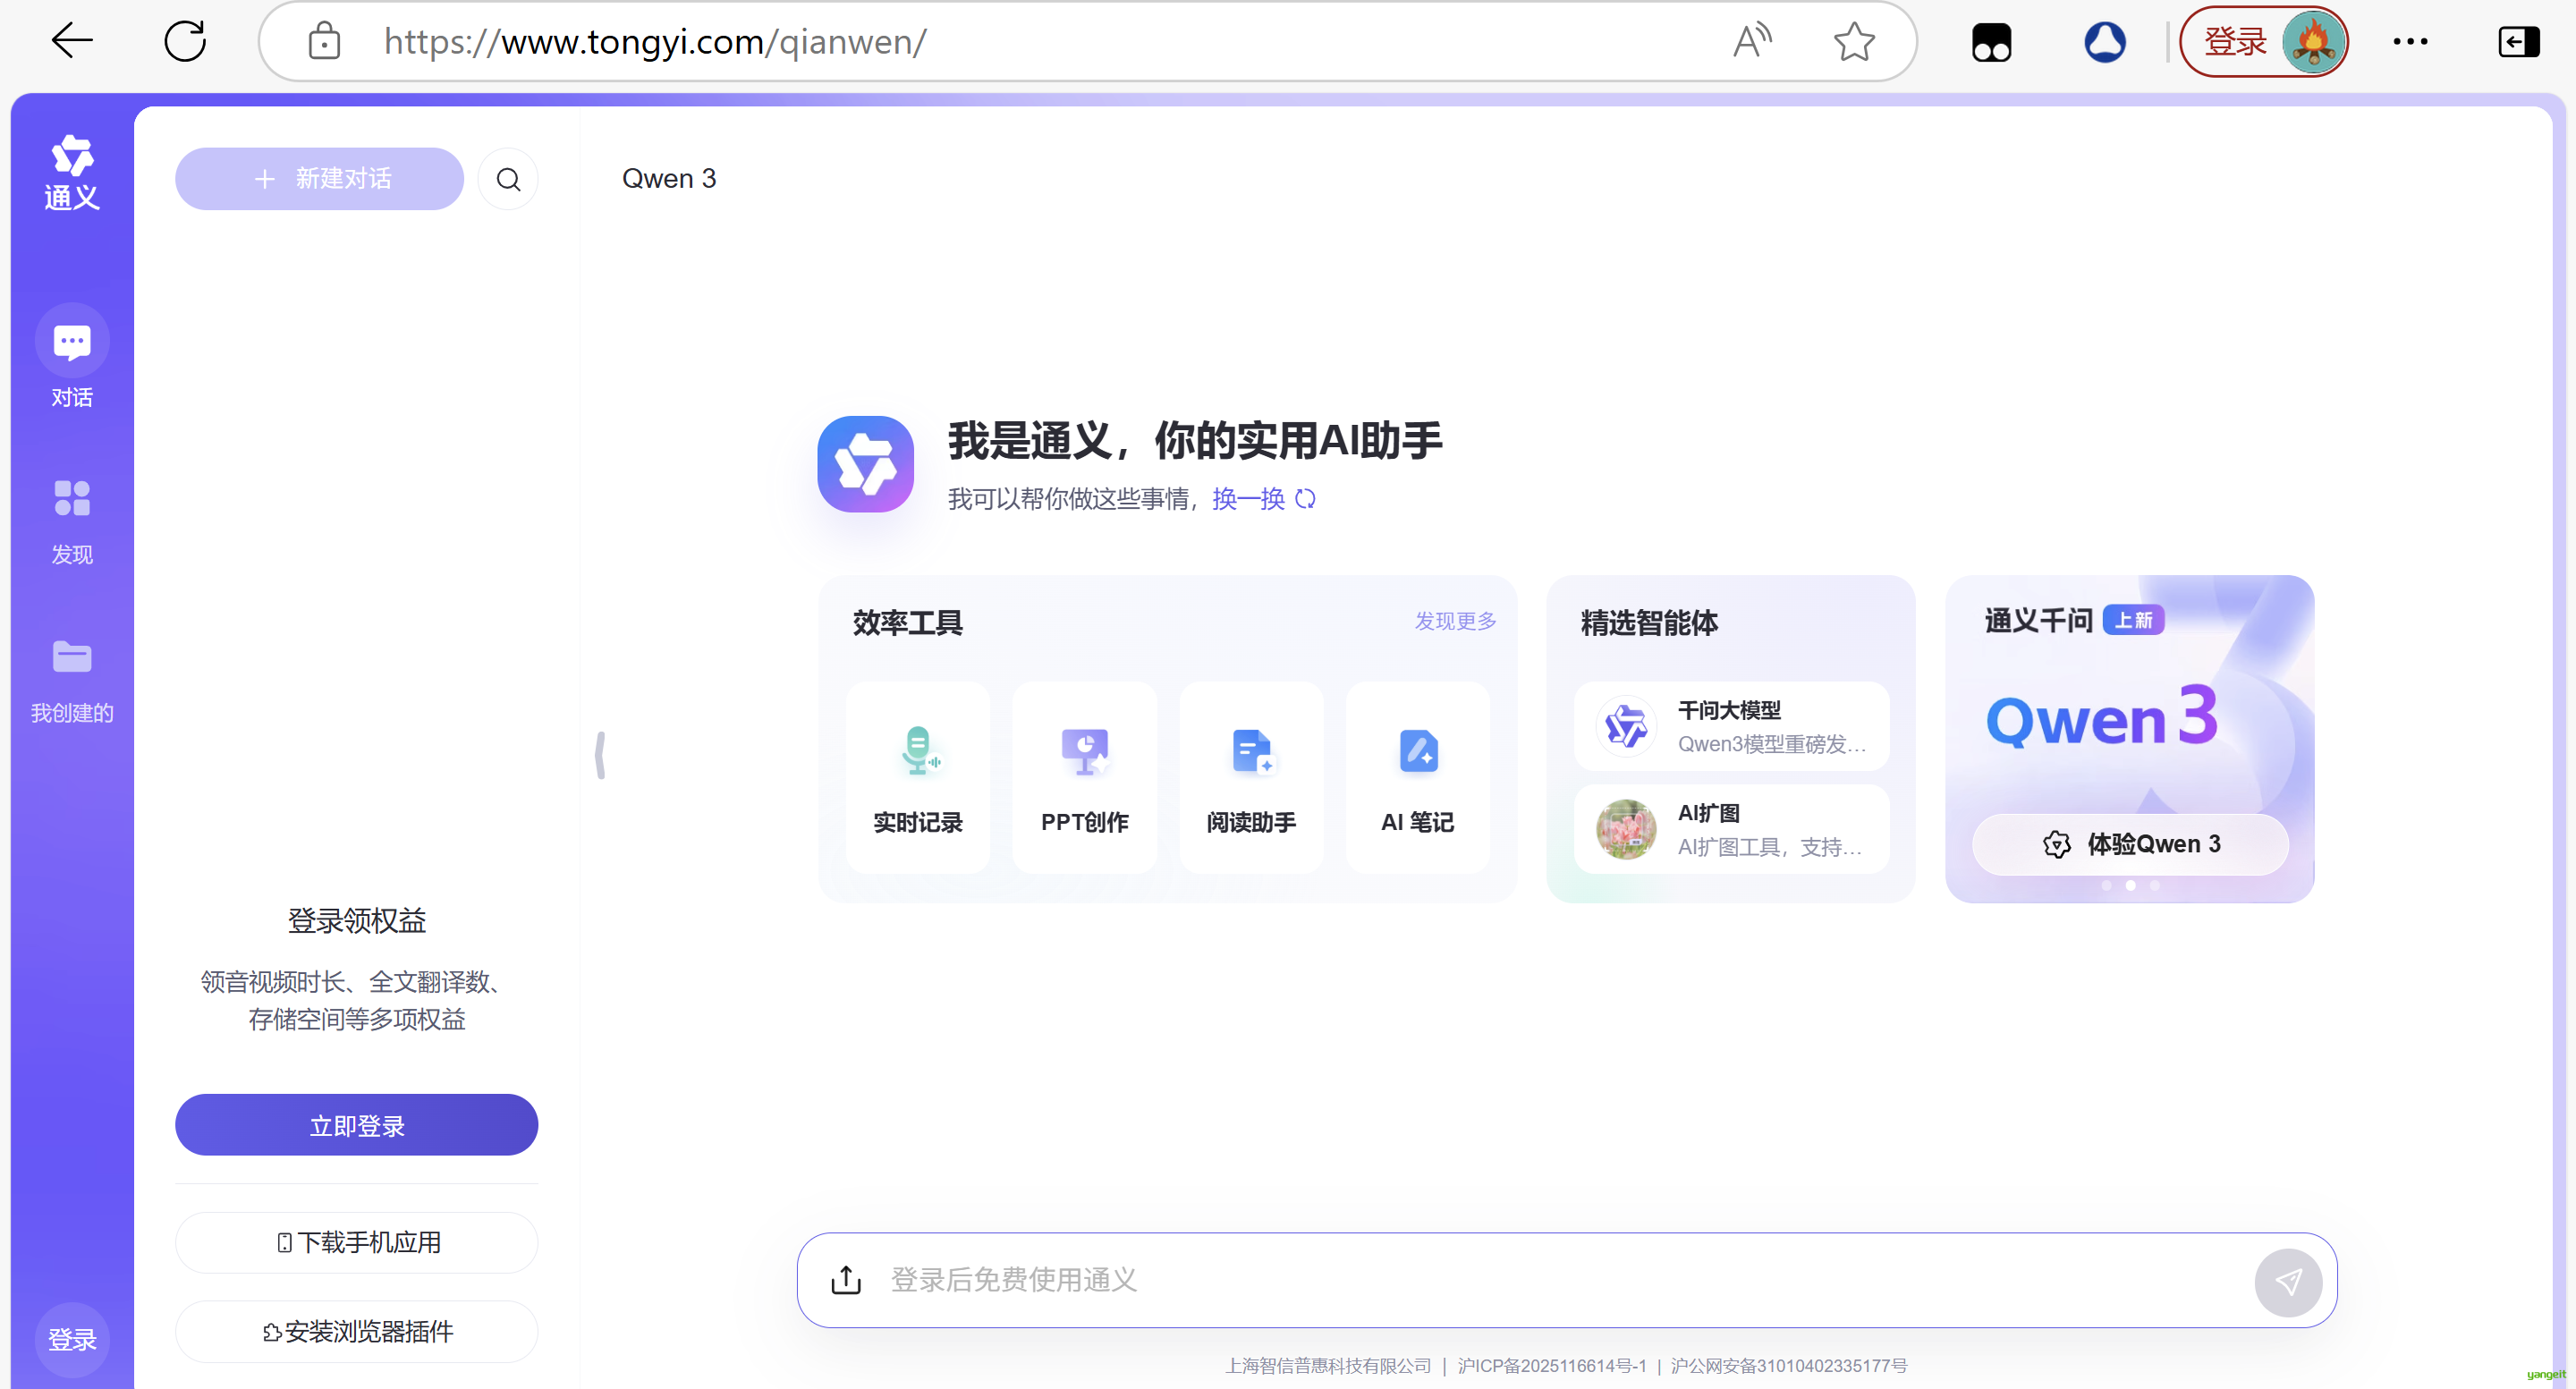
通义千问是阿里云开发的大语言模型(Large language Model )LLM,旨在提供广泛的知识和普适性,可以理解和回答各领域中的问题,其包含网页版和手机版本的通义前文APP,网页使用的模型为不公开的最新版本。 其网页使用版本地址:https://tongyi.aliyun.com/qianwen/ 官网文档地址:https://help.aliyun.com/zh/dashscope/developer-reference/
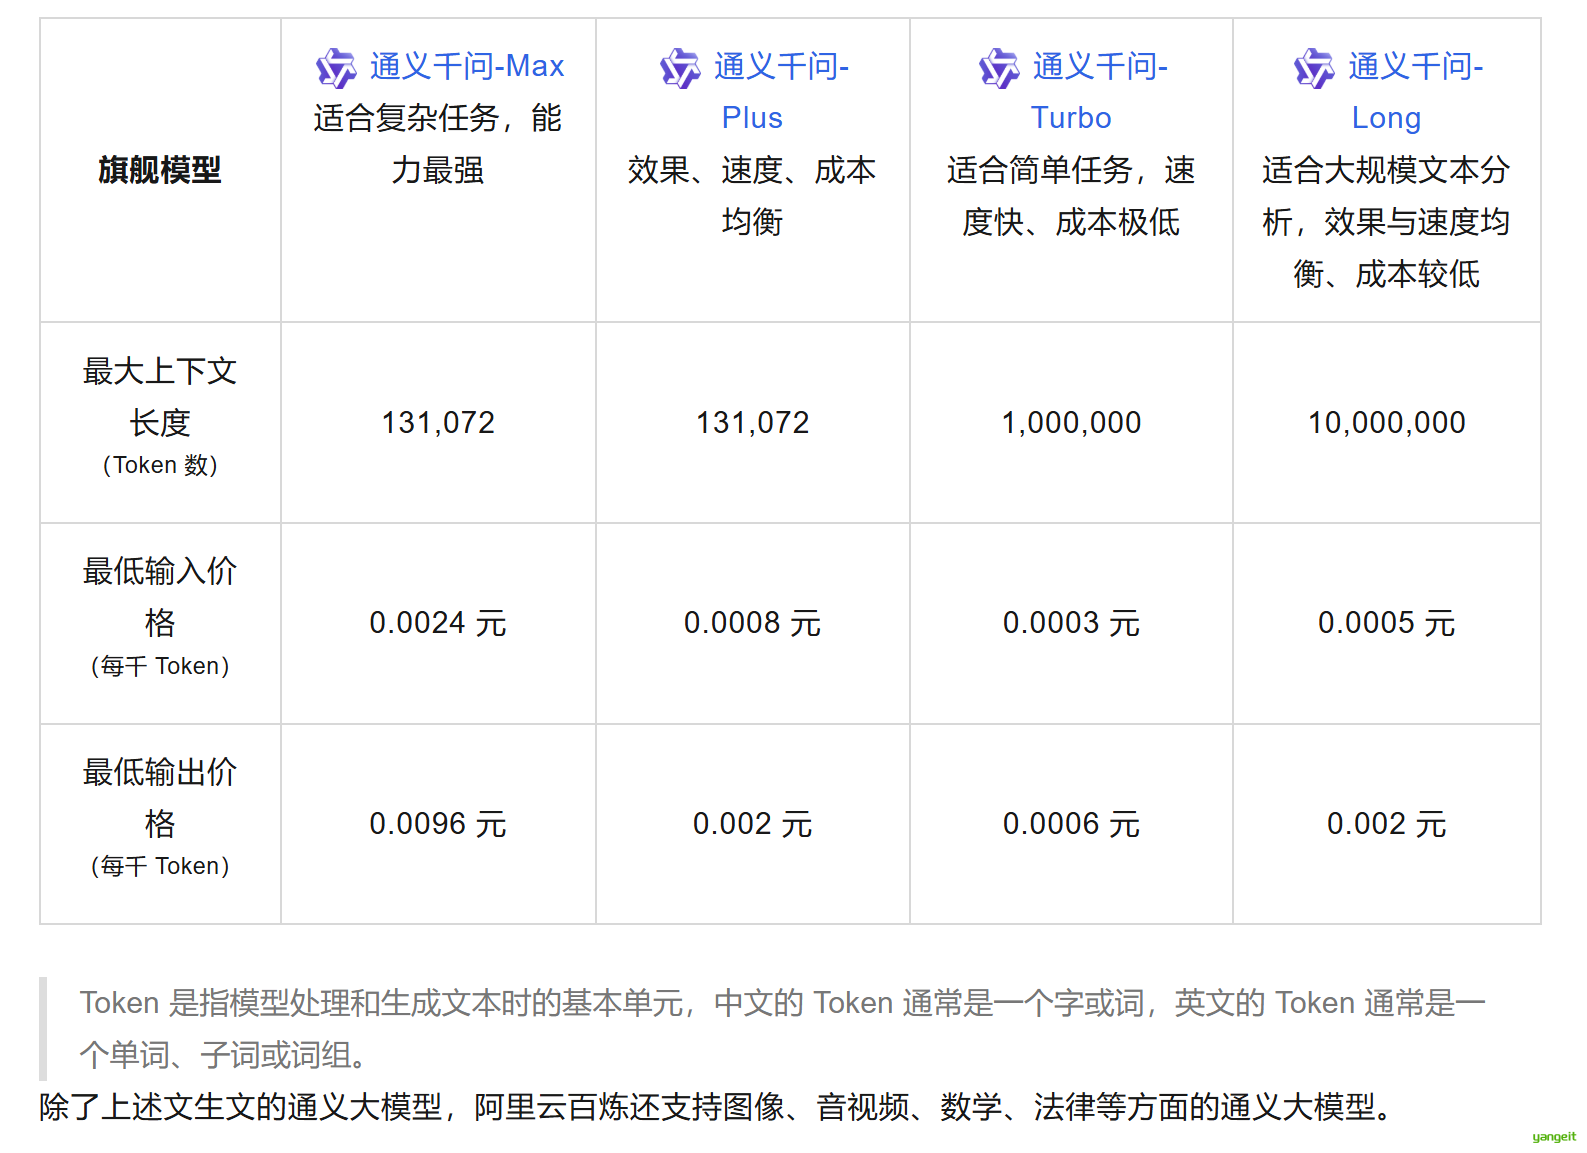
在其官方文档中主要开源了五种可以使用的模型其开源模型的简介和参数如下:
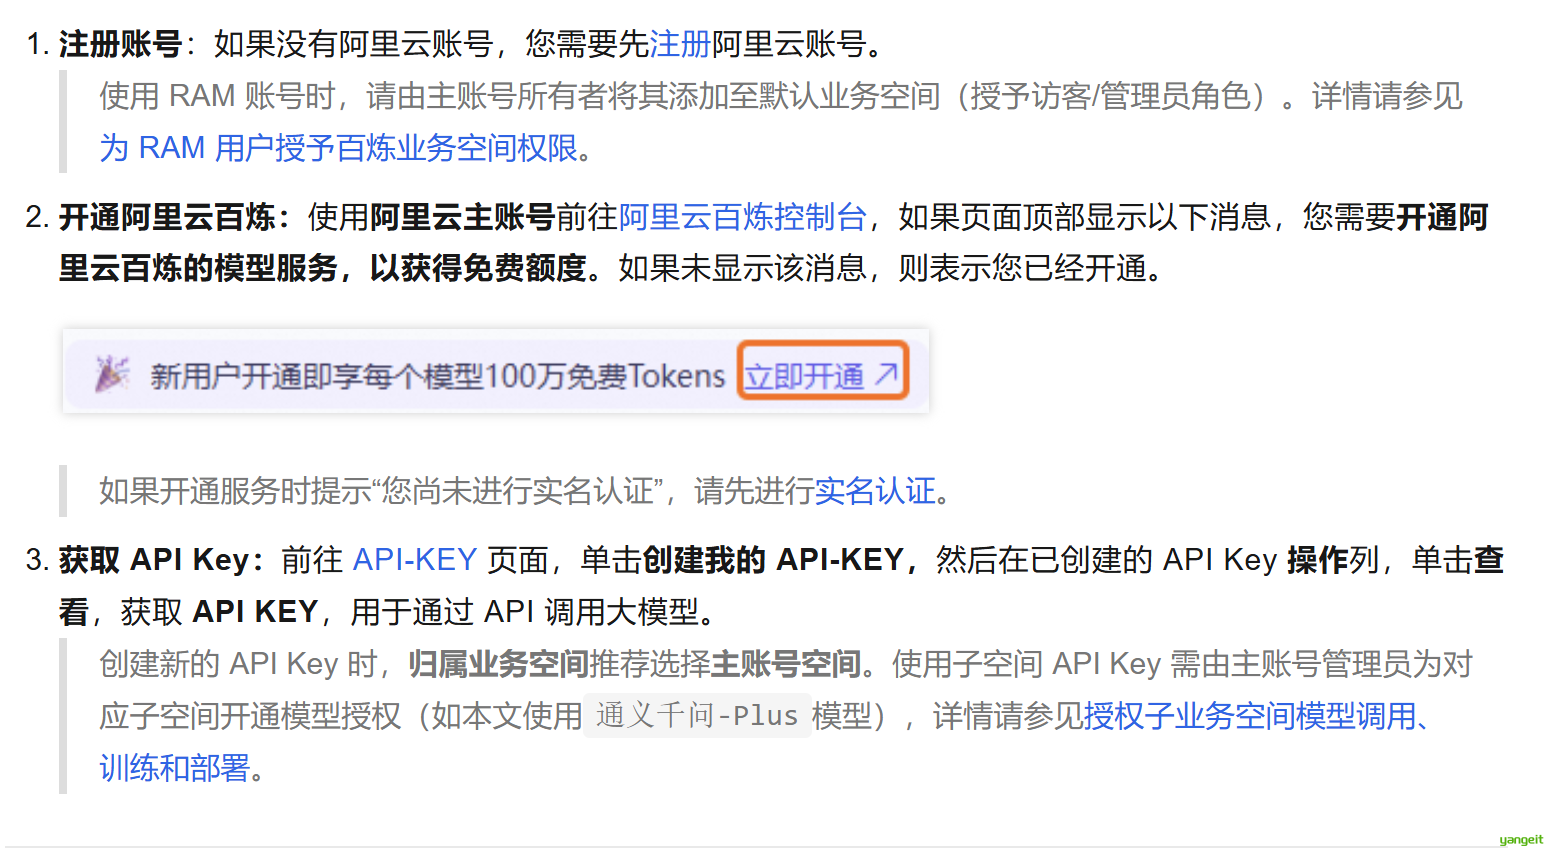
首次调用,有送免费额度
点击某个模型的详情,可以查看免费的调用额度 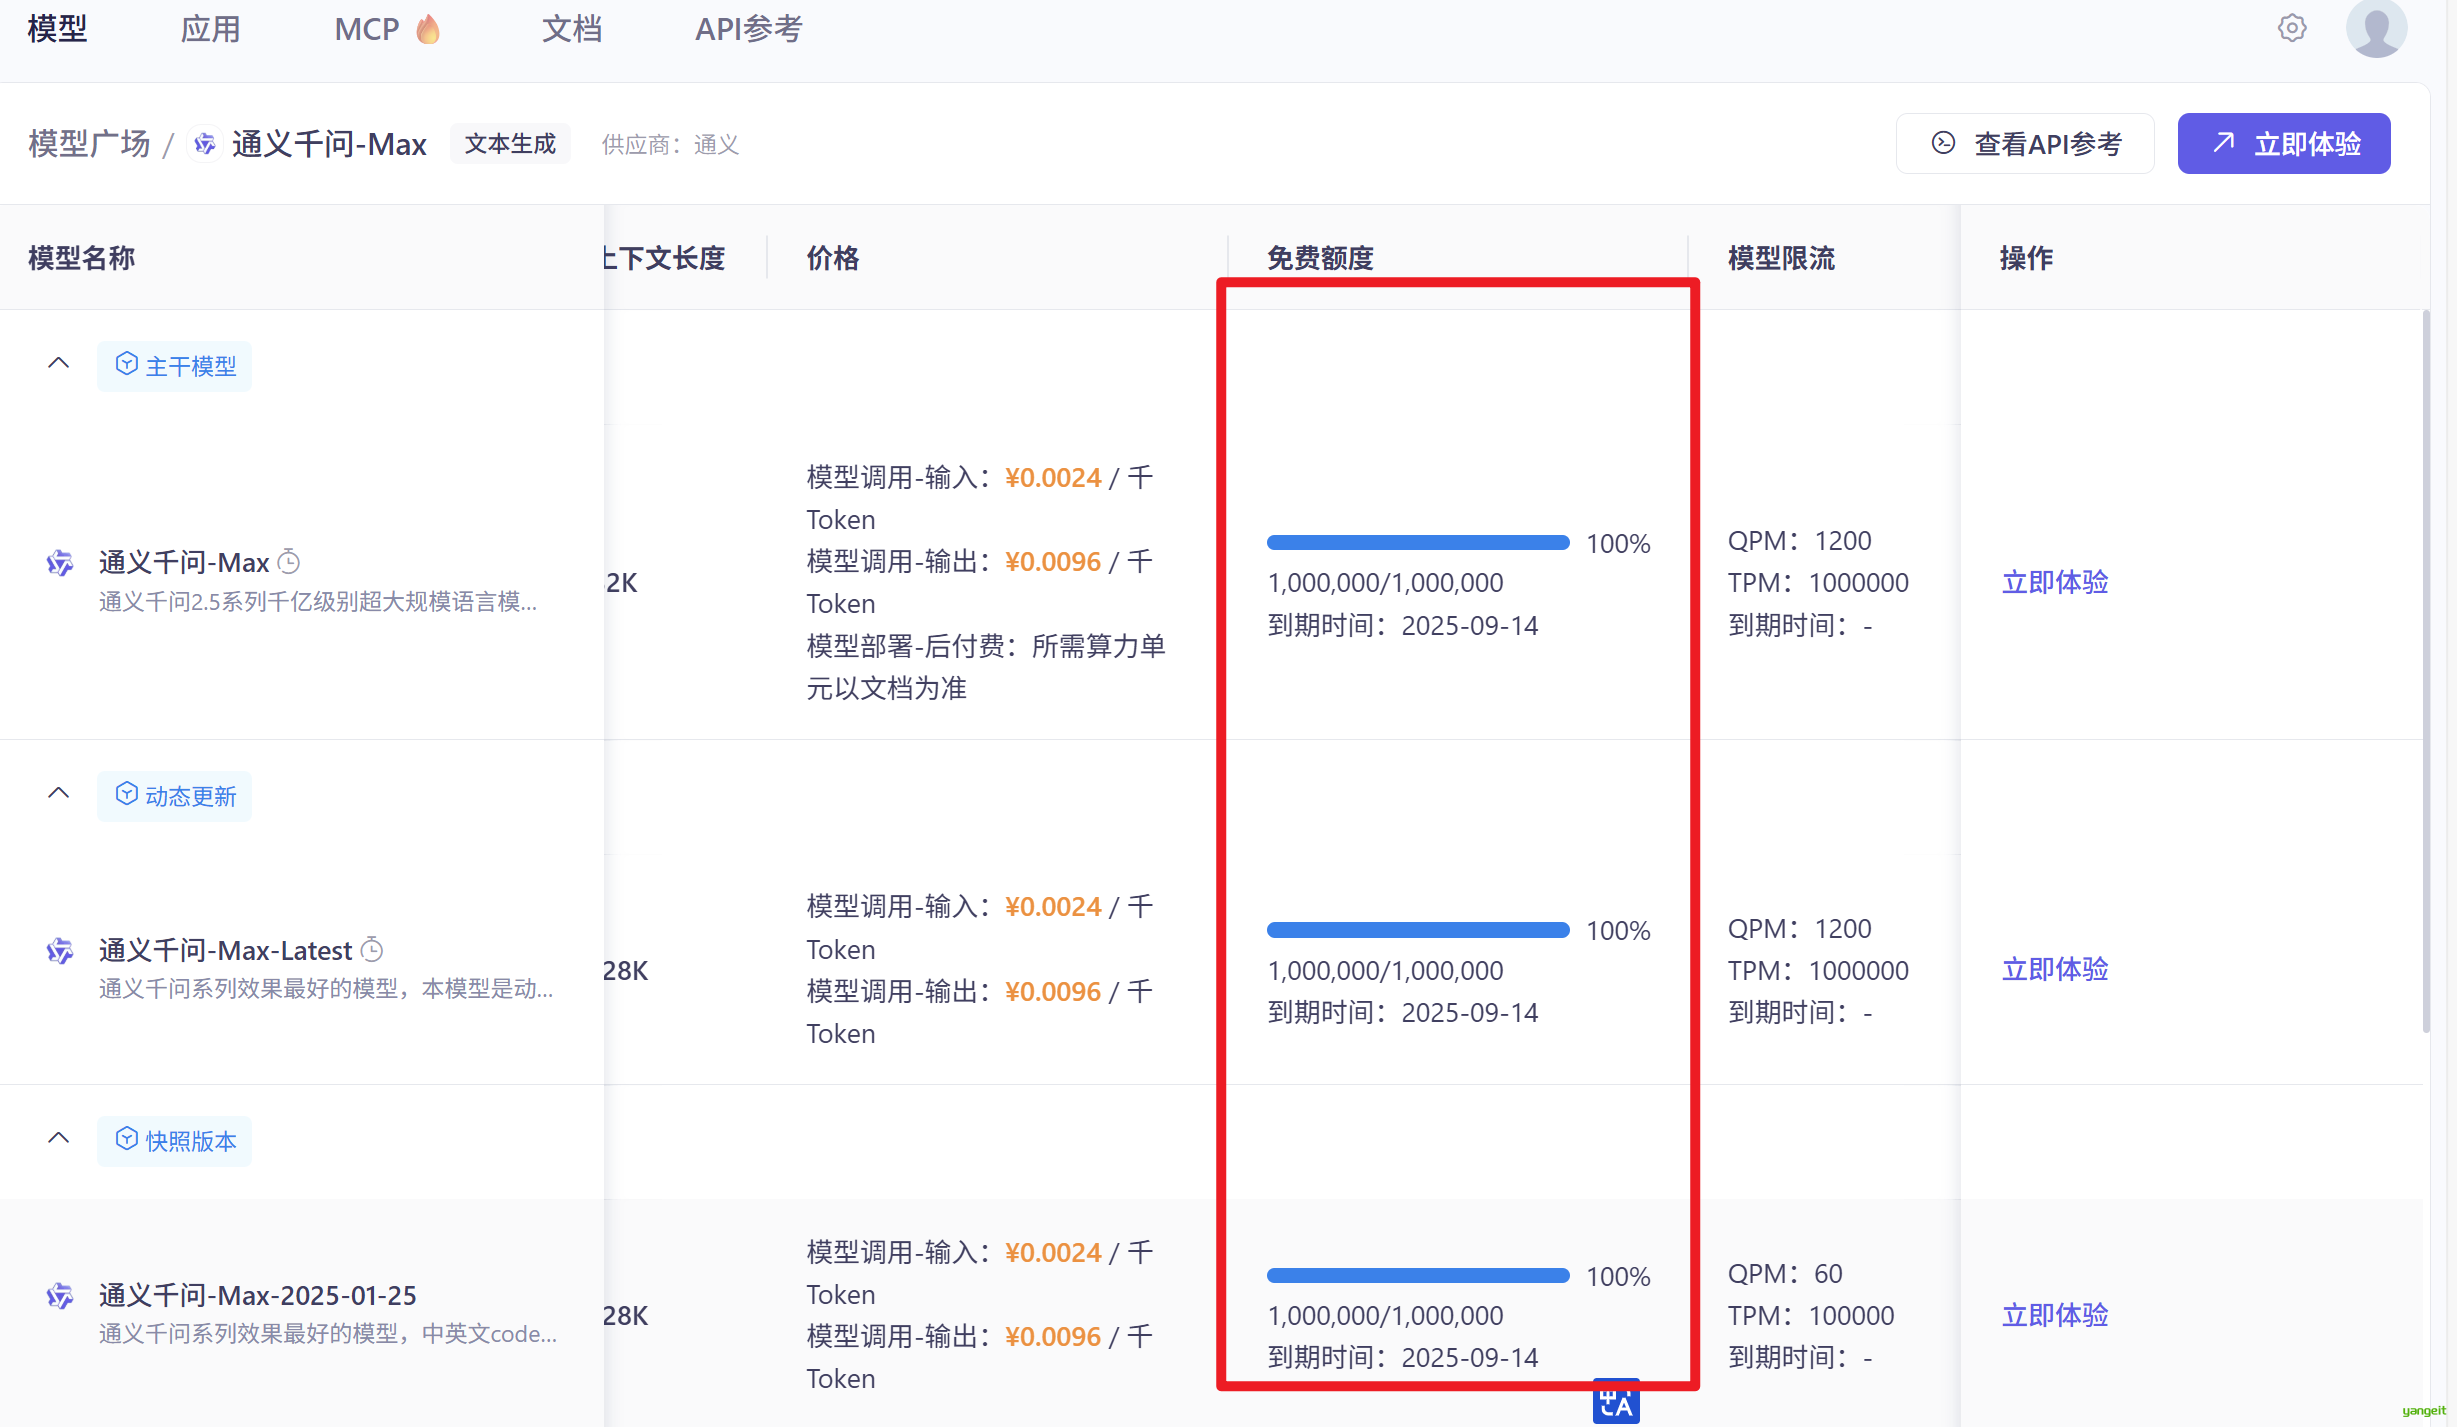
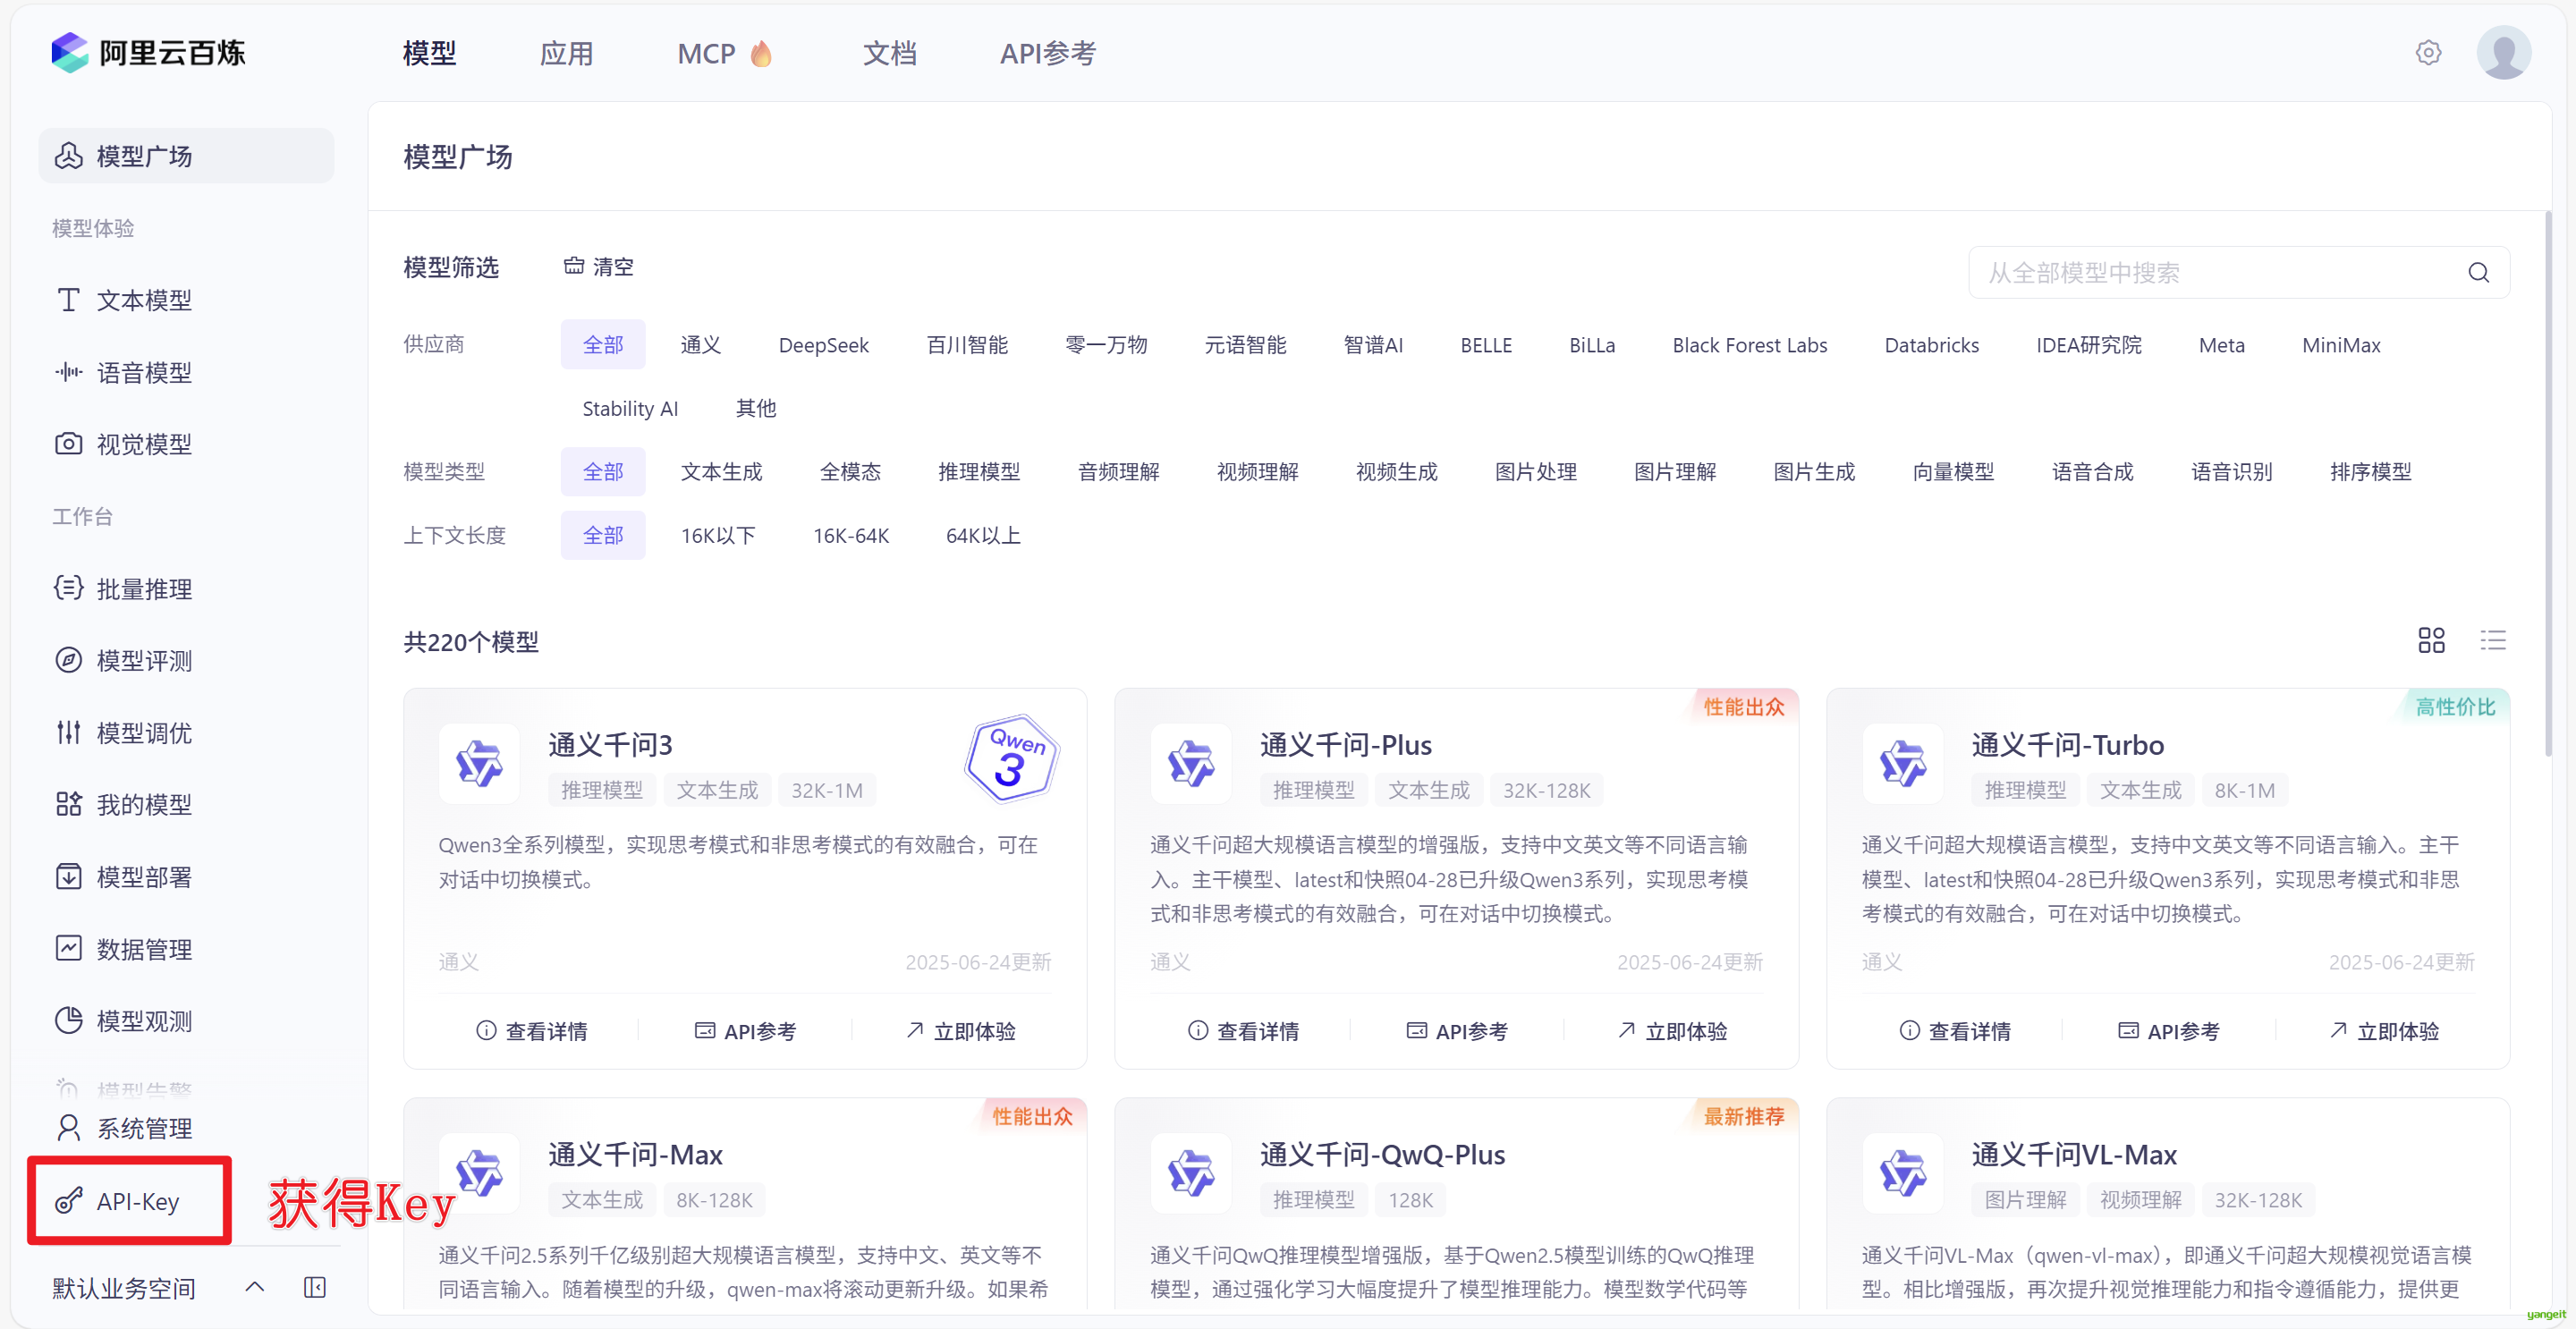
点击 下方的API-KEY 进入key管理页面,创建KEY
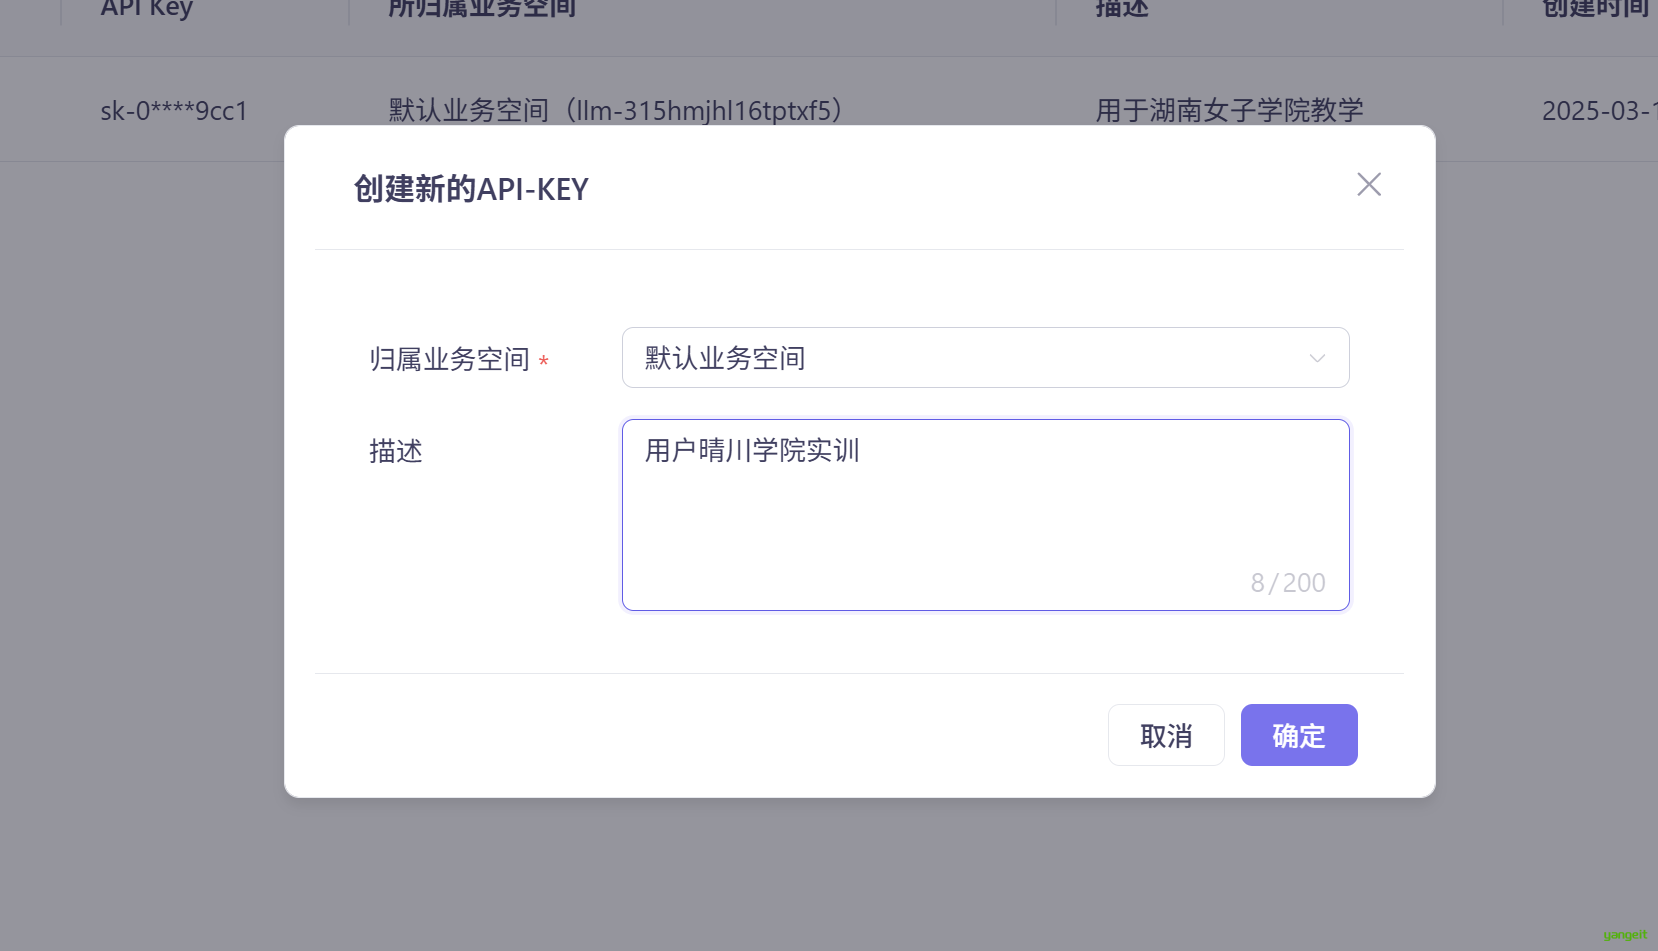
点击列表右边的 查看,可以获取apikey 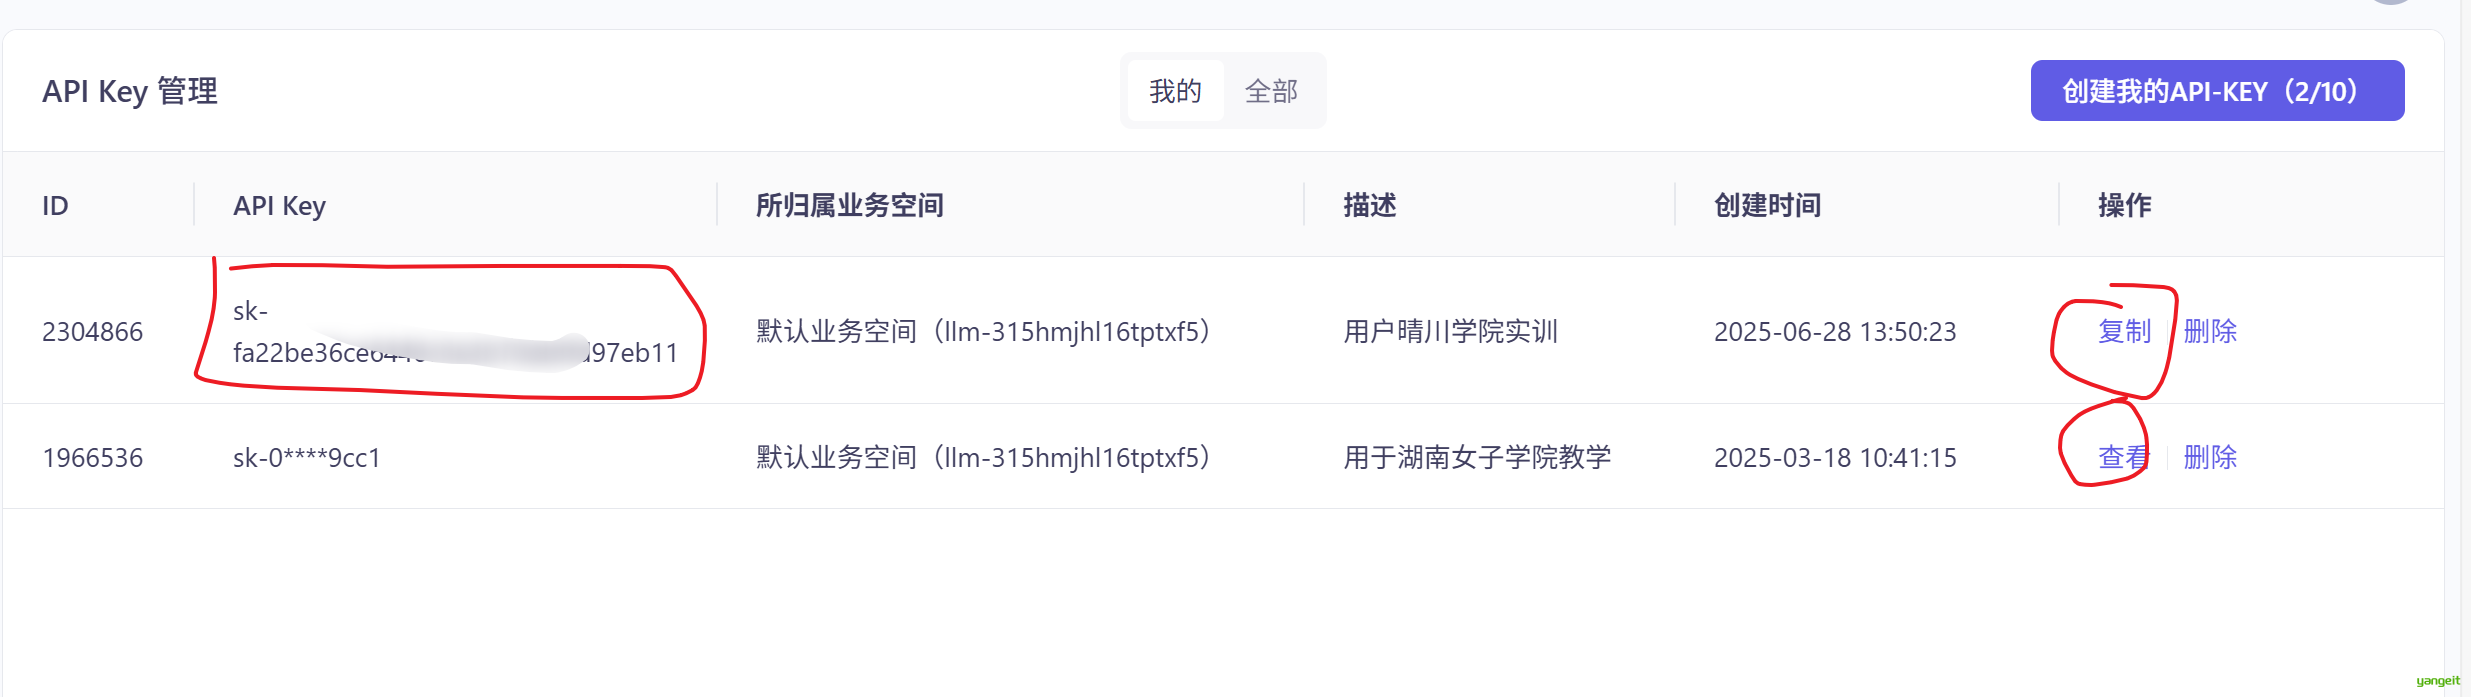
1.2. SpringAI+DeepSeek
前言
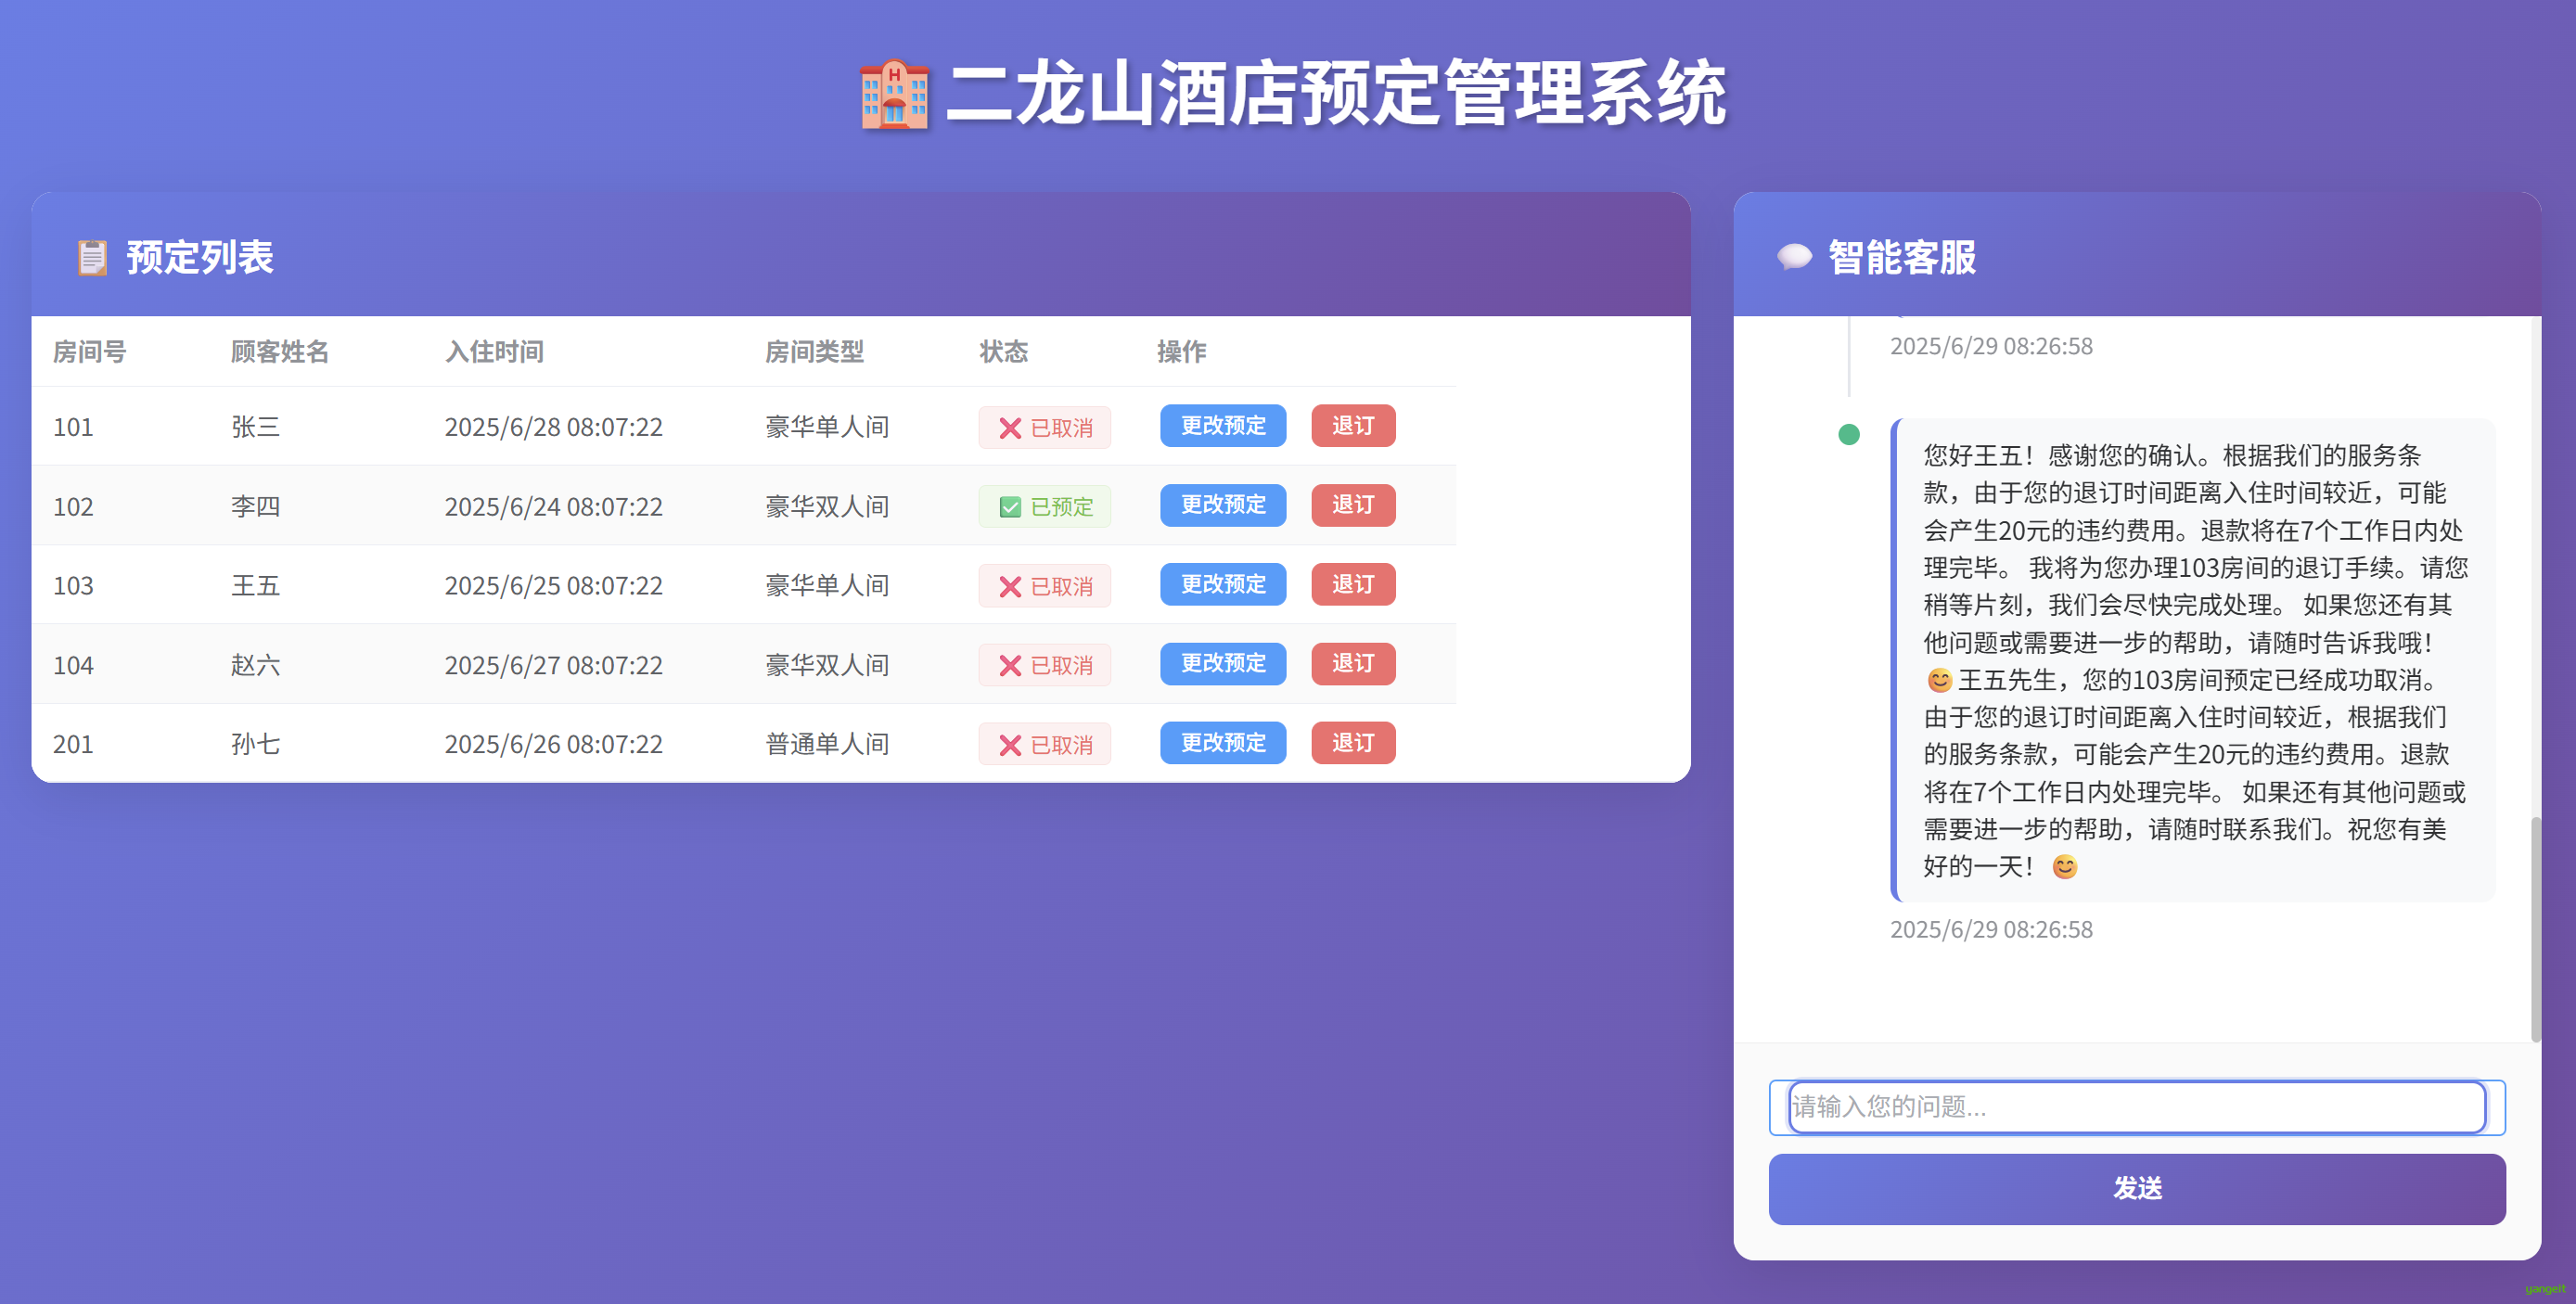
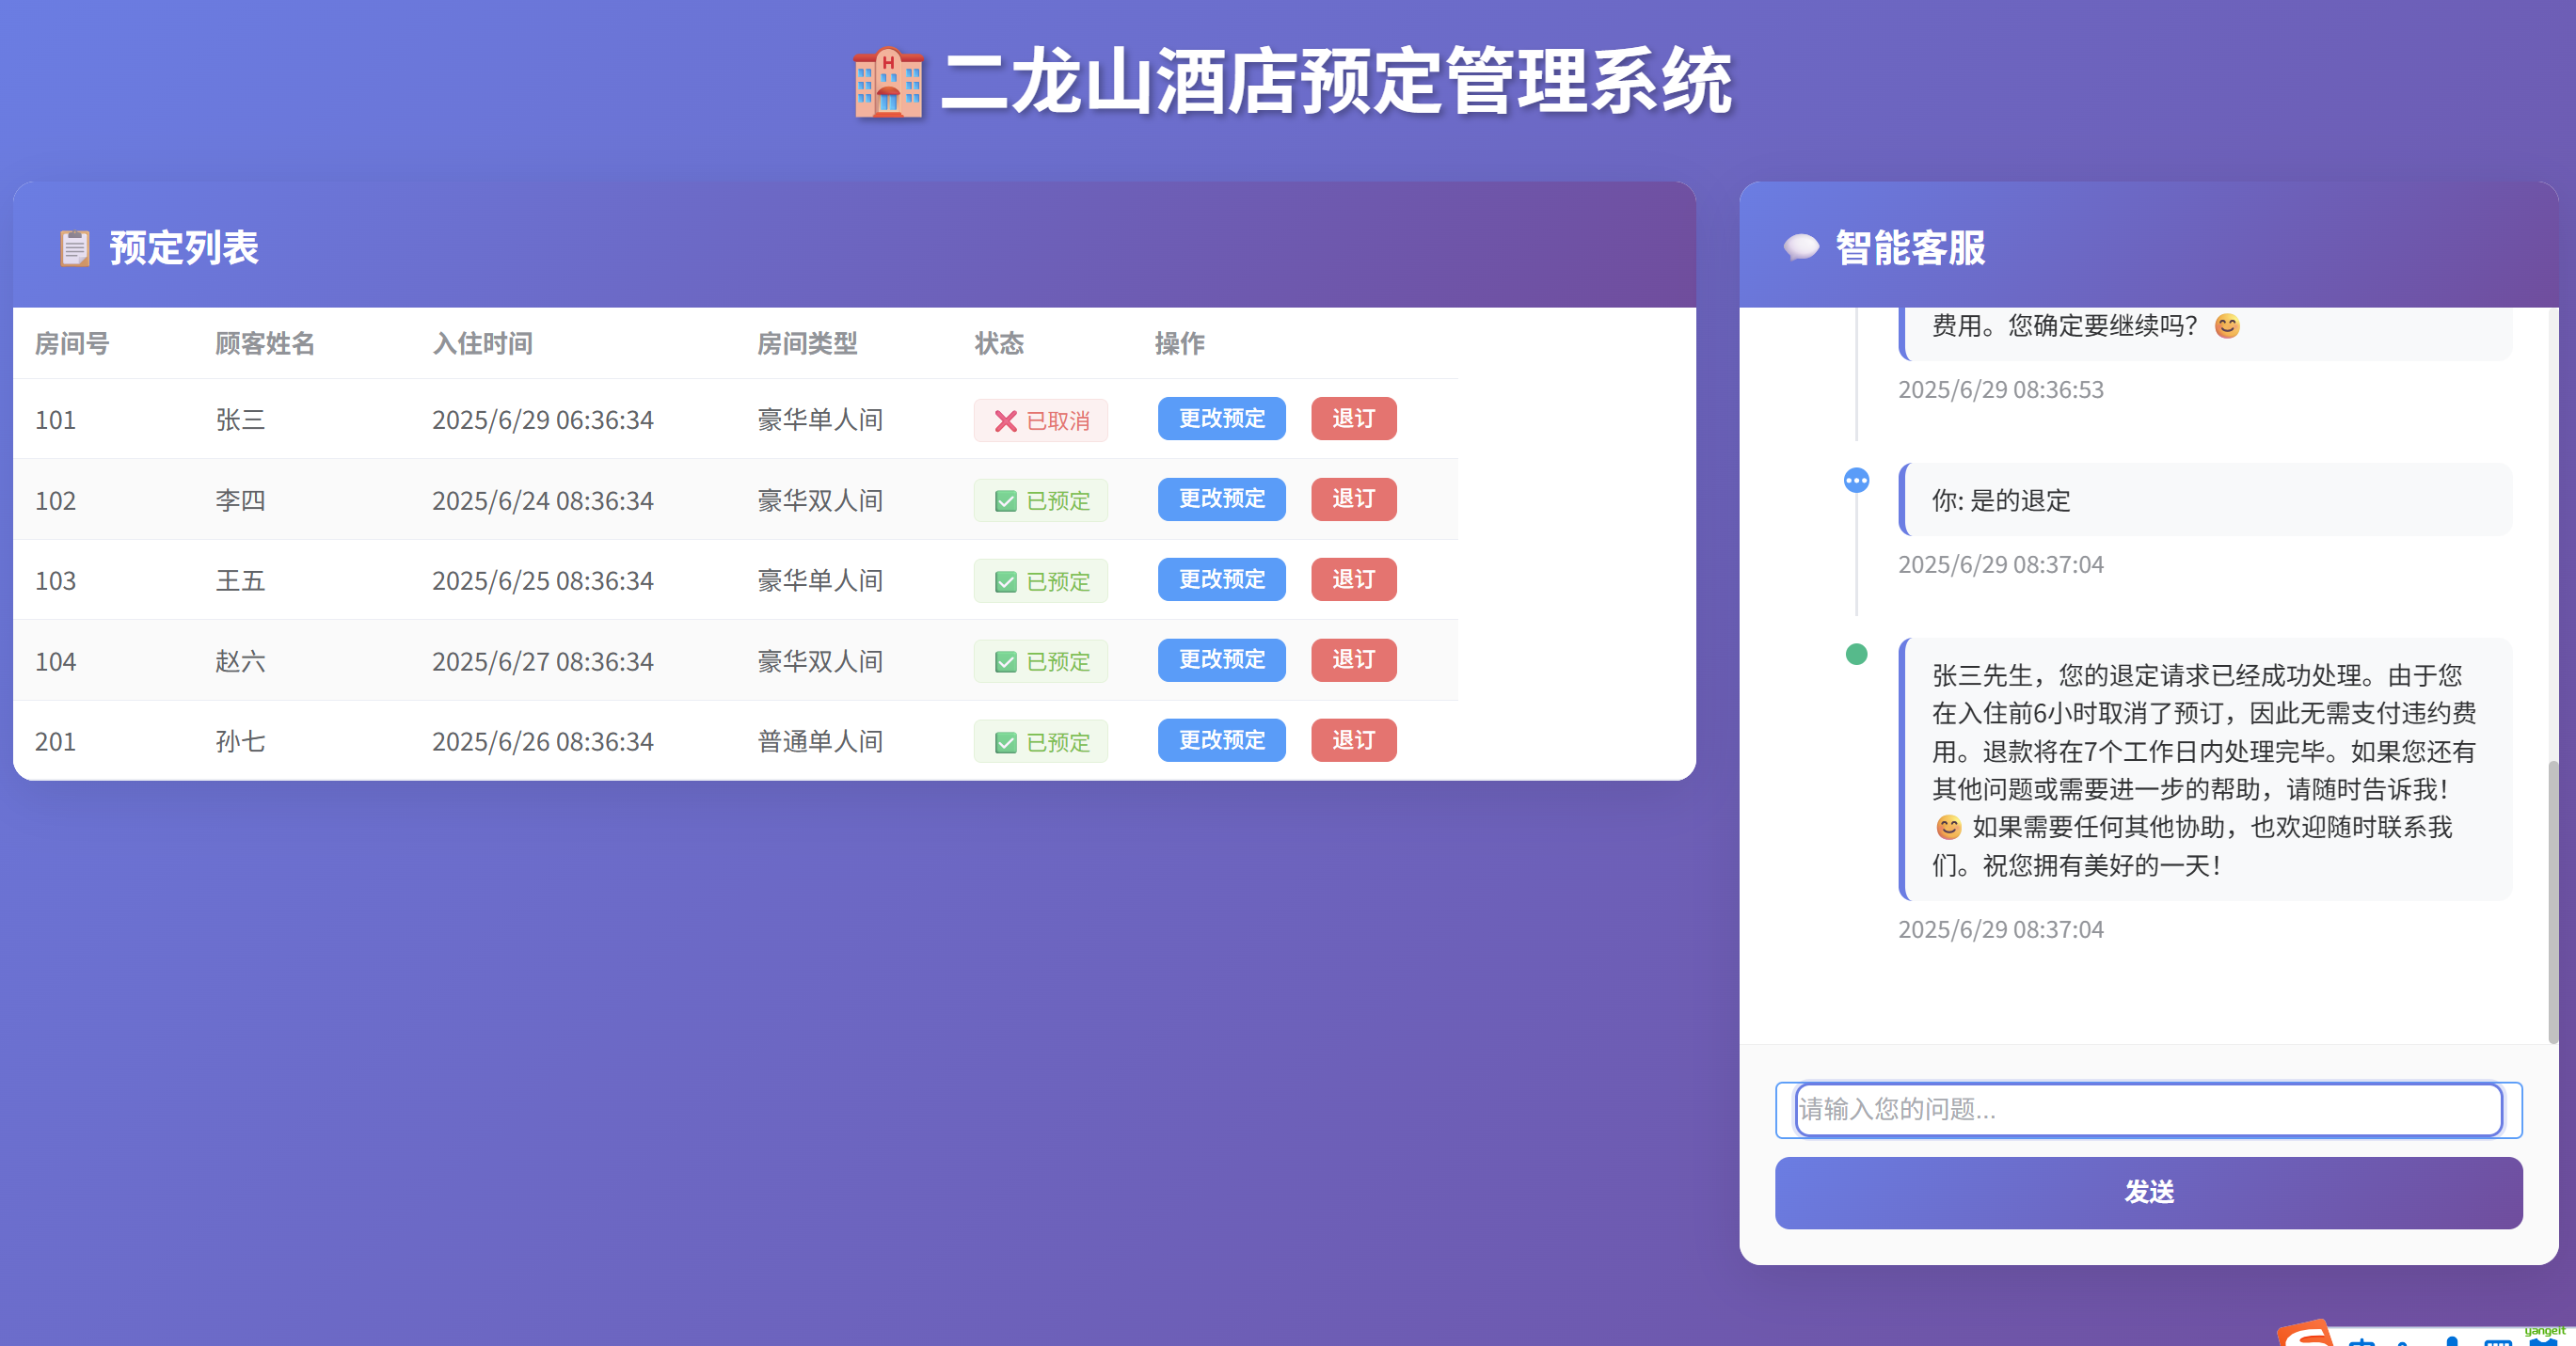
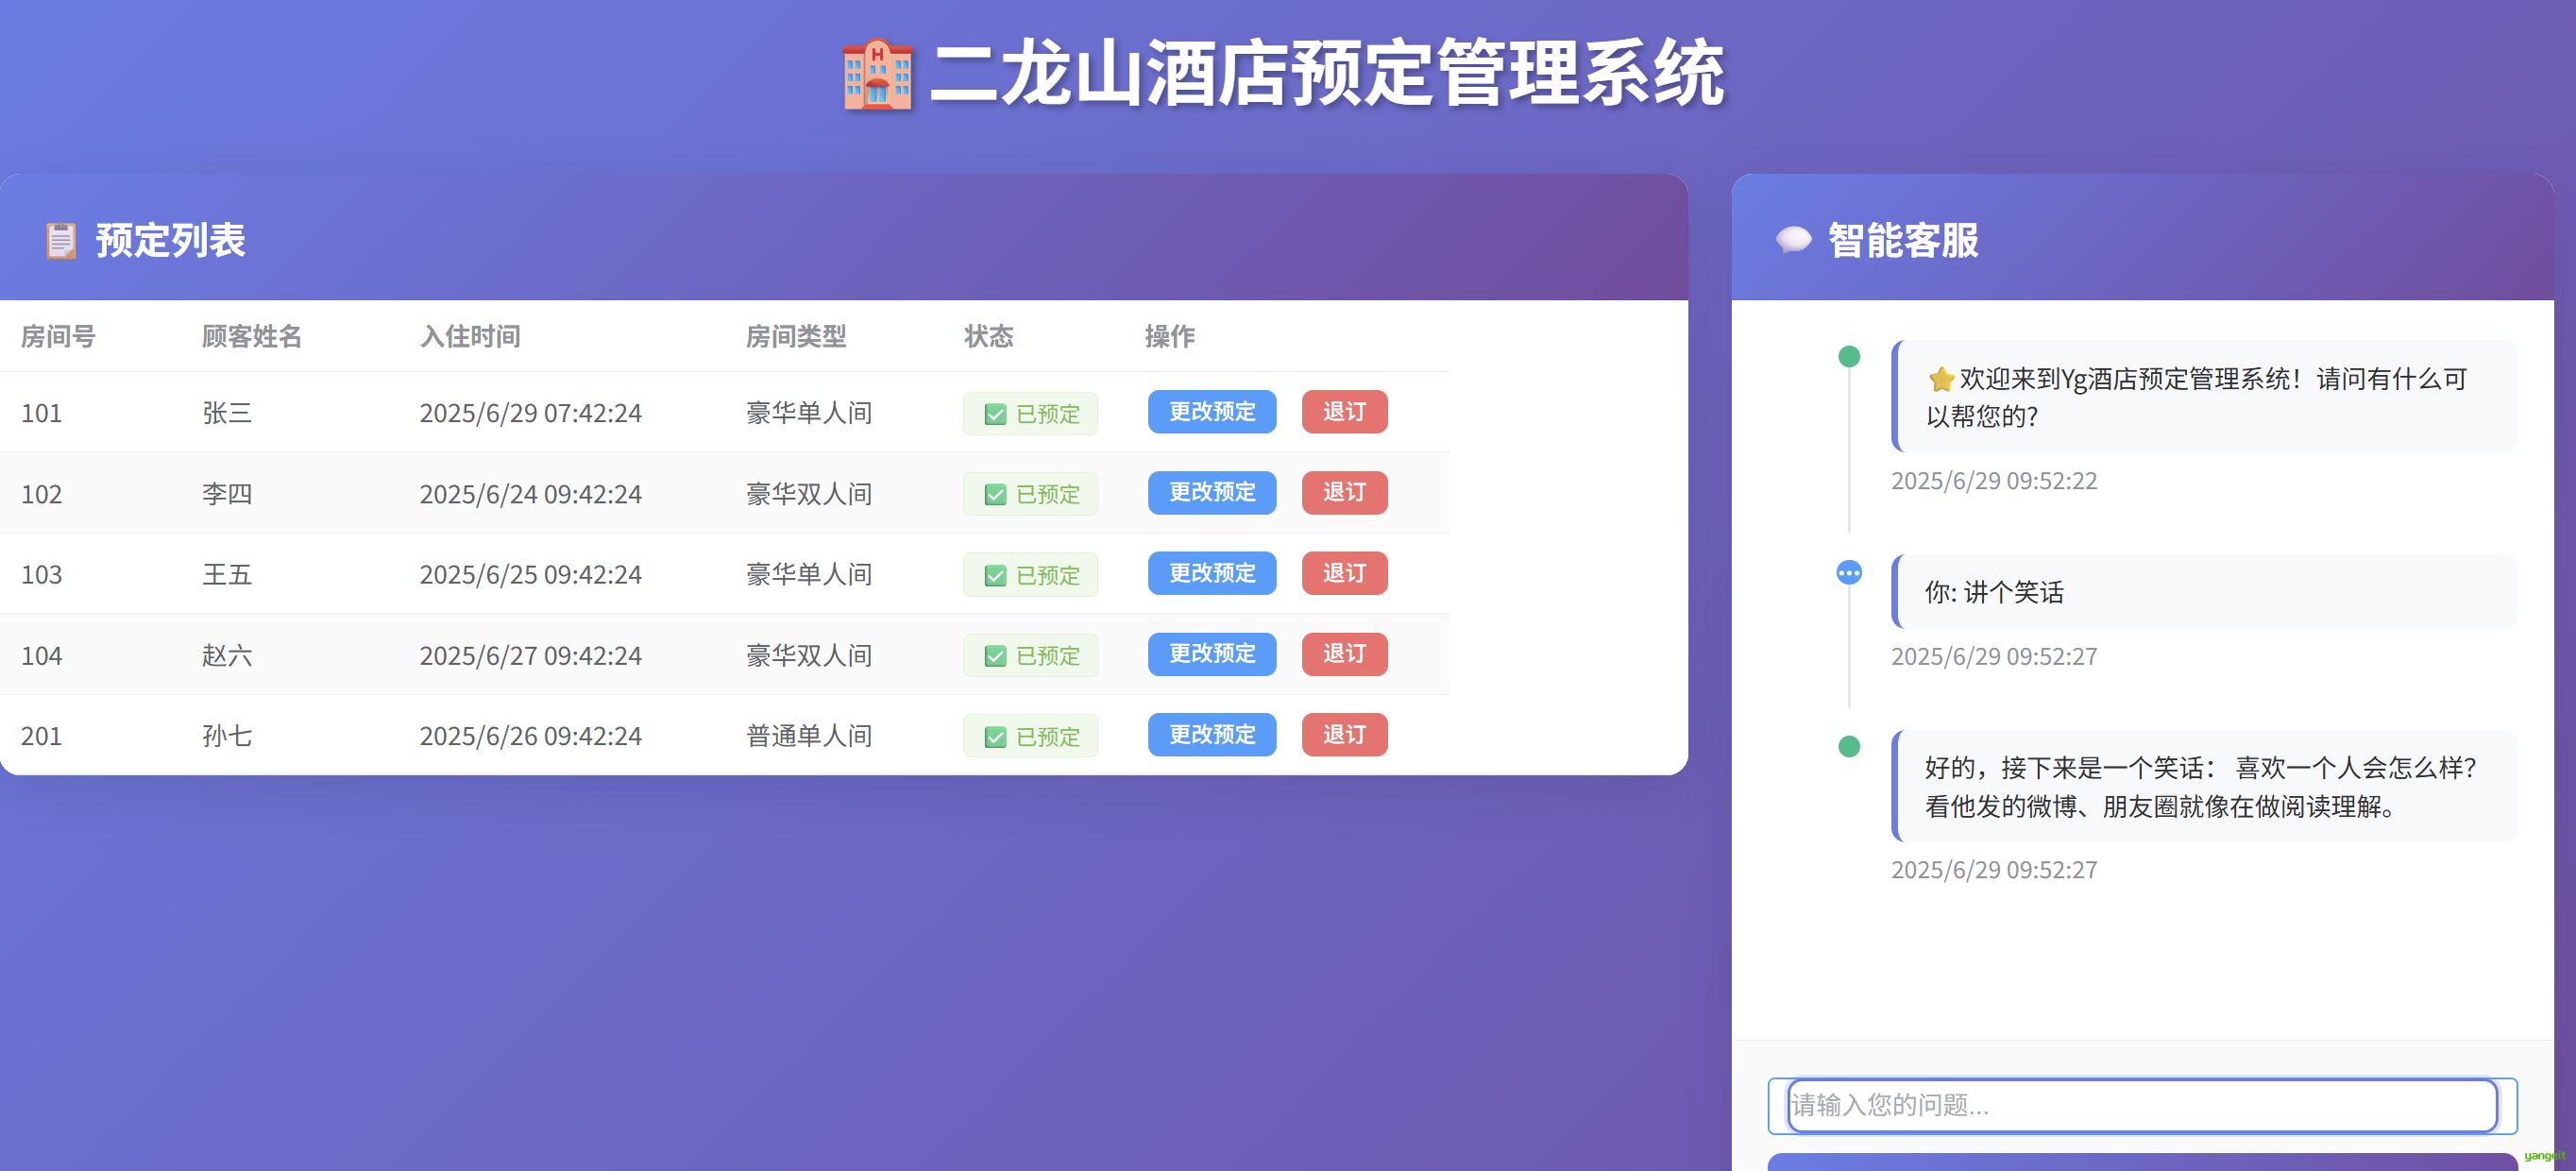
现在AI技术非常火热,那么我们Java程序员如何在自己的业务中使用ai,并落地开发了?,我会在传统的项目中抽取部分业务,如预定,预约,退订,取消,退款,查询等业务,将传统的按钮式的操作转成对话式的交互,来完成整个智能化的改造!!!
好,接下来,我们演示我们的SpringAI+酒店助手项目实战,我们以酒店预定和退订为例,演示如何将传统的按钮式的操作转成对话式的交互,来完成整个智能化的改造!!!
接下来我们先来演示这个项目,然后在将如何完成这个项目进行讲解!!!
1.3. 项目启动和代码介绍
前言
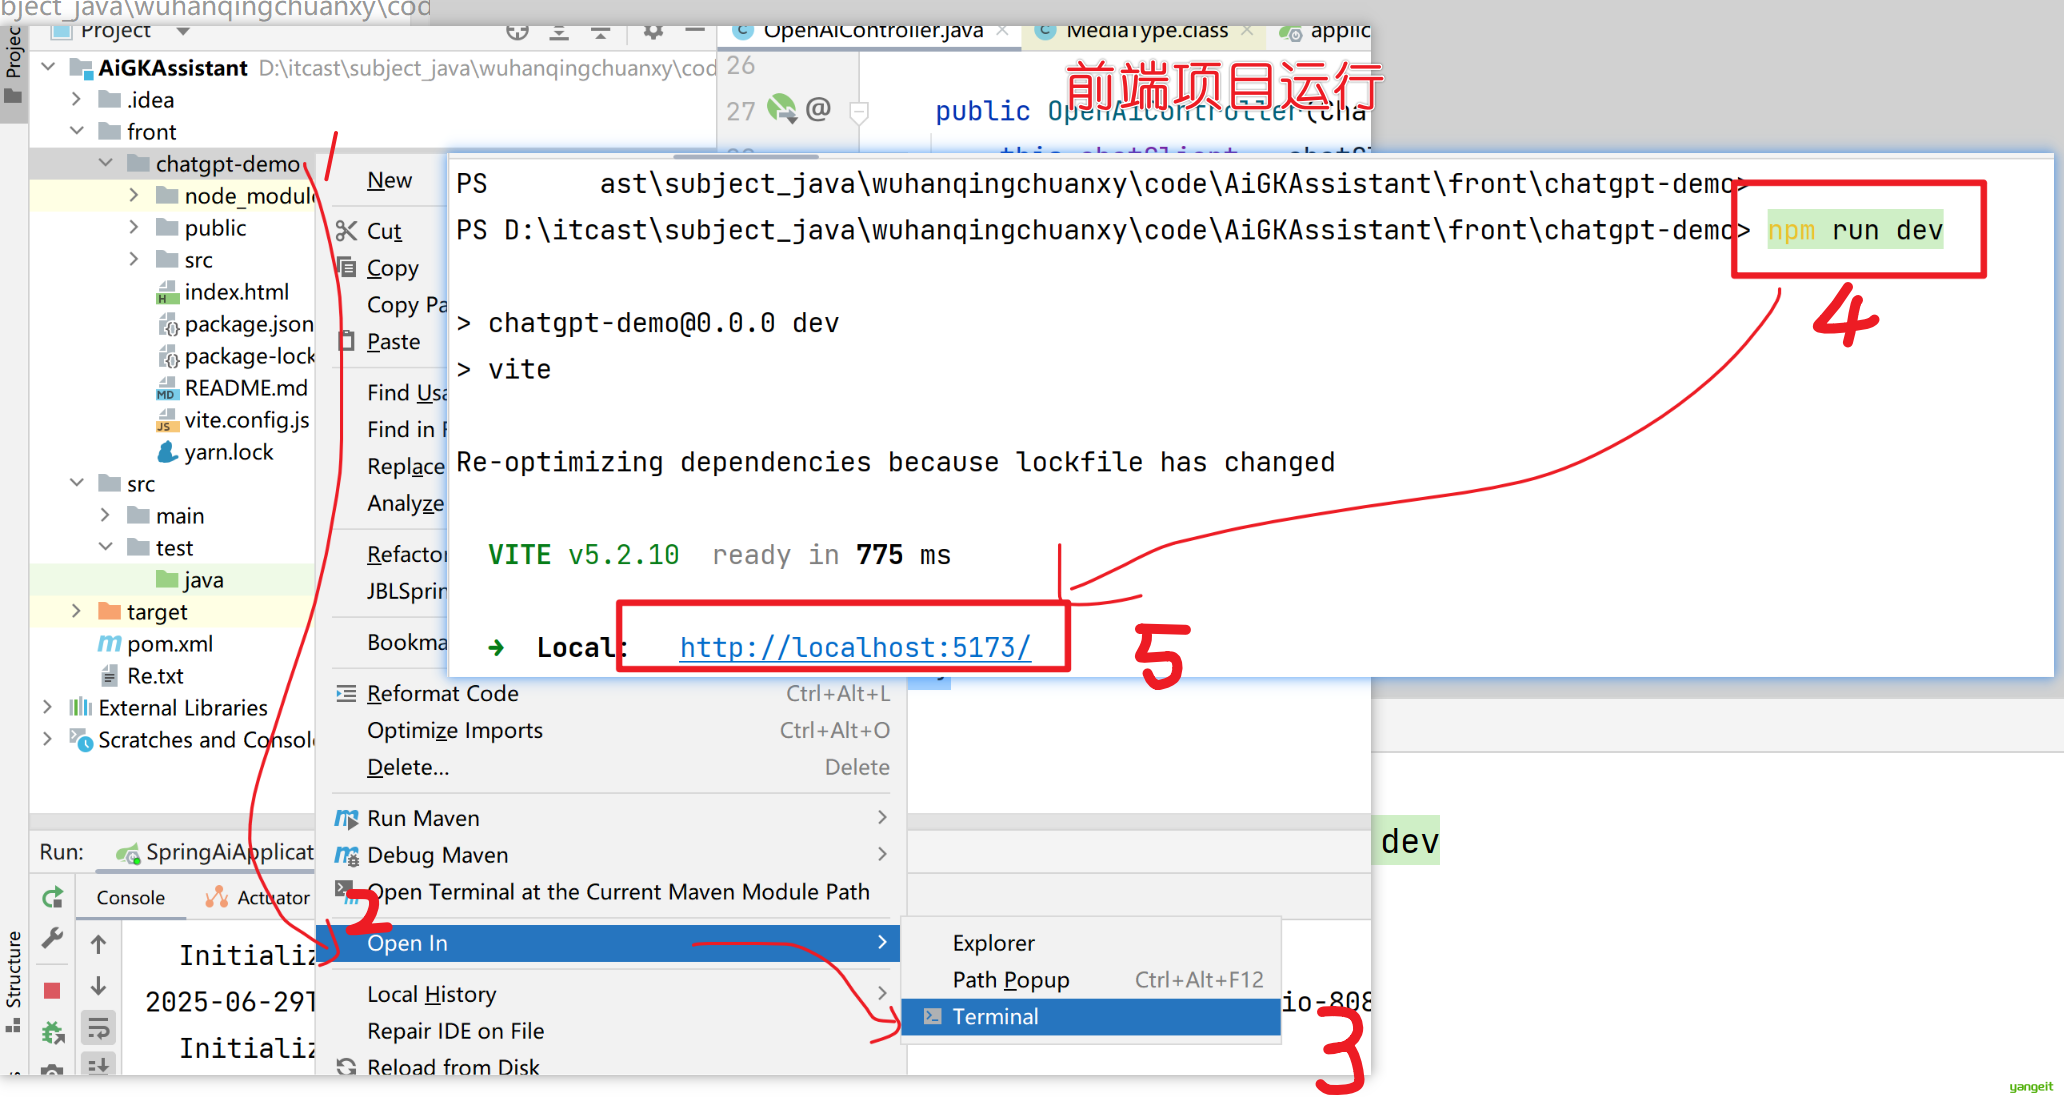
准备代码脚手架
包含前端代码
后端代码的初始工程
运行初始工程
安装Node.js配置环境变量 使用nvm安装node.js环境,教程地址:https://nvm.uihtm.com/doc/npmmirror.html
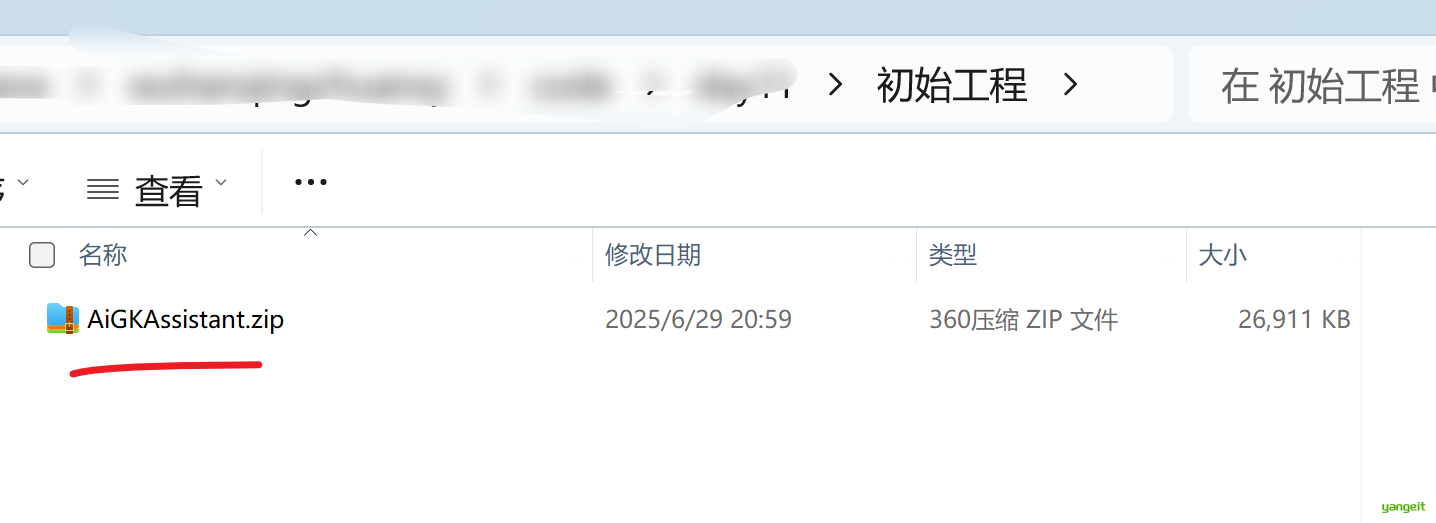
下载项目包,解压到非中文目录下
运行前端项目和后端项目
1.4. 智能对话
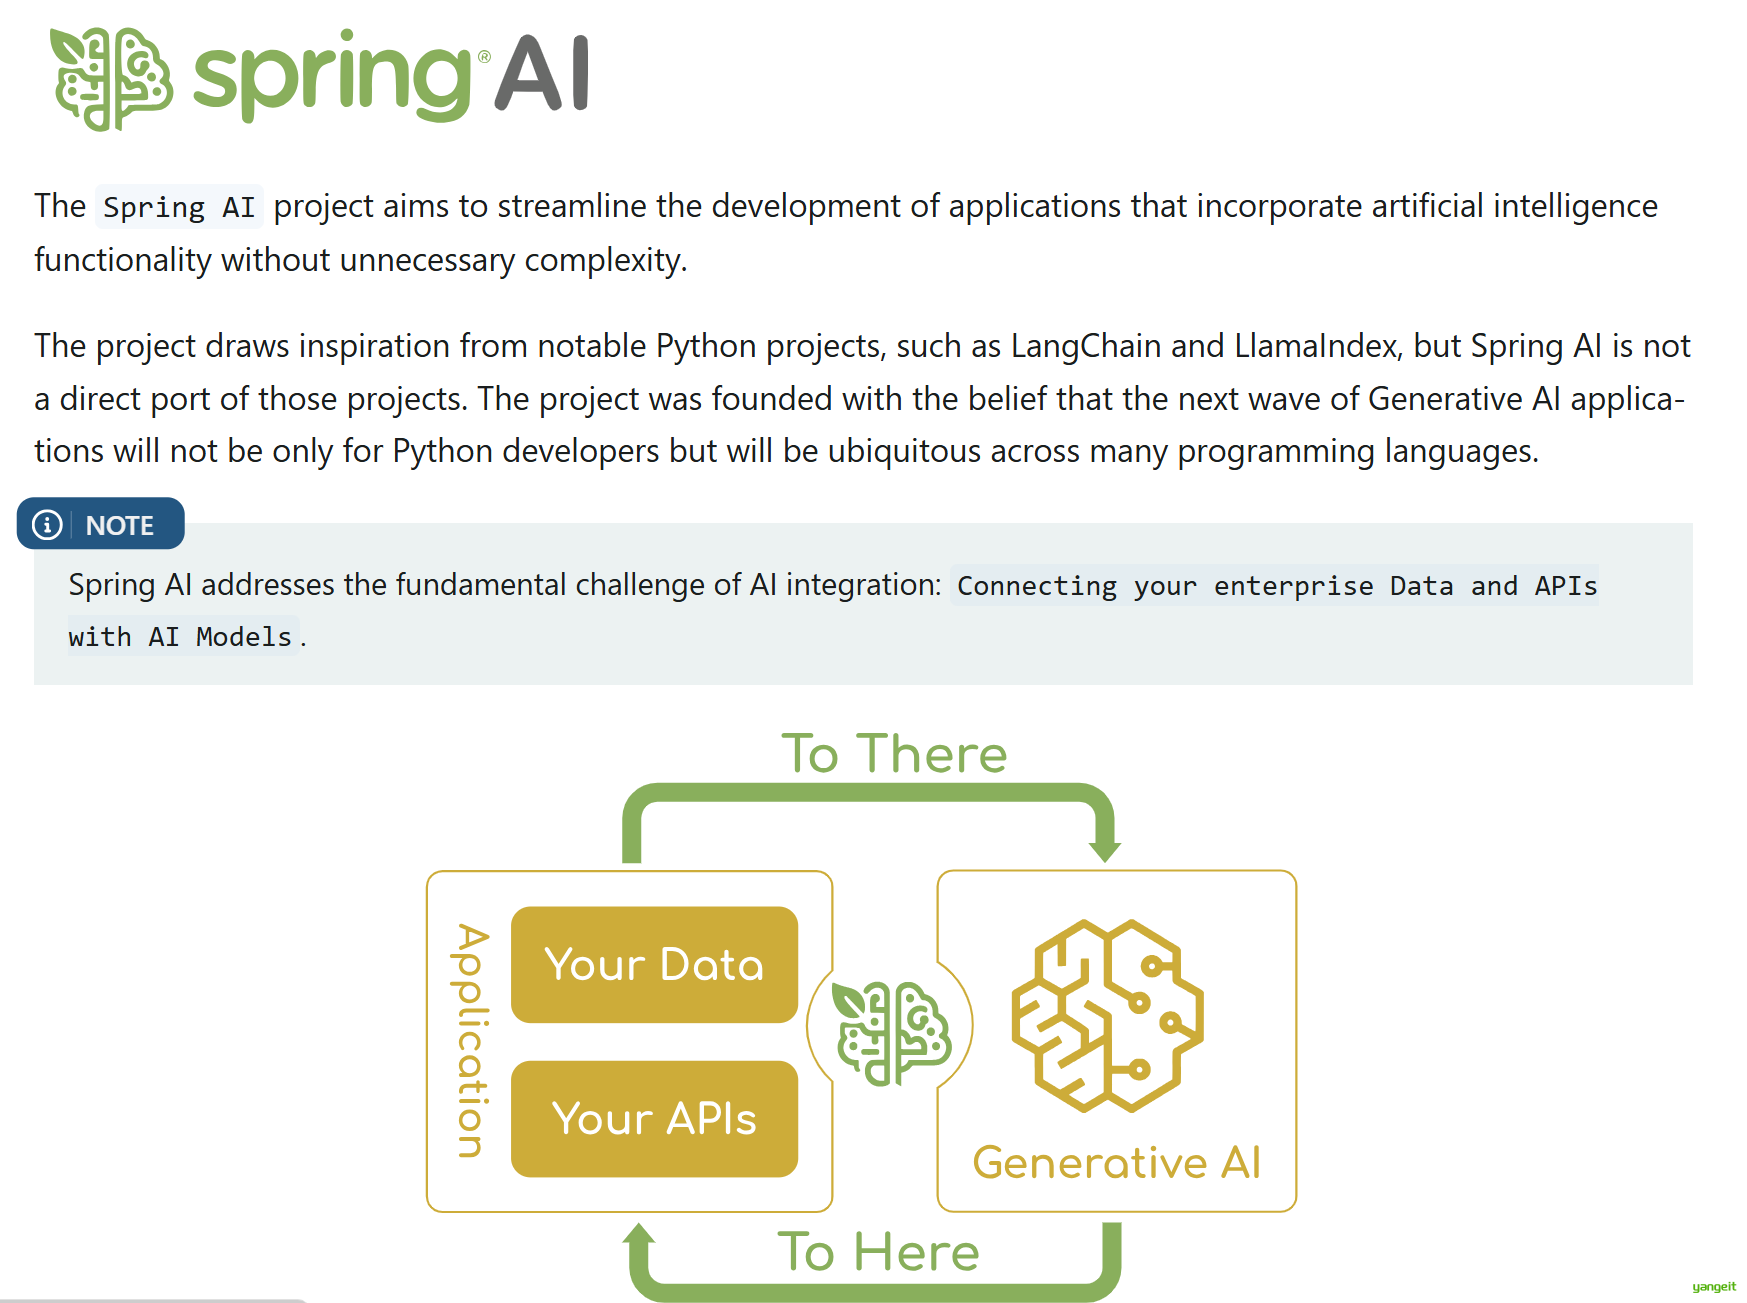
前言
SpringAI官网 ,SpringAI是一个基于Spring Boot的AI框架,它提供了对主流AI模型的支持。
对话方式分为2种: 1. 一次性返回结果,即后端一次性返回所有结果,前端直接展示,用户会感觉卡顿一下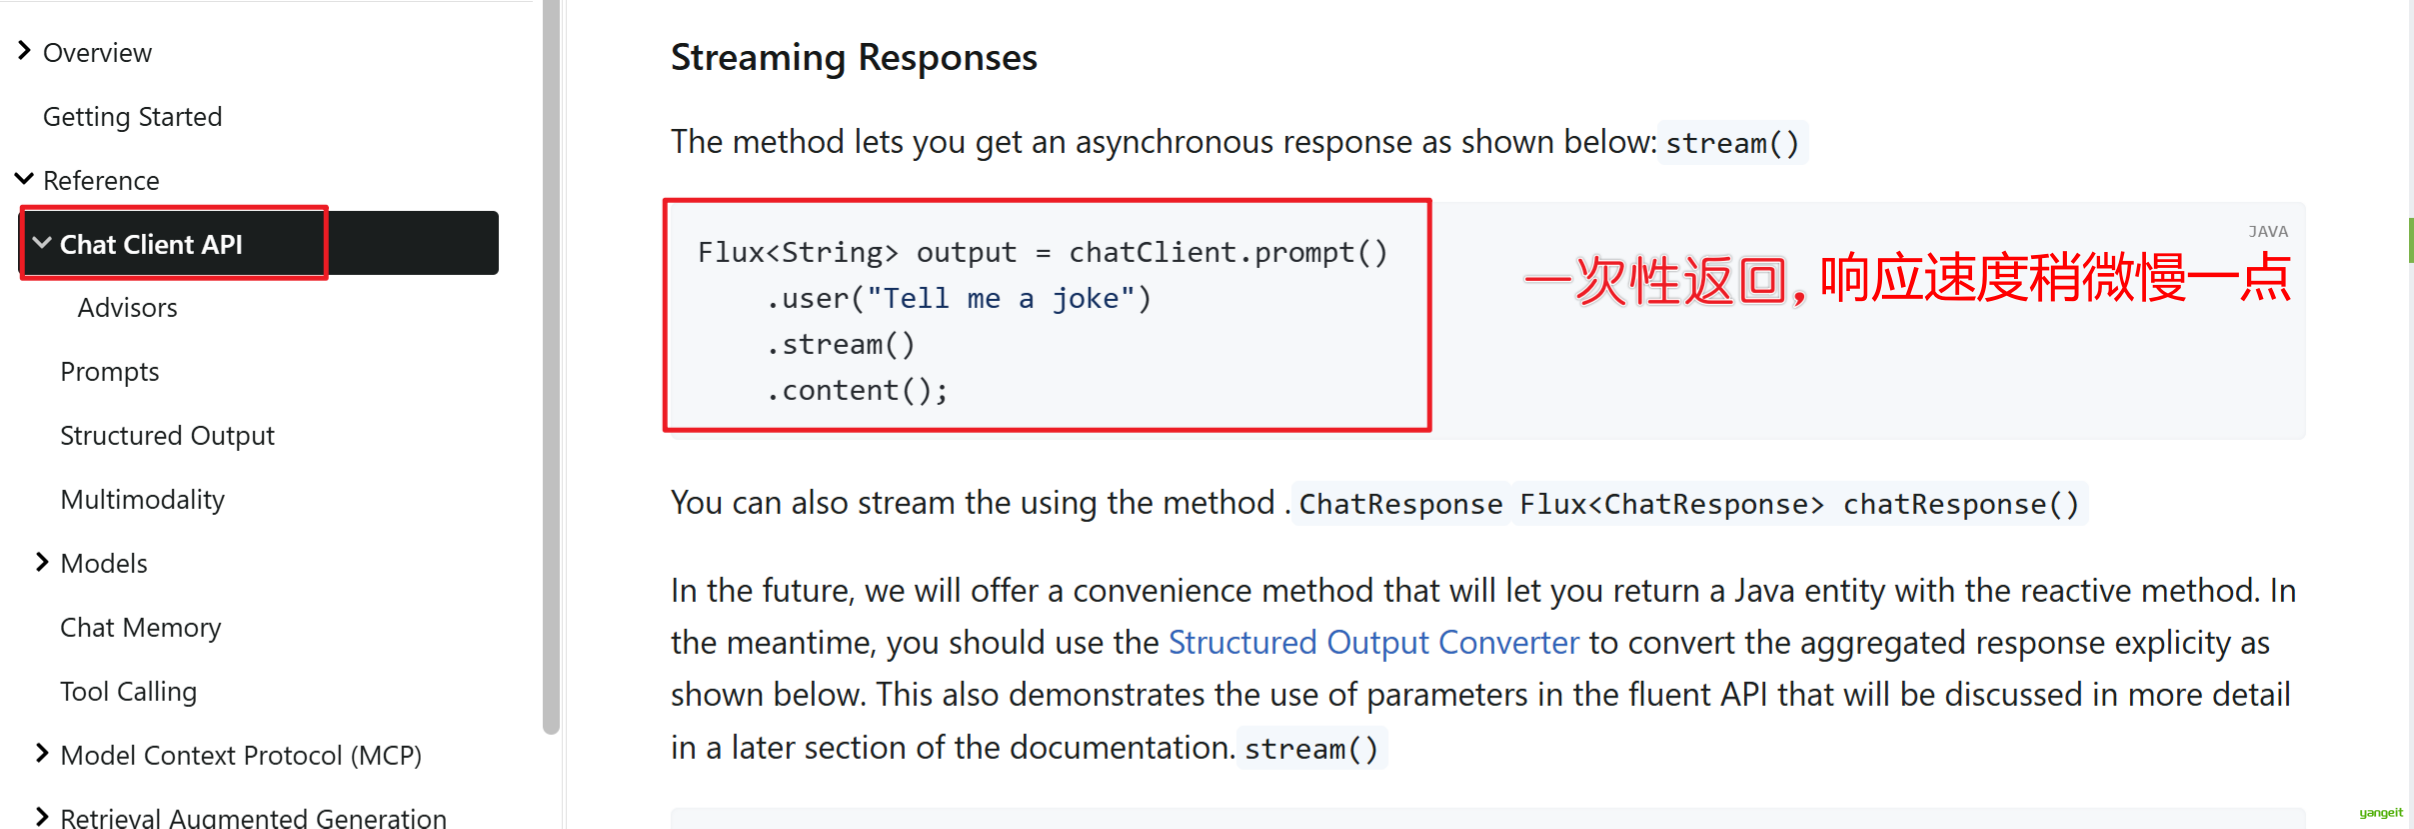
2. 流式返回结果,响应时间短,用户体验好,但是需要后端支持流式返回
首先 我们演示一下一次性返回结果,即后端一次性返回所有结果,前端直接展示,用户会感觉卡顿一下
可以从官网查看教程
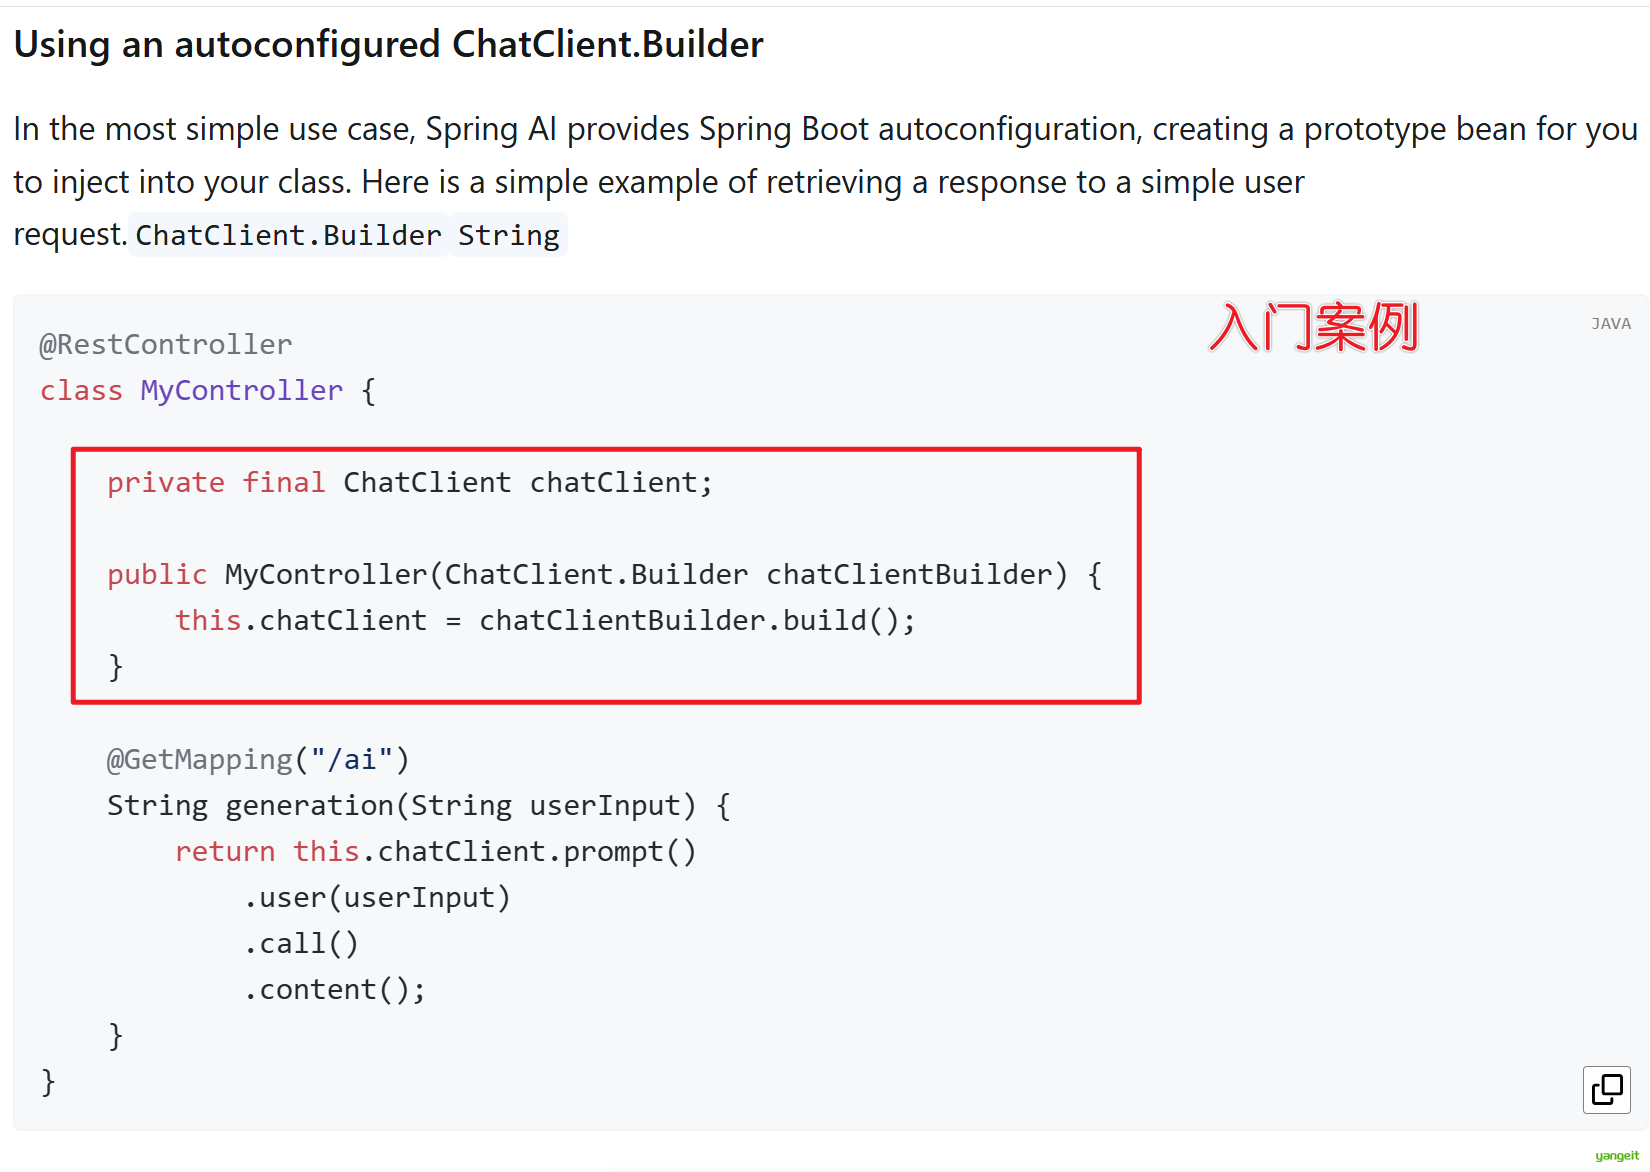
需要注入一个chatClientBuilder对象,然后通过build方法获得ChatClient对象,用这个对象进行交互
@RestController
@CrossOrigin//  解决跨域问题
public class OpenAiController {

    private final ChatClient chatClient;

    public OpenAiController(ChatClient.Builder chatClientBuilder) {
        this.chatClient = chatClientBuilder.build();
    }

    @CrossOrigin//  解决跨域问题
    @GetMapping(value = "/ai/generateStreamAsString")
    public String generateStreamAsString(@RequestParam(value = "message", defaultValue = "讲个笑话") String message) {
        String content = this.chatClient.prompt()
                .user(message)
                .call()
                .content();
        return content;
    }
}
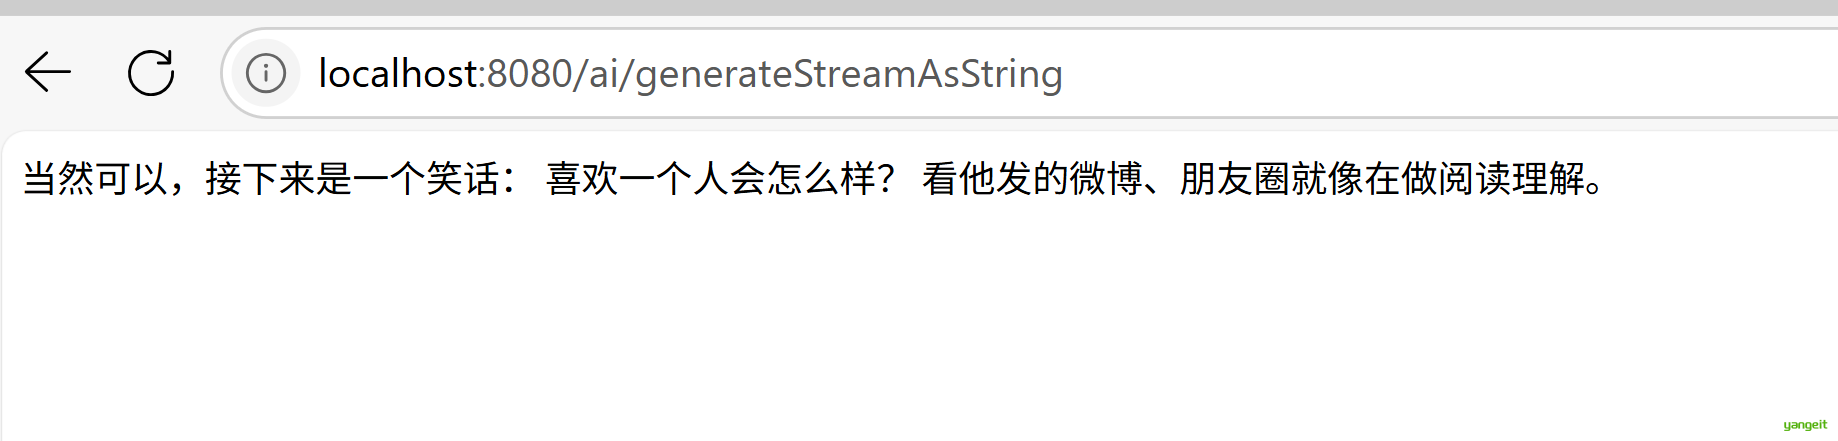
好了,至此我们演示了一次性返回结果

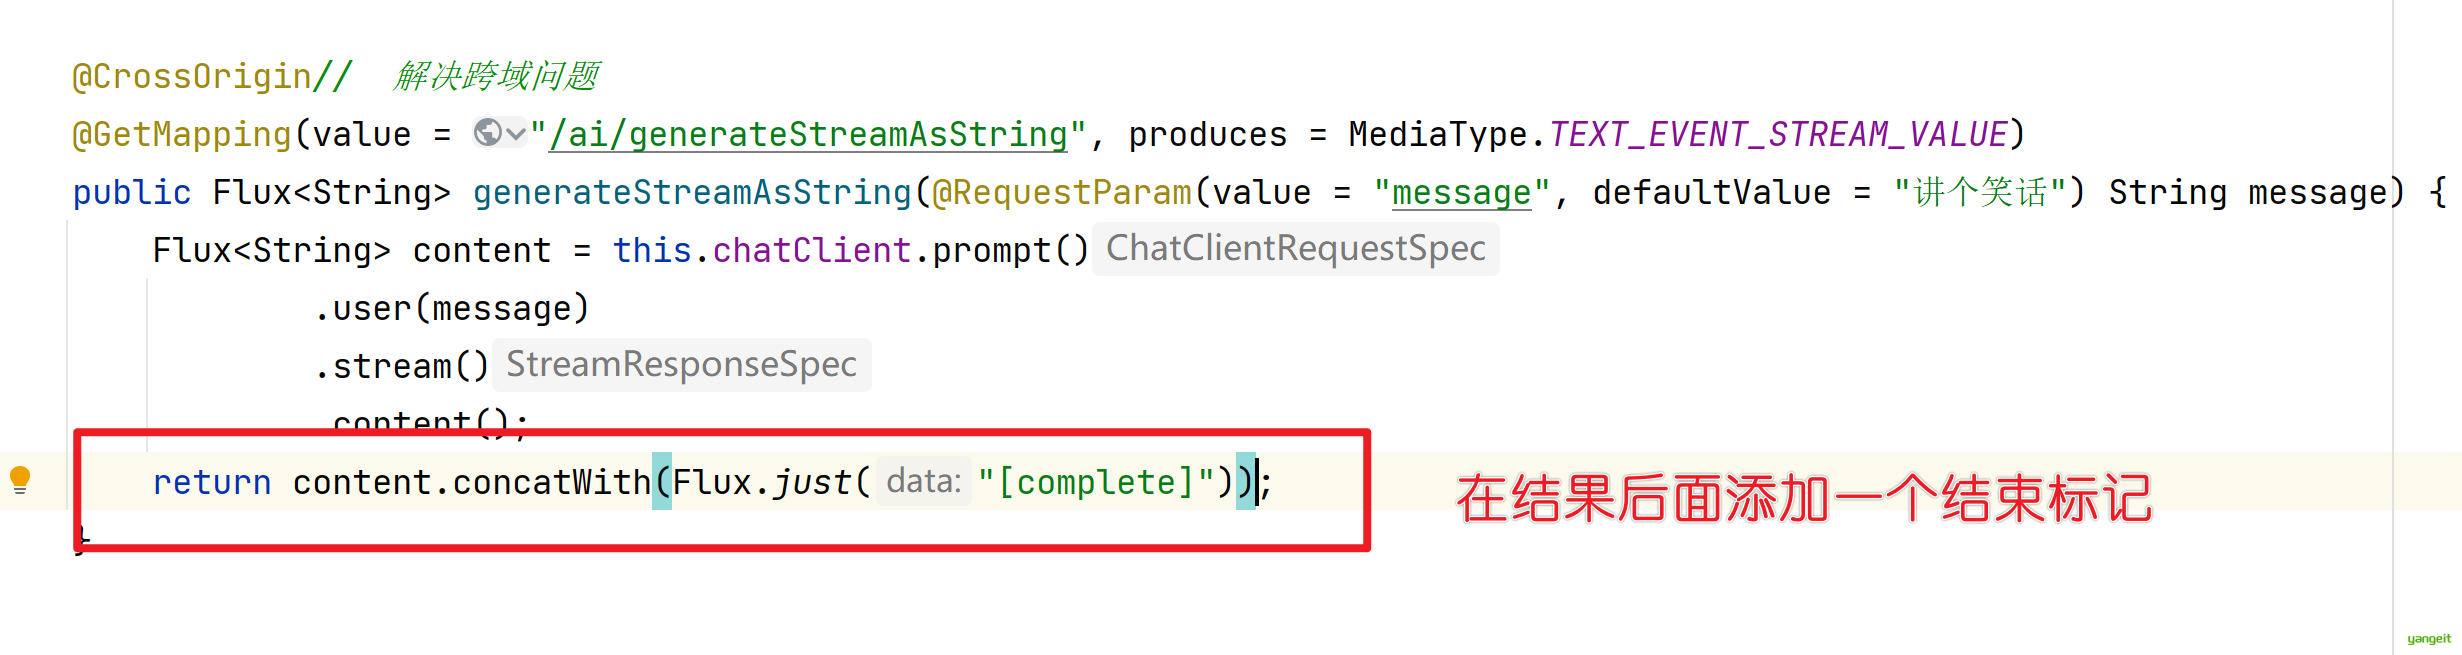
接下来,我们演示流式返回结果,响应时间短,用户体验好,但是需要后端支持流式返回
@CrossOrigin//  解决跨域问题
@GetMapping(value = "/ai/generateStreamAsString", produces = MediaType.TEXT_EVENT_STREAM_VALUE)
public Flux<String> generateStreamAsString(@RequestParam(value = "message", defaultValue = "讲个笑话") String message) {
    Flux<String> content = this.chatClient.prompt()
            .user(message)
            .stream()
            .content();
    return content;
}
注意:这里需要设置produces = MediaType.TEXT_EVENT_STREAM_VALUE,表示返回的是流式数据,返回值是
Flux<String>,表示返回的是字符串流
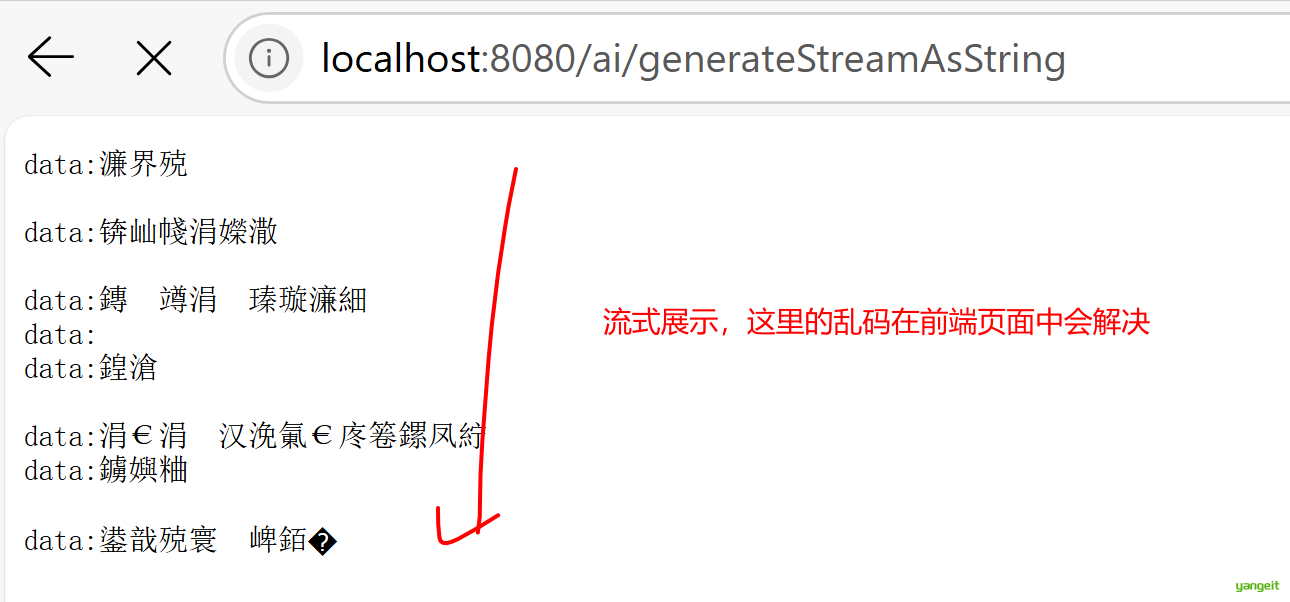
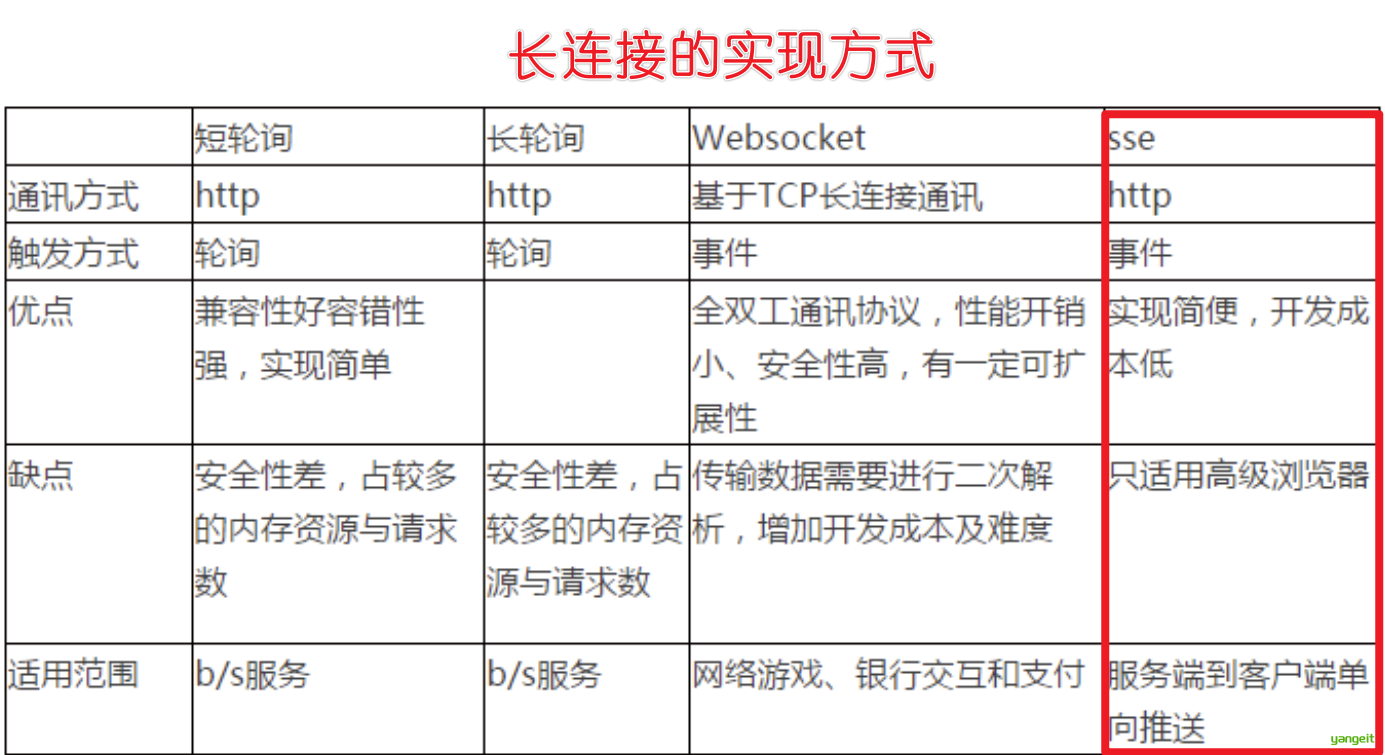
底层使用的是sse长连接,长连接的作用是,后端可以随时向前端发送数据,前端可以随时接收后端发送的数据,这样就可以实现实时通信了。
可以参考下面运行前端工程,观察一下不乱码的情况👇
可以发现,没有乱码了
但是发现,页面会出现重复请求的情况,需要在后端给他发送一个结束标记
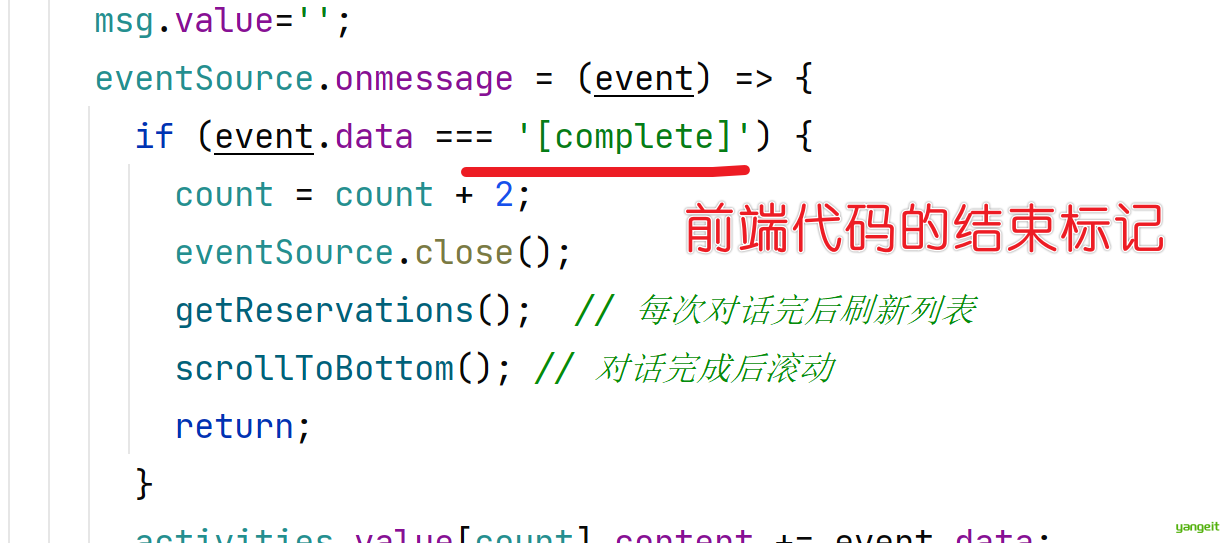
重启后端项目,重新测试,发现已经没有重复请求了
至此,我们学会了2种对话方式,大家可以根据自己的需求选择使用哪种方式。
总结
课堂作业
- 给大家10分钟时间,练习一下🎤
1.5. 预设角色
前言
我们要实现的第一个业务智能功能呢,就是这个预设角色,因为你现在跟他聊天,他是漫无目的的,我们现在希望他作为一个智能酒店助手的角色呢来跟我们进行对话,那我们就需要通过预设角色的方式,给他设置一个角色,让他知道我们跟他是聊天的,这样他就可以根据我们的聊天内容,来做出相应的反应了。
那怎么设置呢?
在方法中设置,但是每次调用都需要设置,比较麻烦
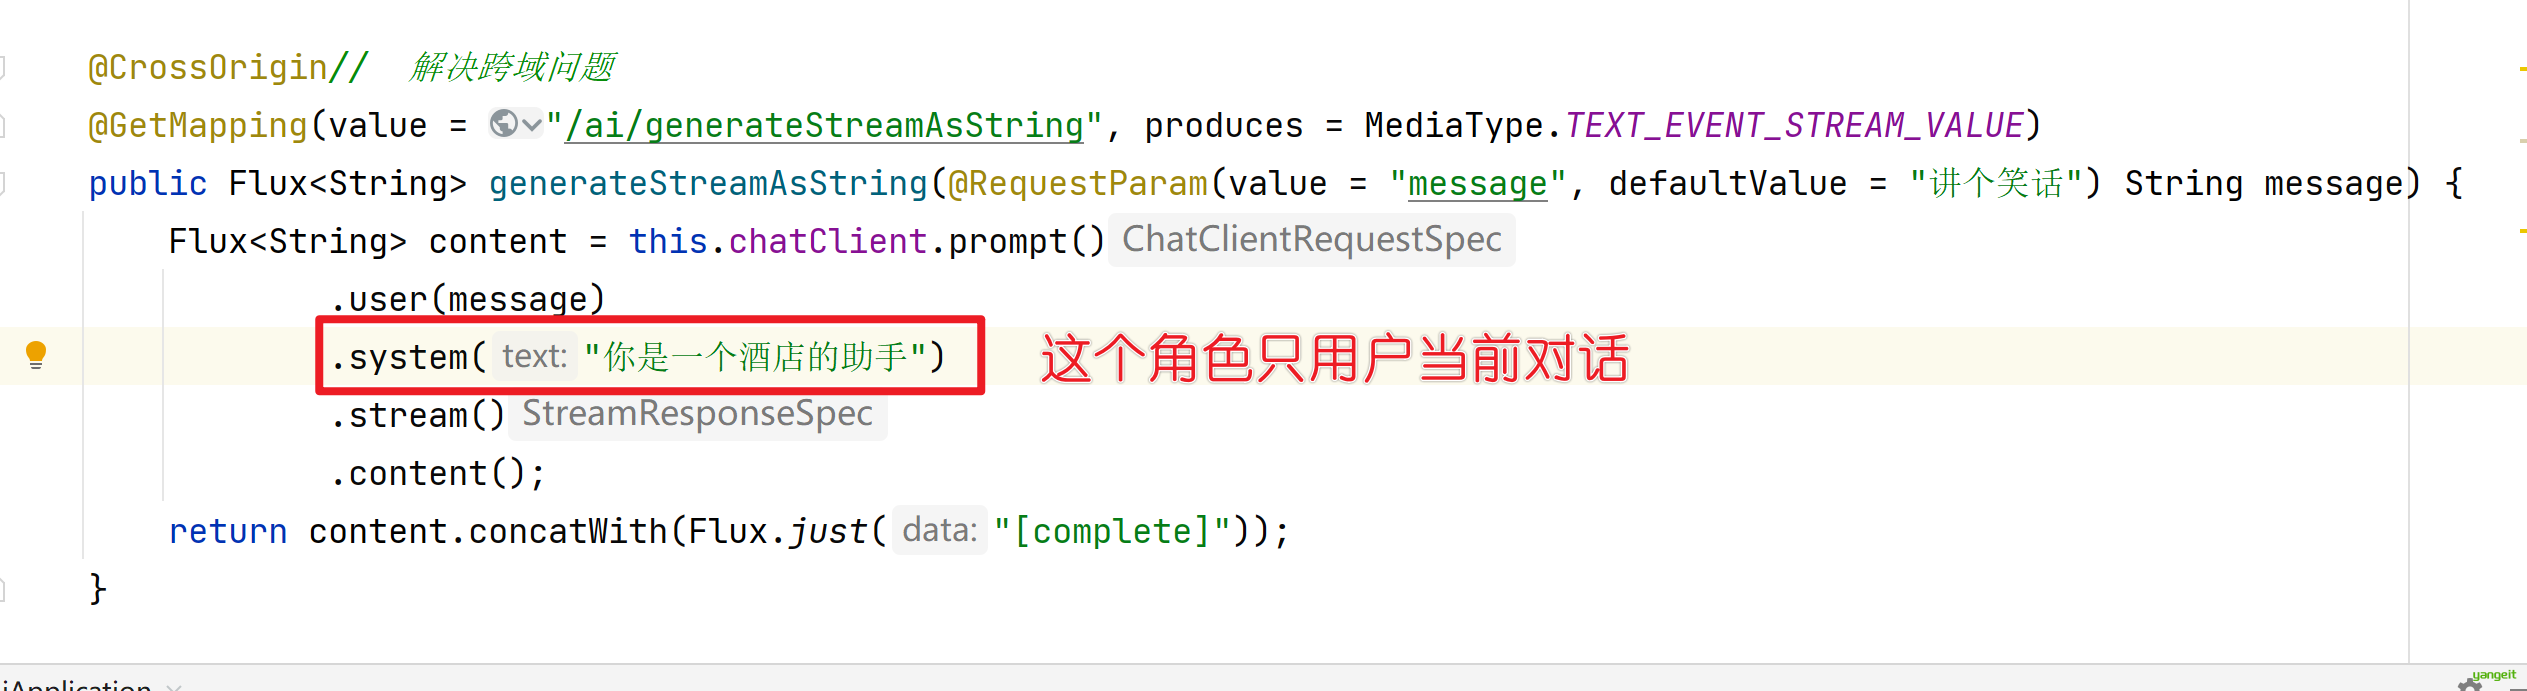
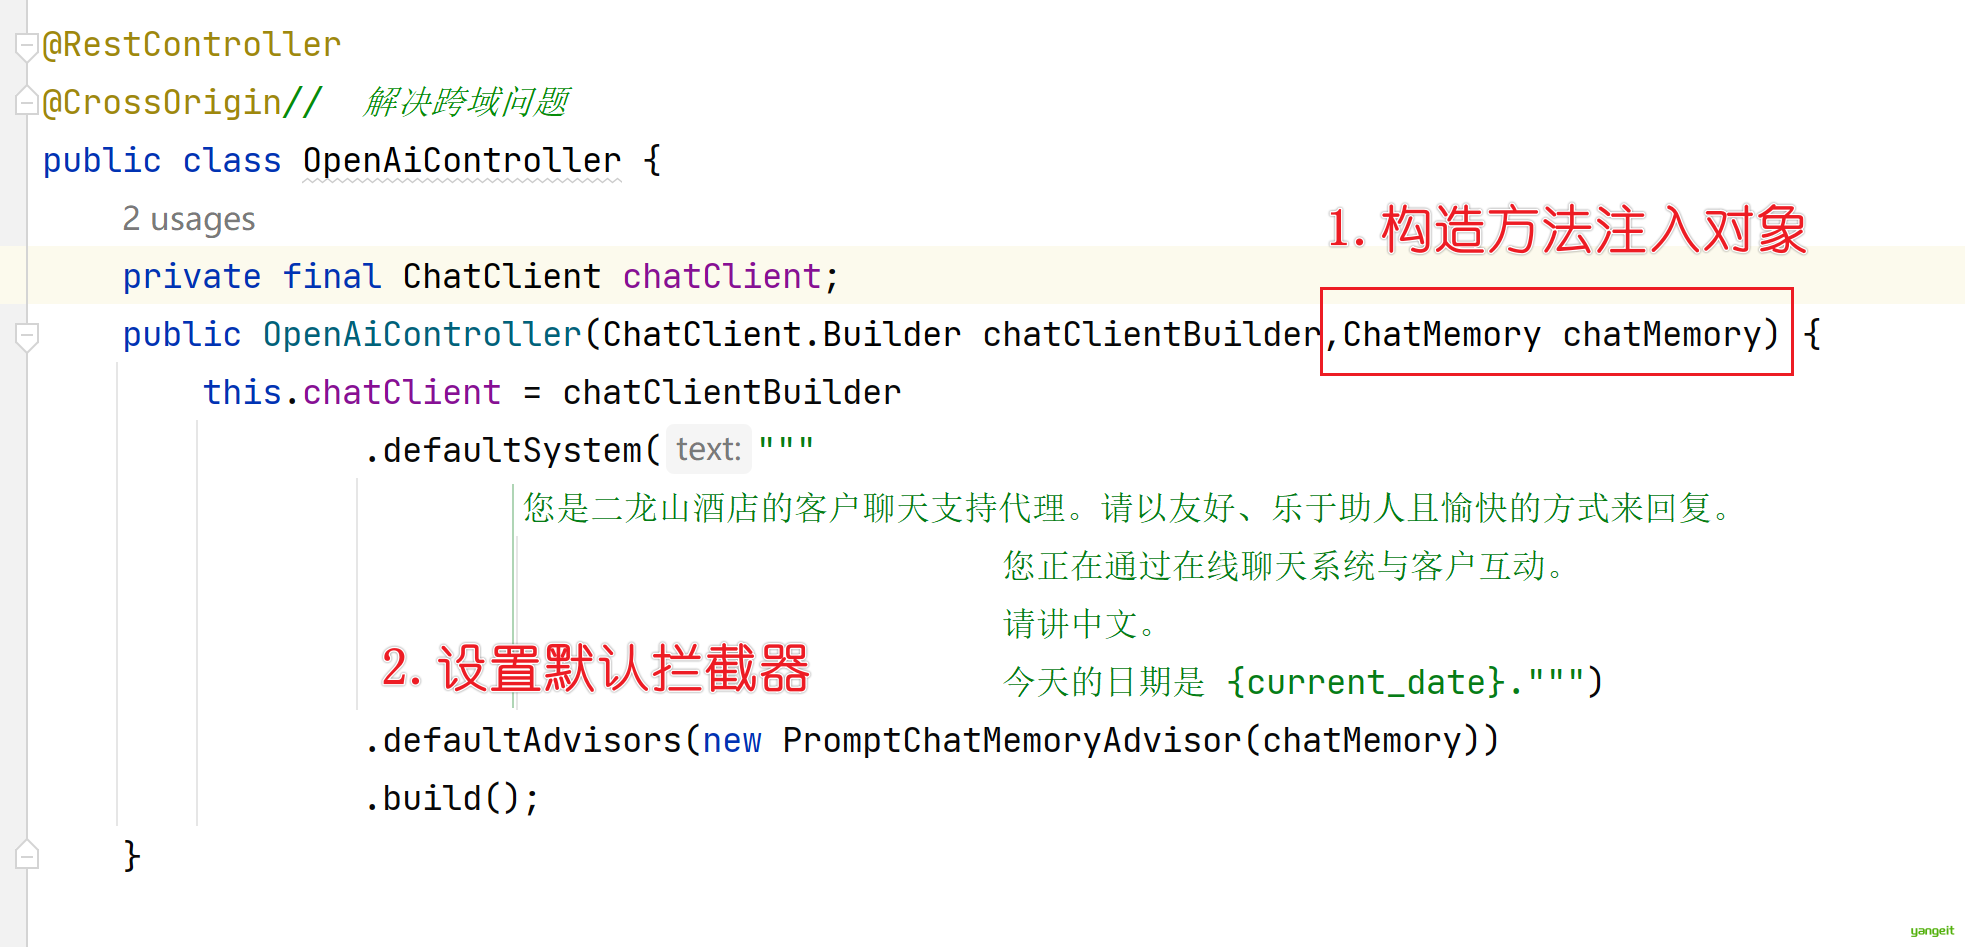
在client中设置
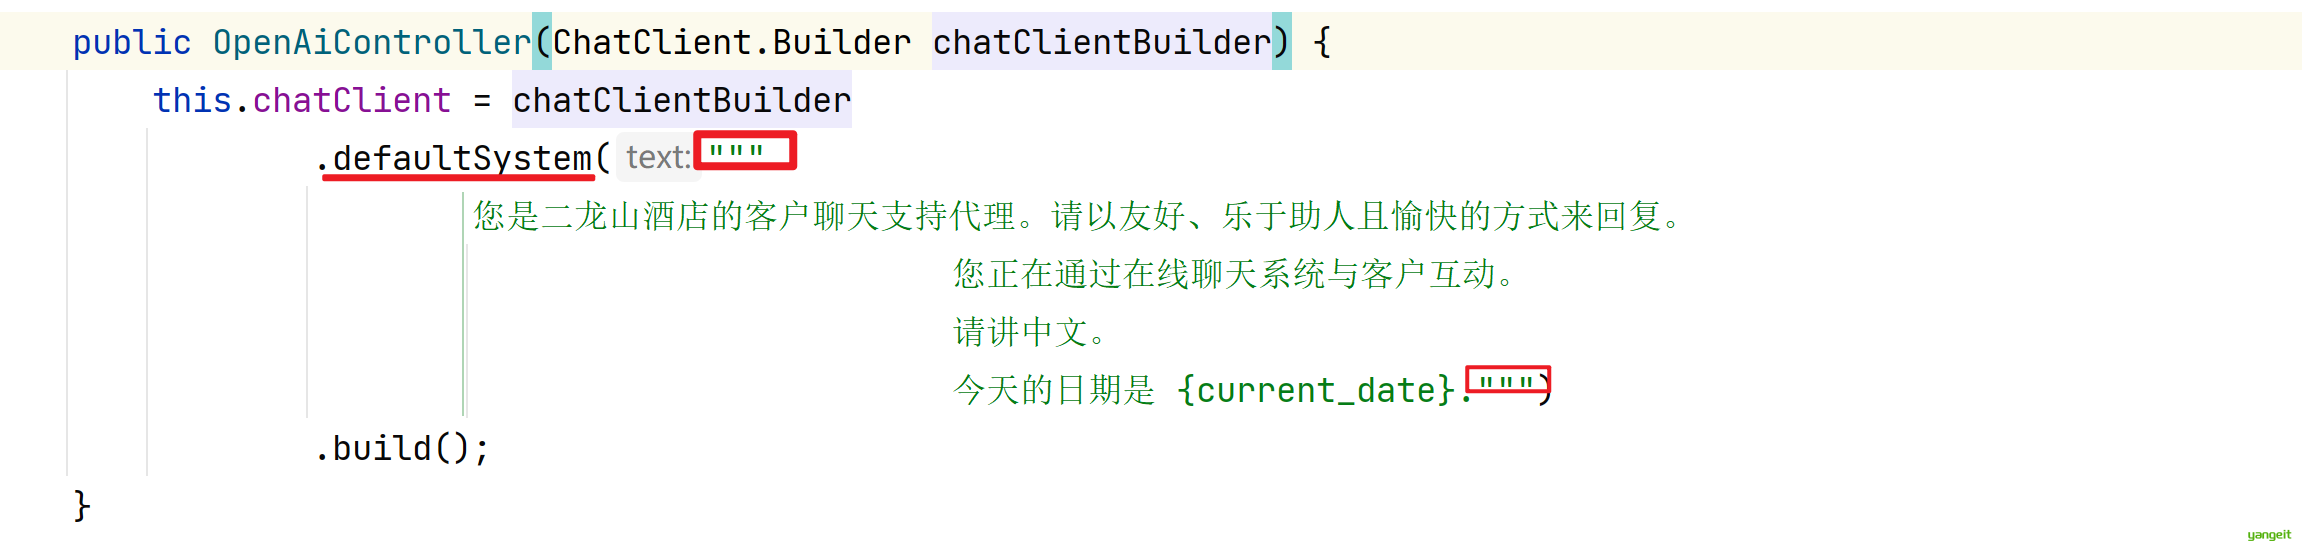
@RestController
@CrossOrigin//  解决跨域问题
public class OpenAiController {

    private final ChatClient chatClient;

    public OpenAiController(ChatClient.Builder chatClientBuilder) {
        this.chatClient = chatClientBuilder
                .defaultSystem("""
                        您是二龙山酒店的客户聊天支持代理。请以友好、乐于助人且愉快的方式来回复。
                                                您正在通过在线聊天系统与客户互动。
                                                请讲中文。
                                                今天的日期是 {current_date}.""")
                .build();
    }
}
说明:这里的提示词不是固定的,后期会不断的调试,和优化
可以看到上面的人设中有一个今日的日期,因此需要在对话中进行设置current_date变量
@CrossOrigin//  解决跨域问题
@GetMapping(value = "/ai/generateStreamAsString", produces = MediaType.TEXT_EVENT_STREAM_VALUE)
public Flux<String> generateStreamAsString(@RequestParam(value = "message", defaultValue = "讲个笑话") String message) {
    Flux<String> content = this.chatClient.prompt()
            .user(message)
            .system(promptSystemSpec -> promptSystemSpec.param("current_date", LocalDate.now().toString()))
            .stream()
            .content();
    return content.concatWith(Flux.just("[complete]"));
}
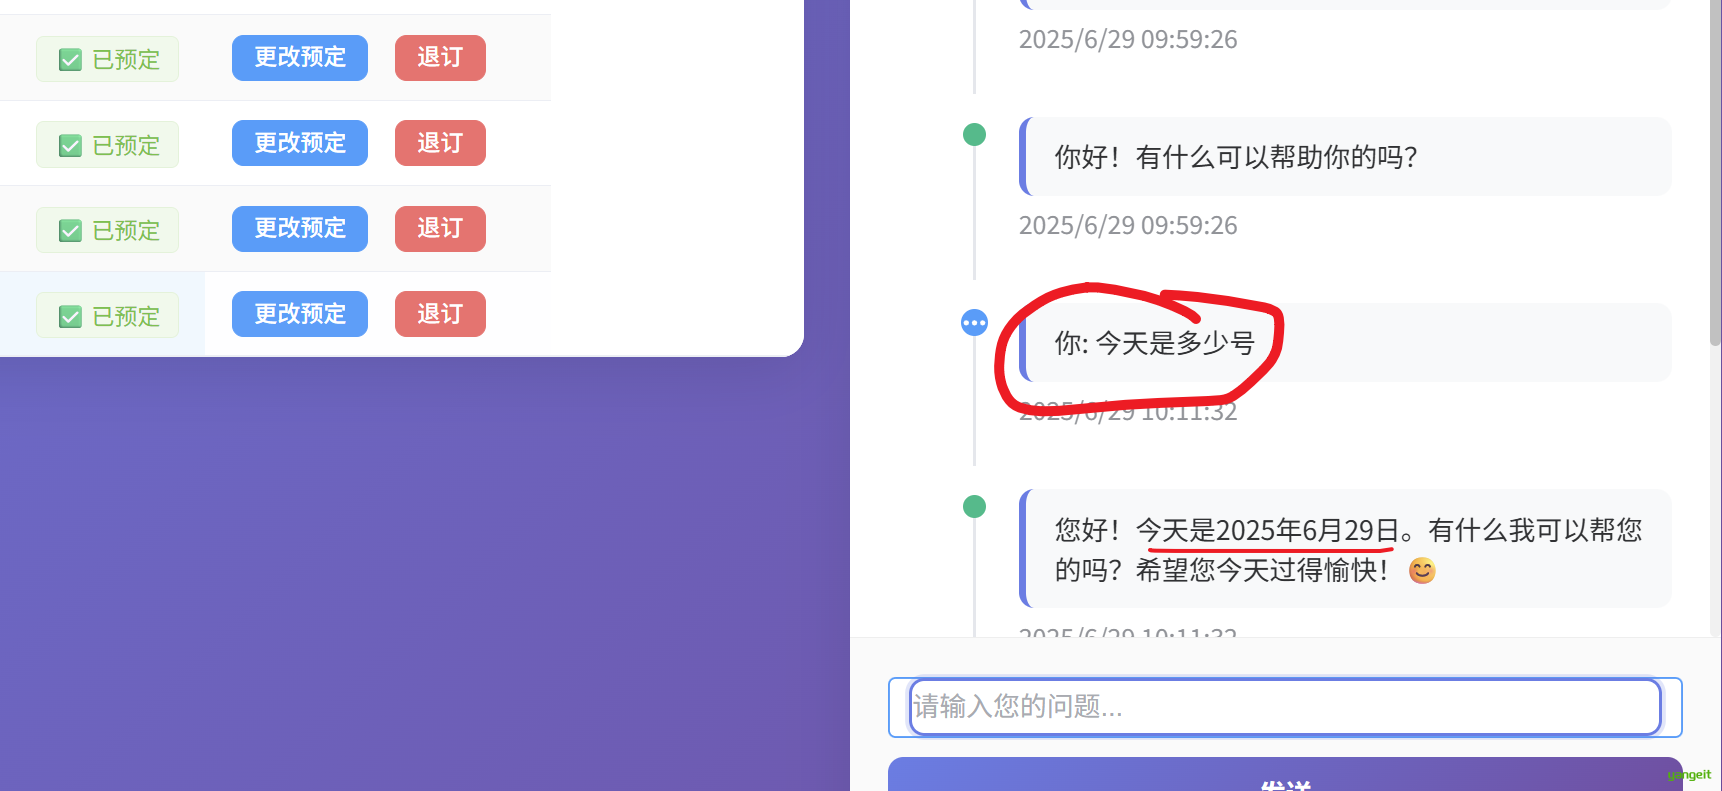
你可以在设置时间的代码中减去1天,然后再问他,观察是否有变化
好,至此,我们了解了角色设置和角色设置字符串中的变量设置
总结
课堂作业
- 参考上述讲义,完成角色设置,10分钟🎤
1.6. 对话记忆
前言
接下来完成对话记忆功能,这个功能呢,就是当用户跟我们对话的时候,我们记录下用户说的话,然后当用户再次跟我们对话的时候,我们就可以根据用户之前说的话,来做出相应的反应。
首先我们来看下,没有设置会话记忆的情况,我们先来测试一下,看看效果:
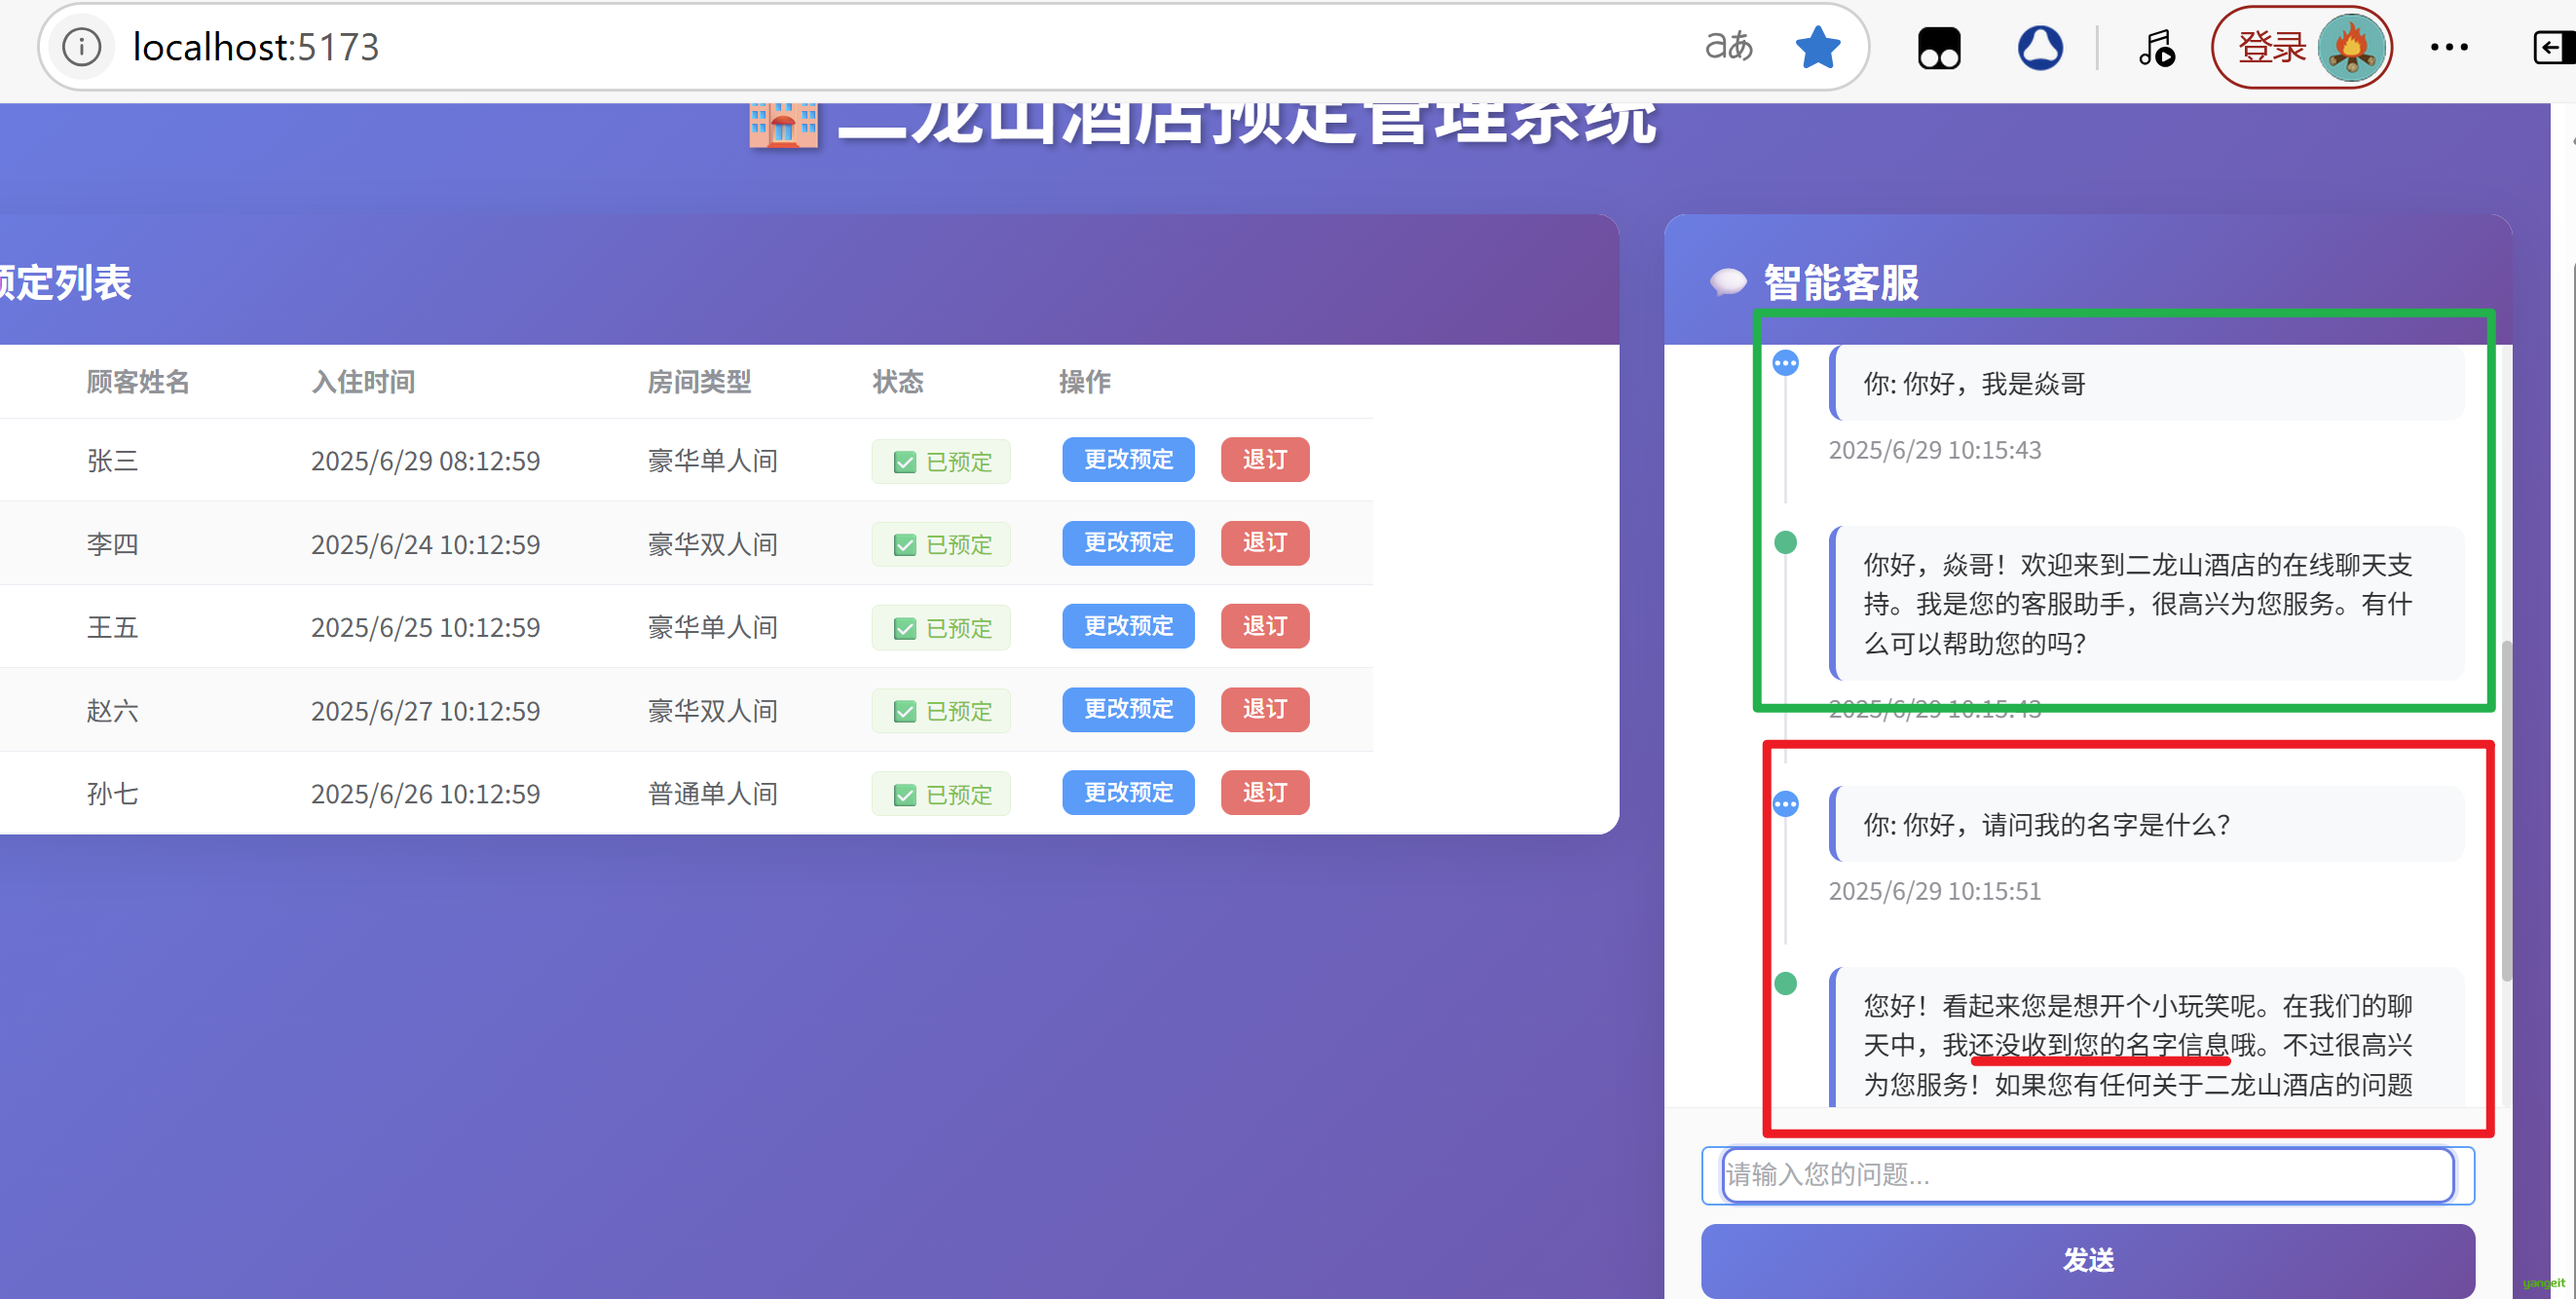
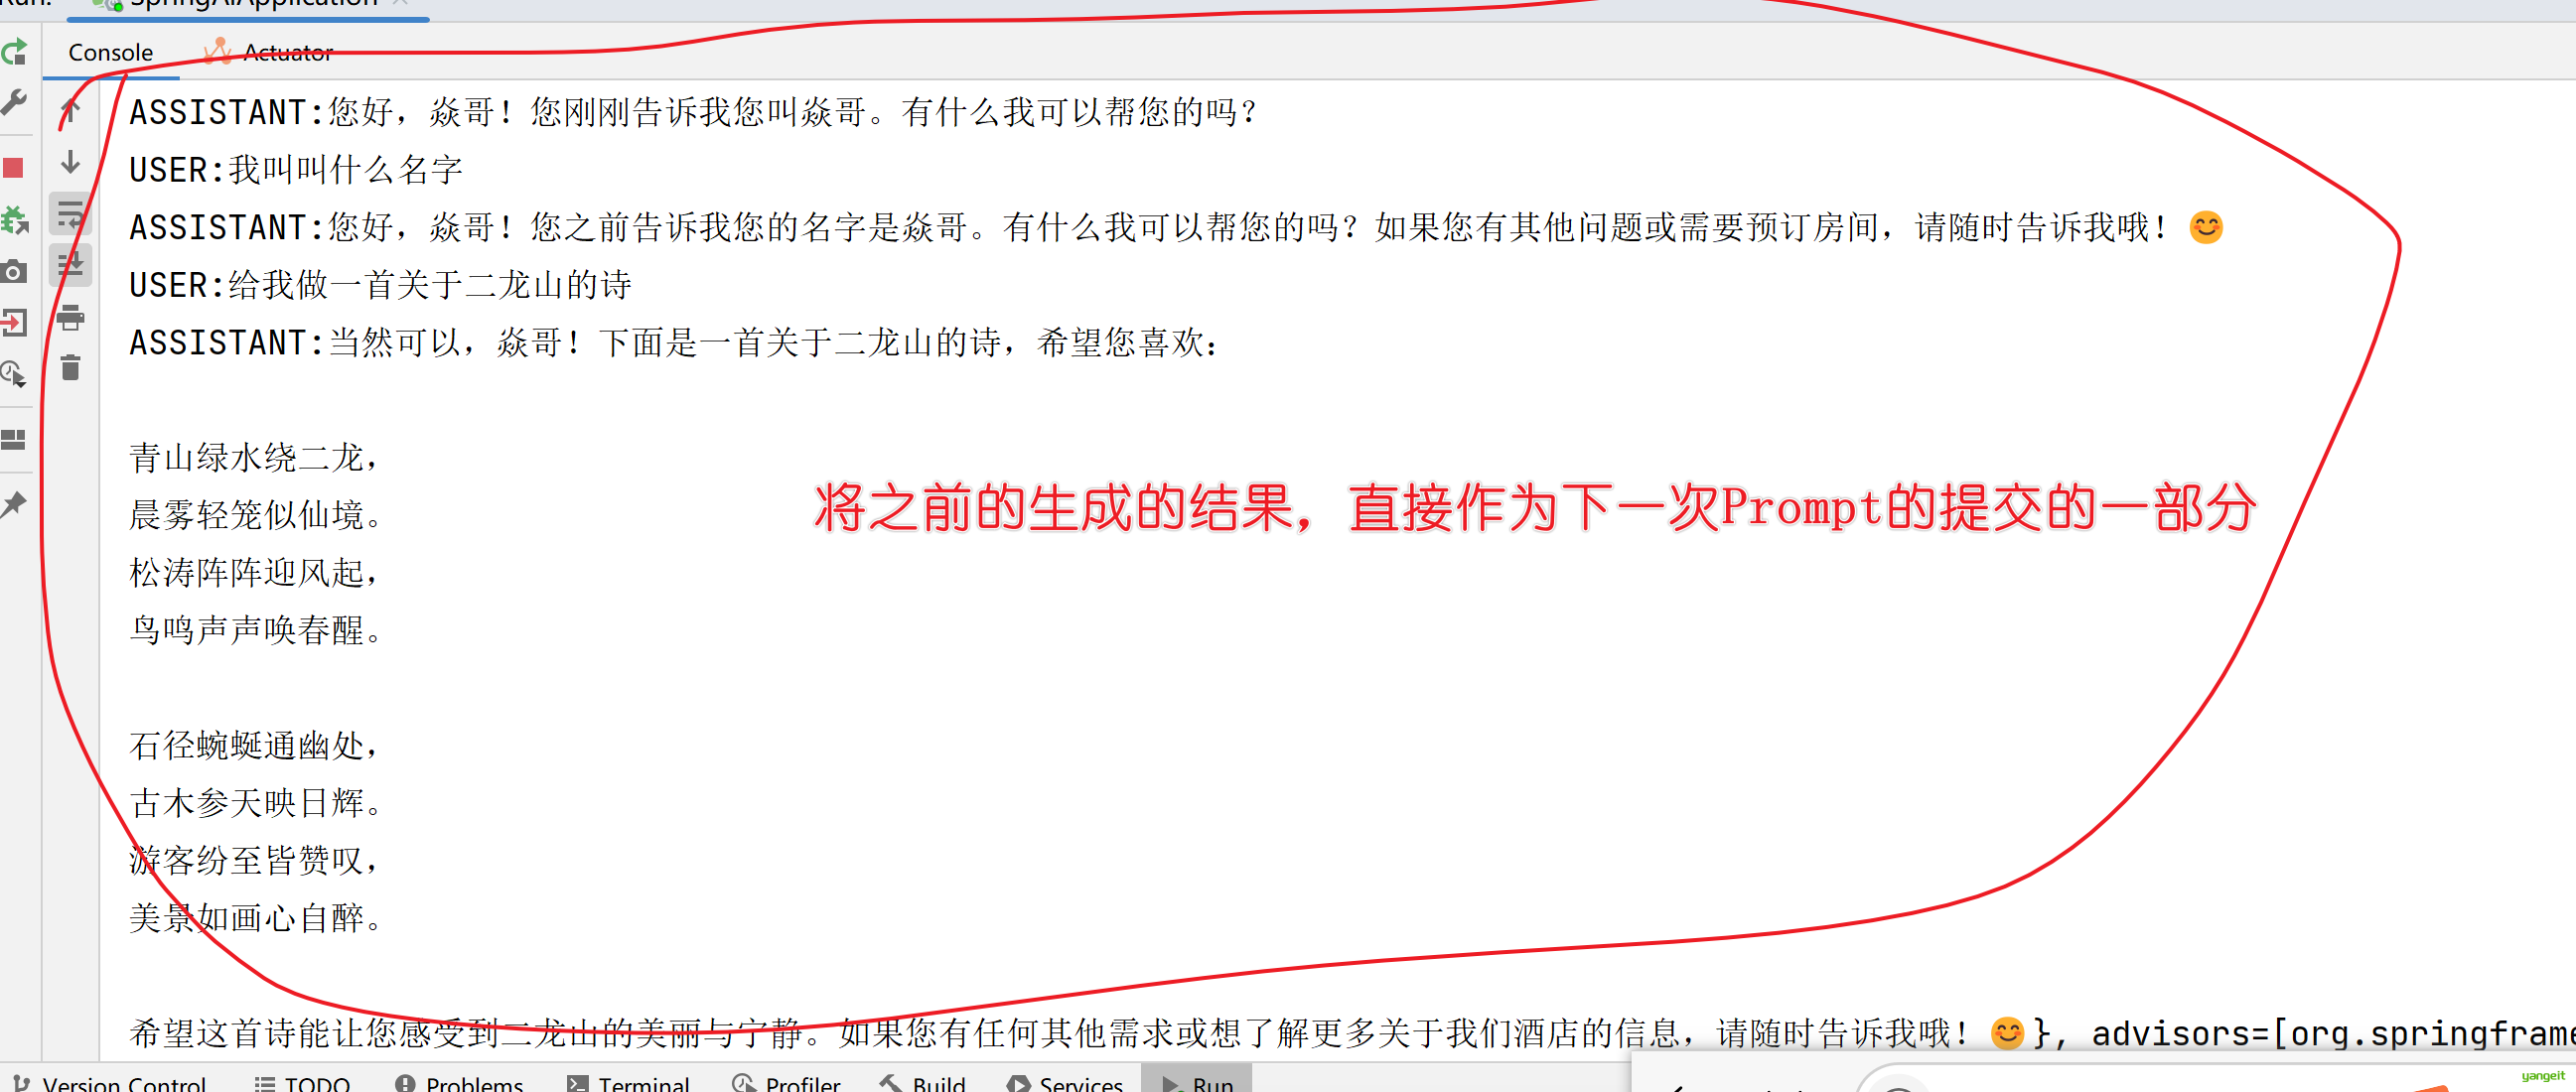
可以看到,我们每次跟二龙山酒店聊天,我告诉他的名字,但是他每次都记不住,所以我们需要设置会话记忆,让他记住我们跟他的对话。
接下来我们来设置记忆,其实很简单,就是创建一个容器将我们跟他的对话记录下来,然后每次我们跟二龙山酒店聊天,我们先去容器中查找,如果找到了,就直接使用,如果没有找到,就使用默认的回复。
- 第一步 ,在配置类中,配置一个ChatMemory的bean ,这里为了方便我们在Application启动类中配置
@SpringBootApplication
public class SpringAiApplication {

    public static void main(String[] args) {
        SpringApplication.run(SpringAiApplication.class, args);
        System.out.println("启动成功");
    }


    @Bean
    public ChatMemory chatMemory(){
        return new InMemoryChatMemory();
    }
}
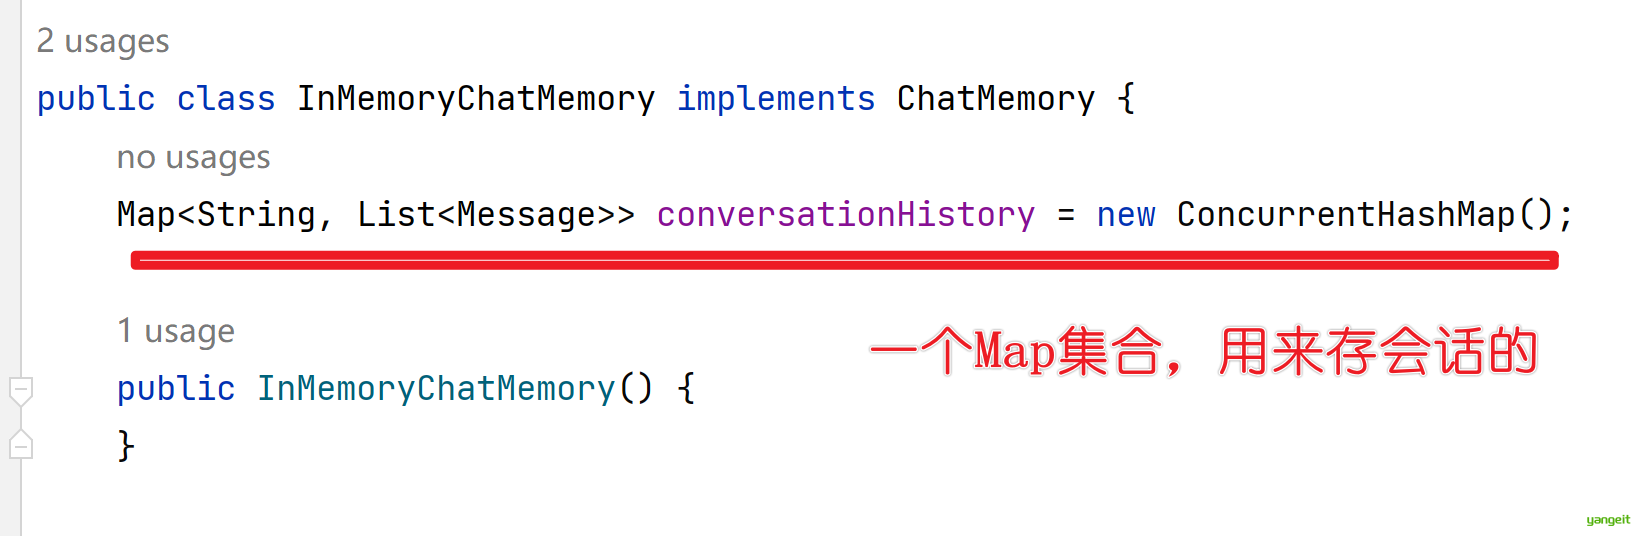
InMemoryChatMemory是一个内存中的会话记忆,当然你也可以使用redis,mysql等数据库来存储会话记忆,这里为了方便,我们使用内存中的会话记忆。
打开InMemoryChatMemory的源码,可以看到,它是一个Map,key是用户id,value是用户跟二龙山酒店聊天的内容
- 第二步 ,在ChatClient中设置会话记忆 在OpenAiController构造方法中设置一个拦截器,在拦截器中注入ChatMemory对象
- 第三步 ,在方法中设置会议记忆次数,其实就是Map的尺寸
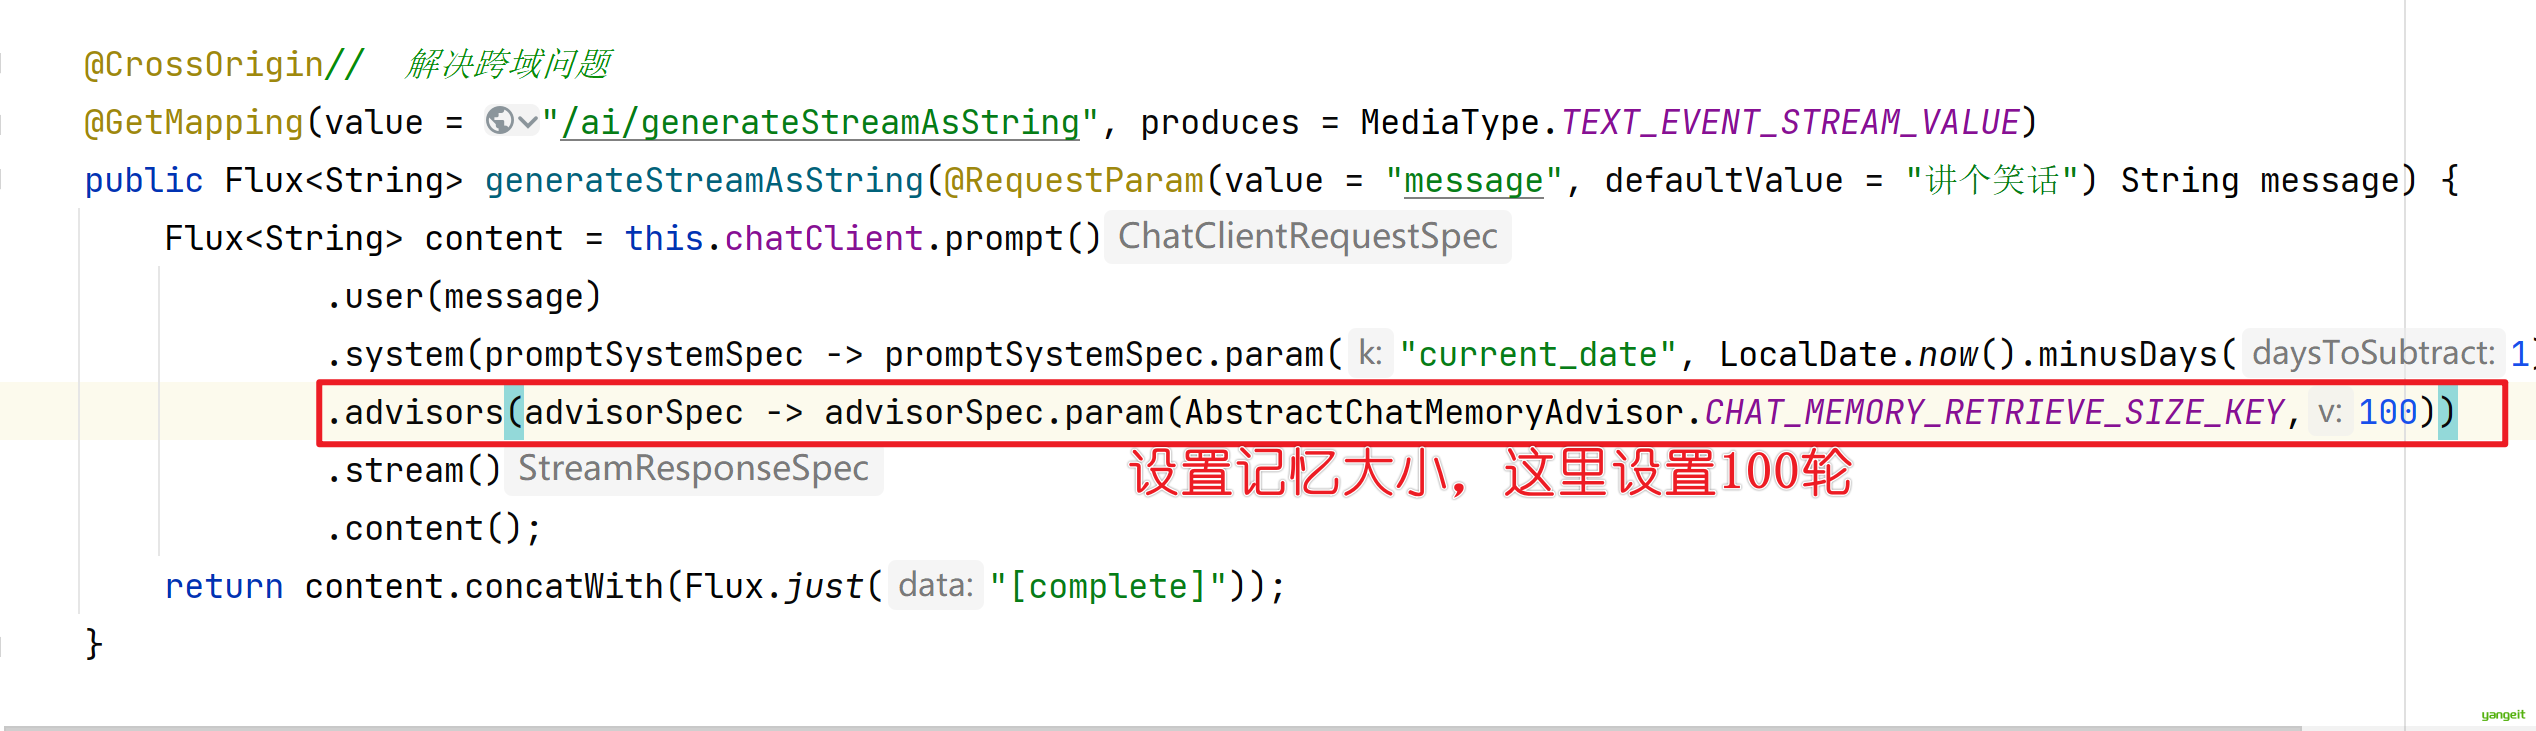
测试一下: 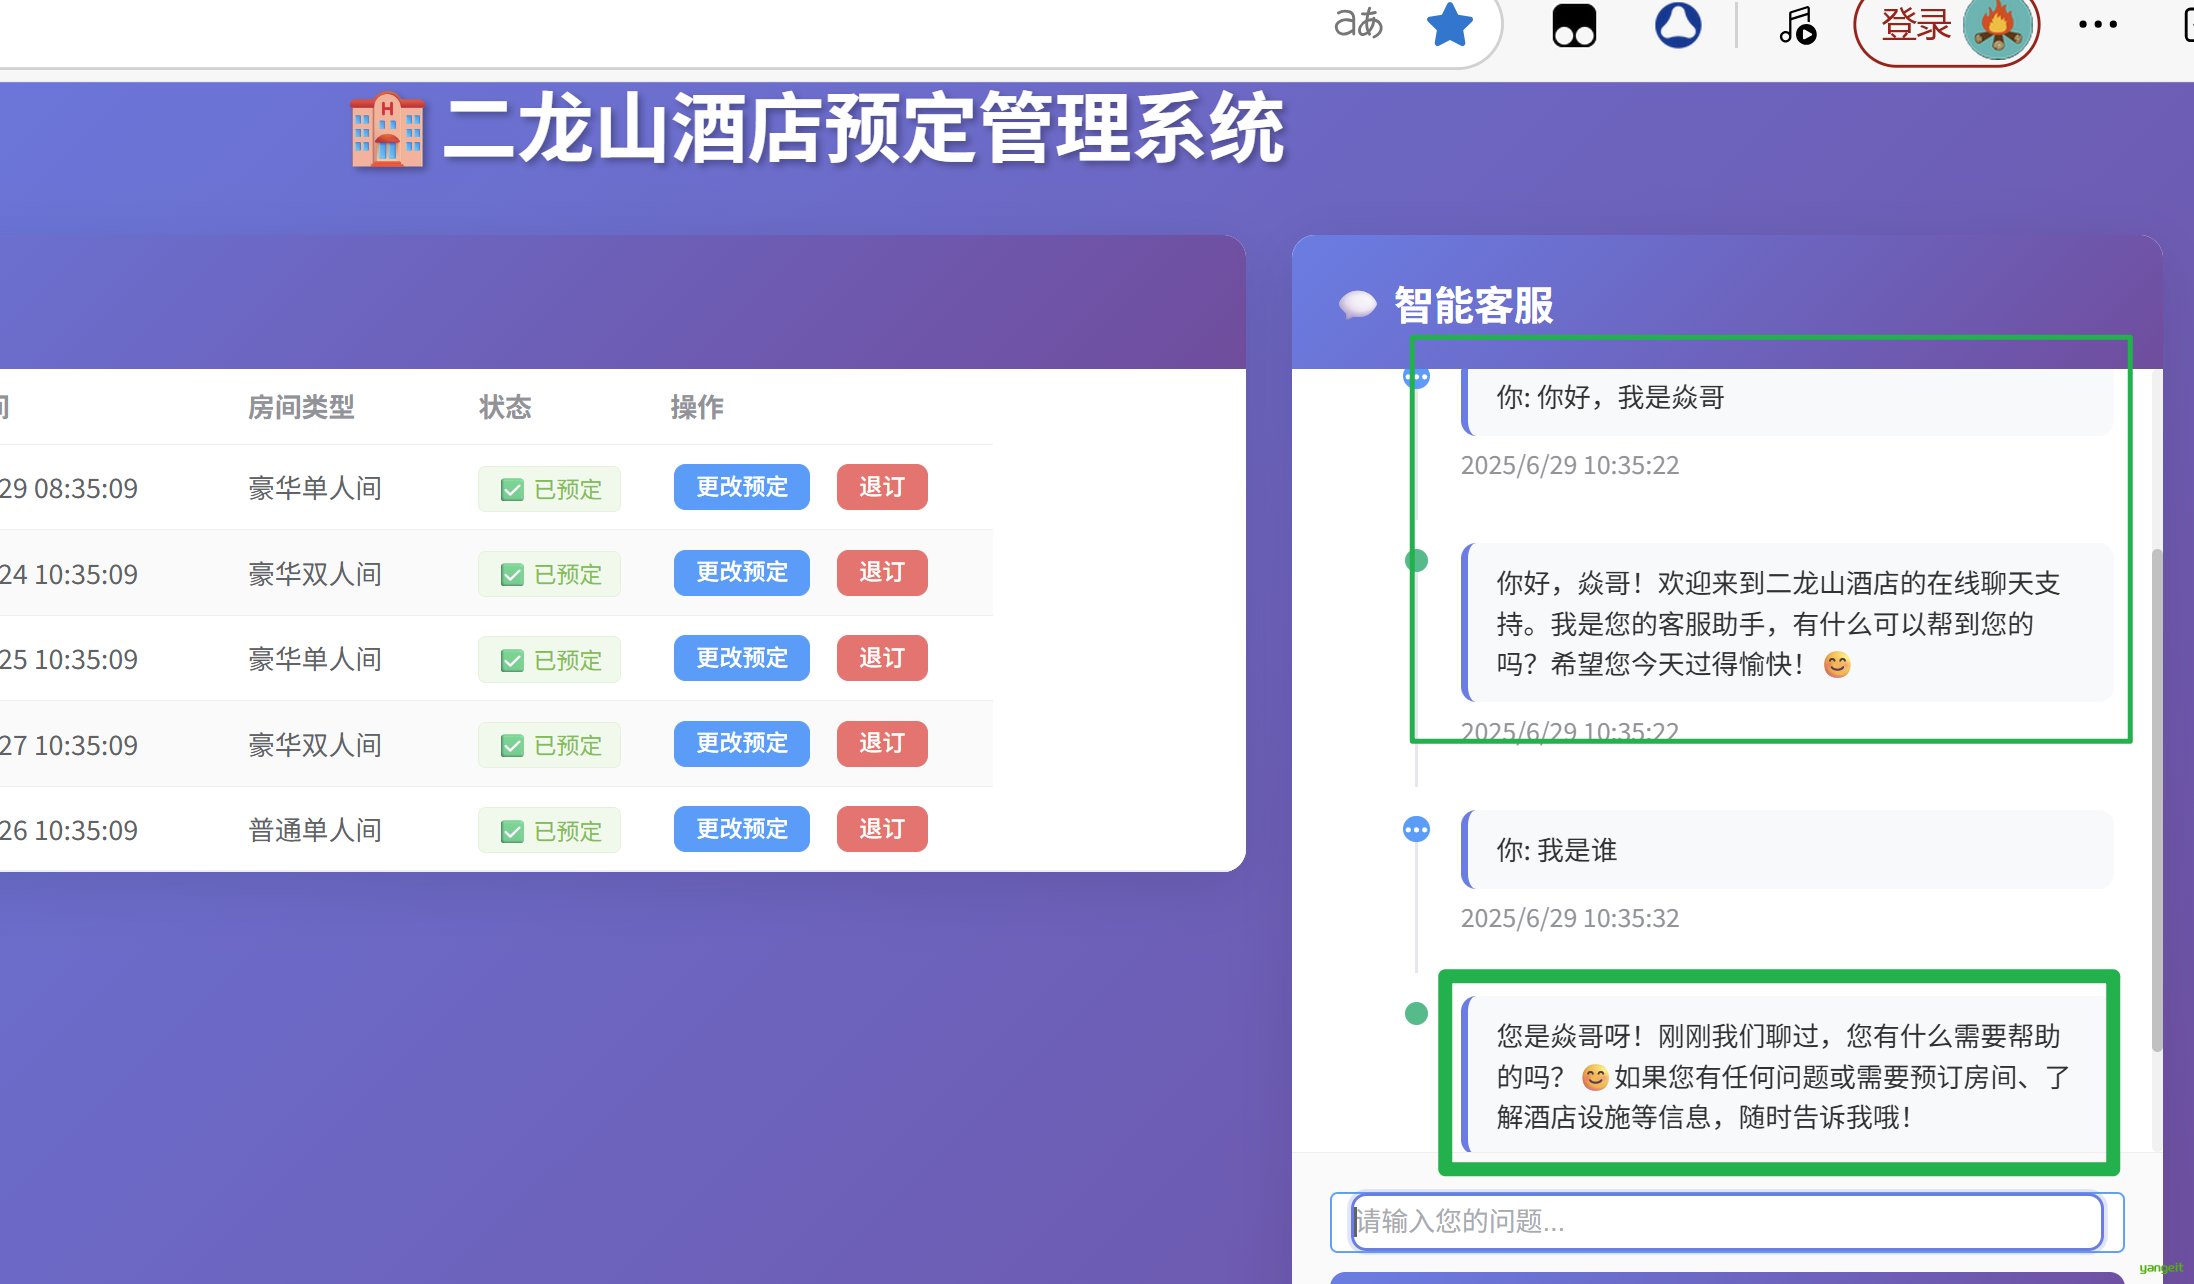
至此,我们完成了会话记忆的设置,本案例的记忆是存在内存中的,当项目重启或者关闭后,记忆就不存在了,如果想要持久化,可以使用redis,mysql等数据库。
1.7. 日志记录
前言
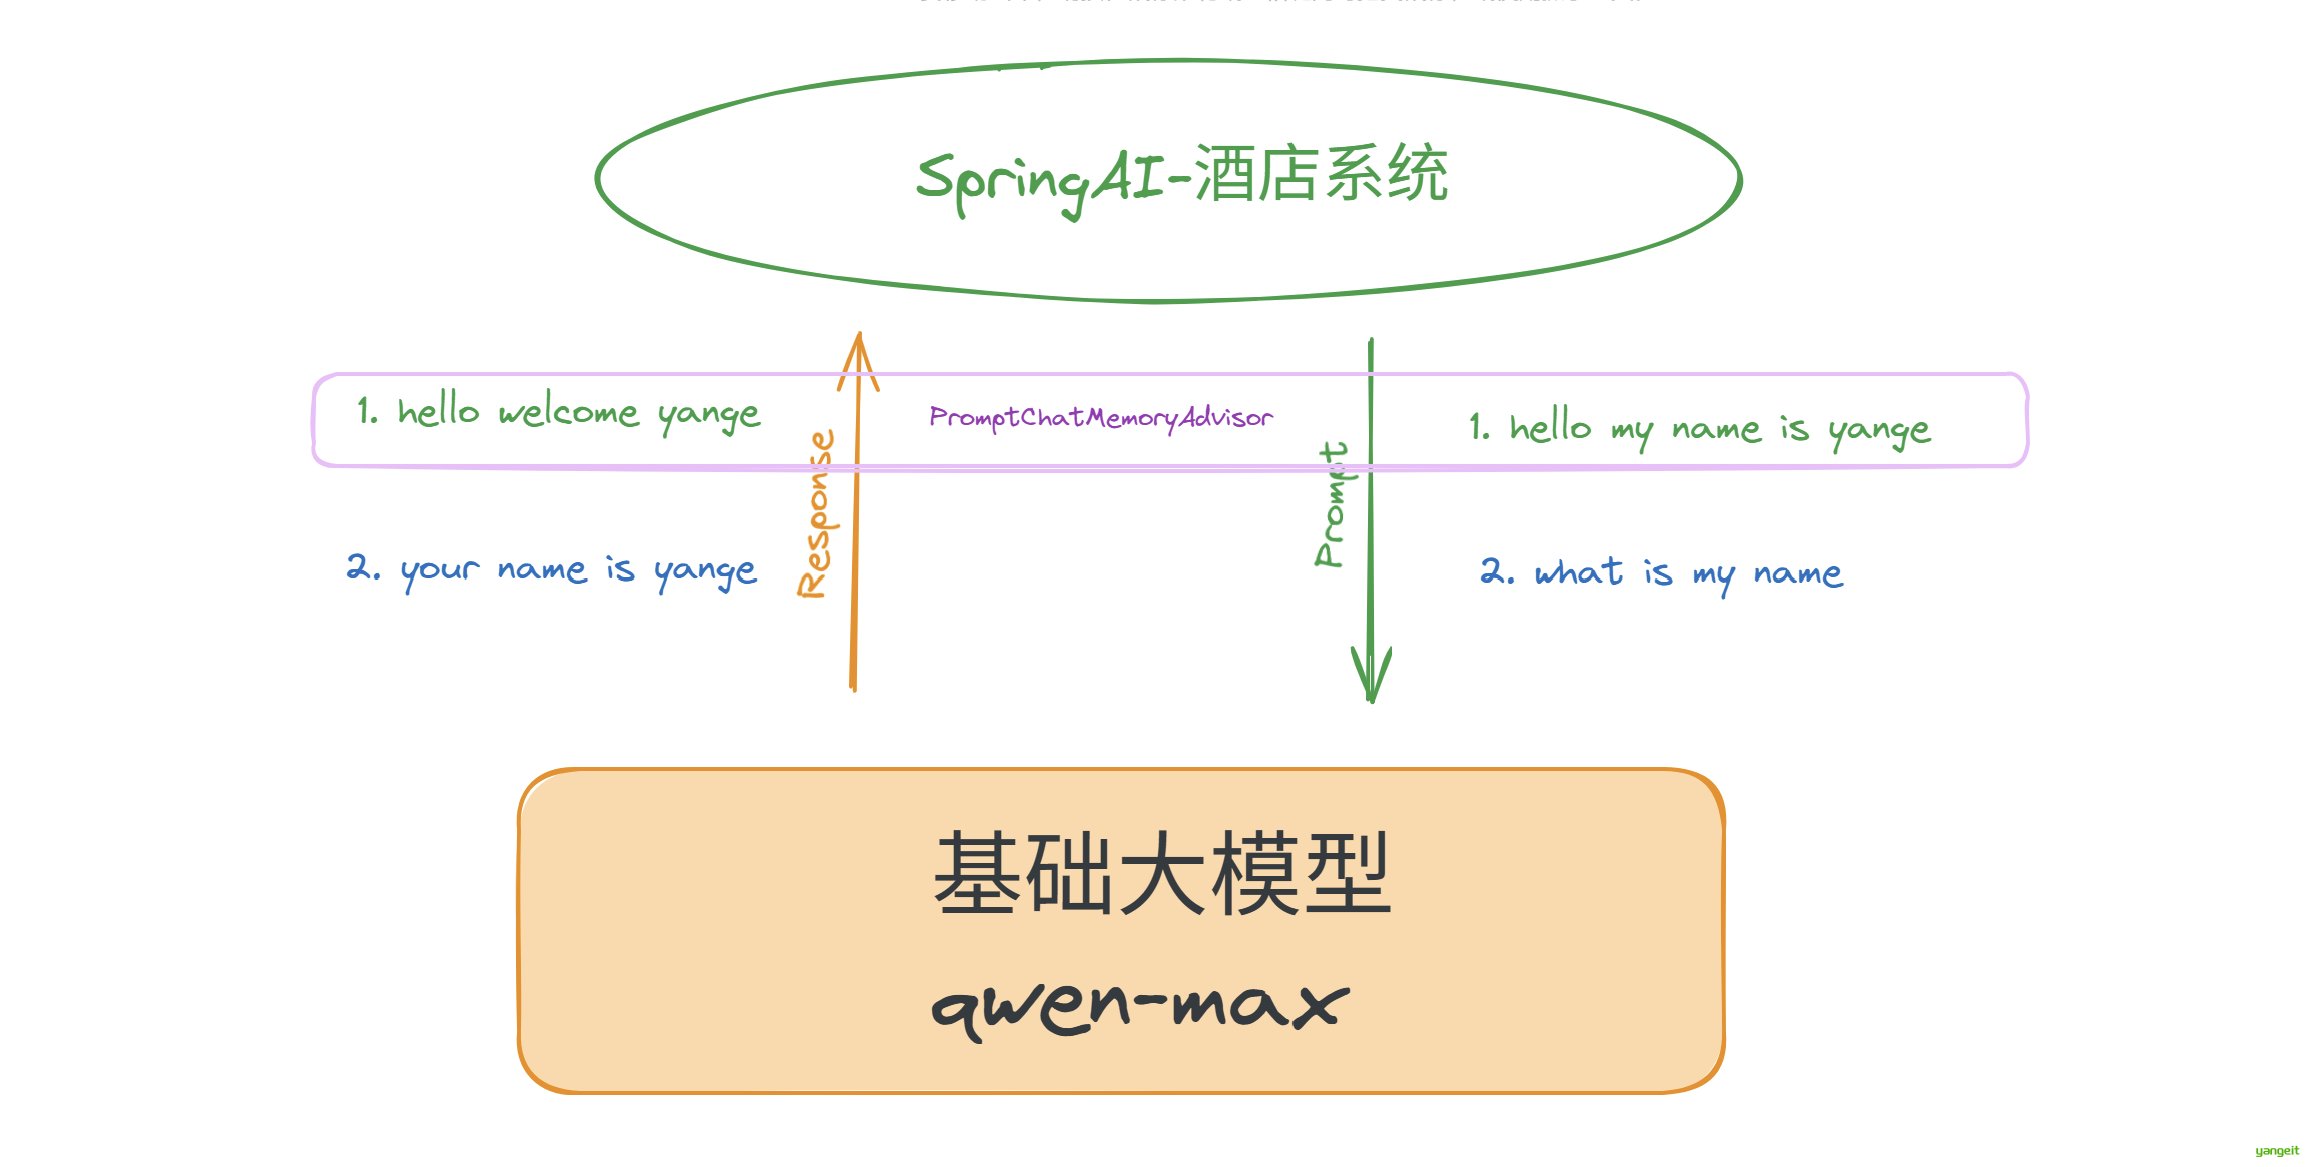
前面我们完成了会话记忆,那他核心原理是什么呢?就是将我们跟他的对话记录下来,然后当用户再次跟我们对话的时候,我们就可以根据用户之前说的话,来做出相应的反应。接下来我们在项目中集成日志功能,然后通过观察日志,我们来了解会话记忆的原理。
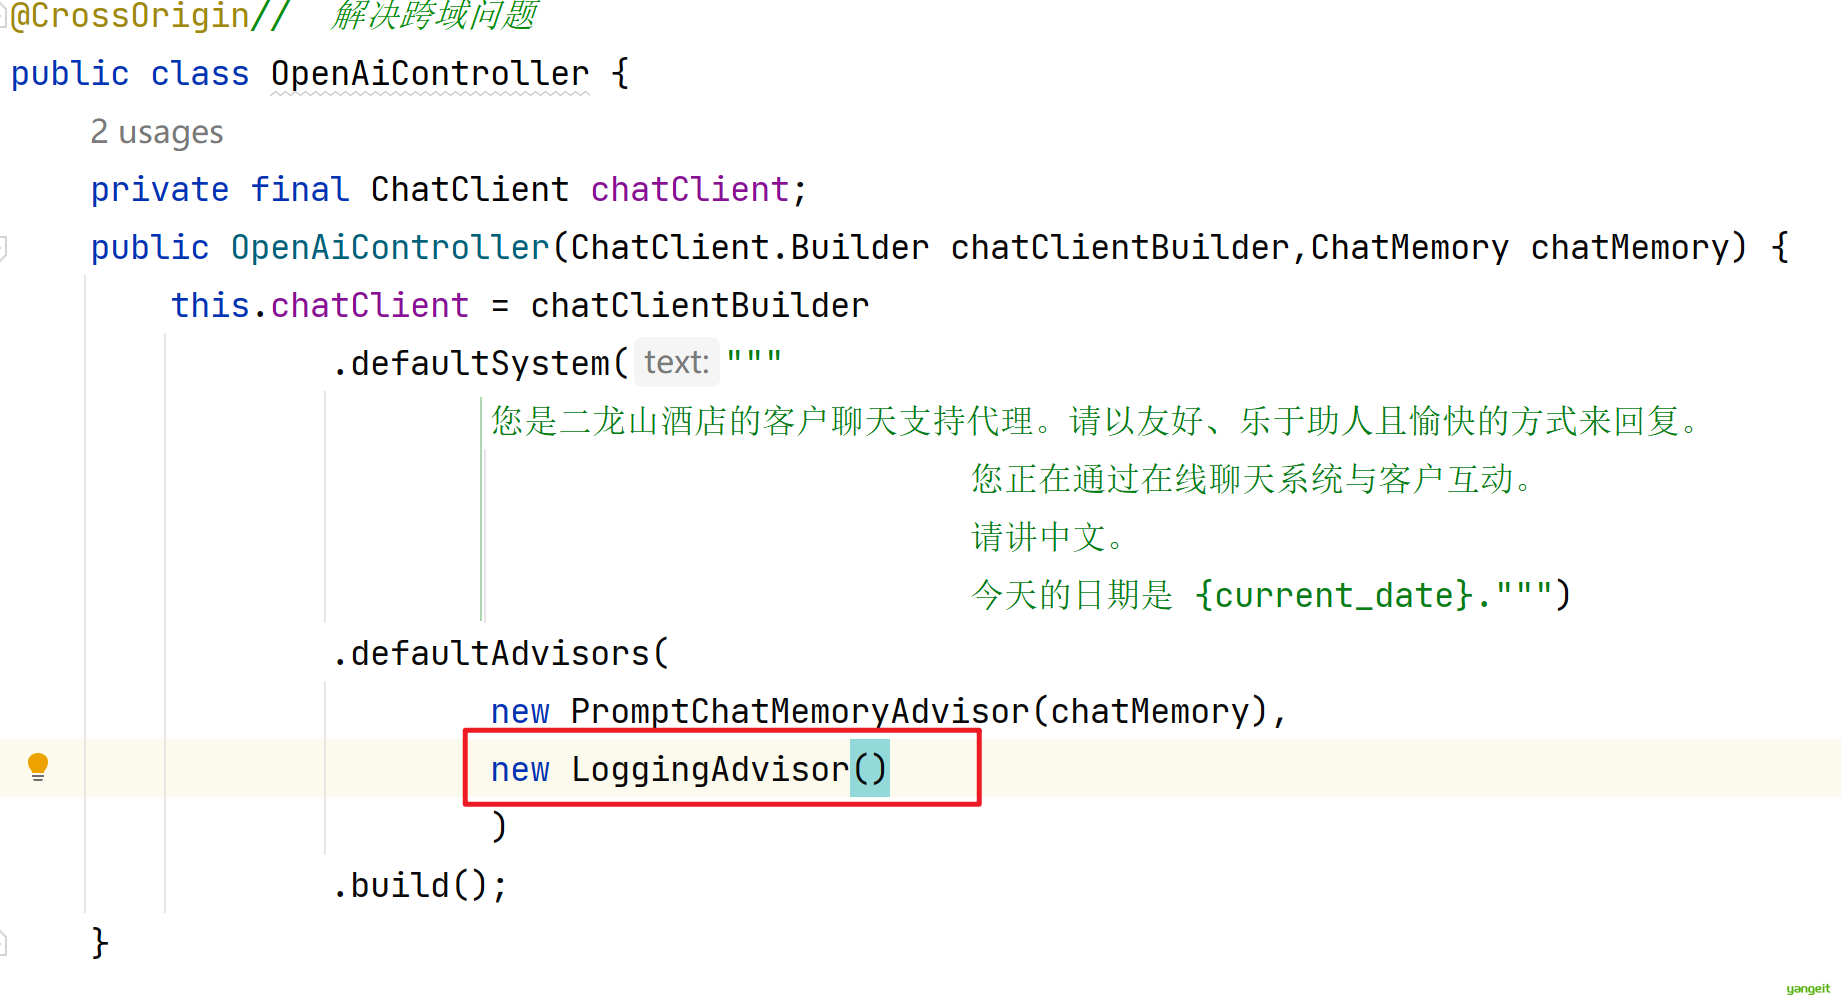
首先,在config包下创建LoggingAdvisor类,实现RequestResponseAdvisor接口,重写adviseRequest方法,打印请求信息
public class LoggingAdvisor implements RequestResponseAdvisor {

    @Override
    public AdvisedRequest adviseRequest(AdvisedRequest request, Map<String, Object> context) {
        System.out.println("Request"+request);
        return request;
    }
}
然后 在OpenAiController构造方法中设置一个拦截器,在defaultAdvisors中注入LoggingAdvisor对象
最后 ,重启项目,对话,观察idea的控制台信息,可以看到,每次对话,都会打印出请求信息,其中包含了我们跟他的对话内容,这就是会话记忆的原理。
总结
课堂作业
- 根据上面的内容,完成会话记忆和日志记录的功能,理解会话记忆的原理
- 通过观察日志,了解会话记忆的原理,10分钟🎤