Mybatis操作
Mybatis操作
1.Mybatis基础操作
需求说明:
- 根据资料中提供的《tlias智能学习辅助系统》页面原型及需求,完成员工管理的需求开发。
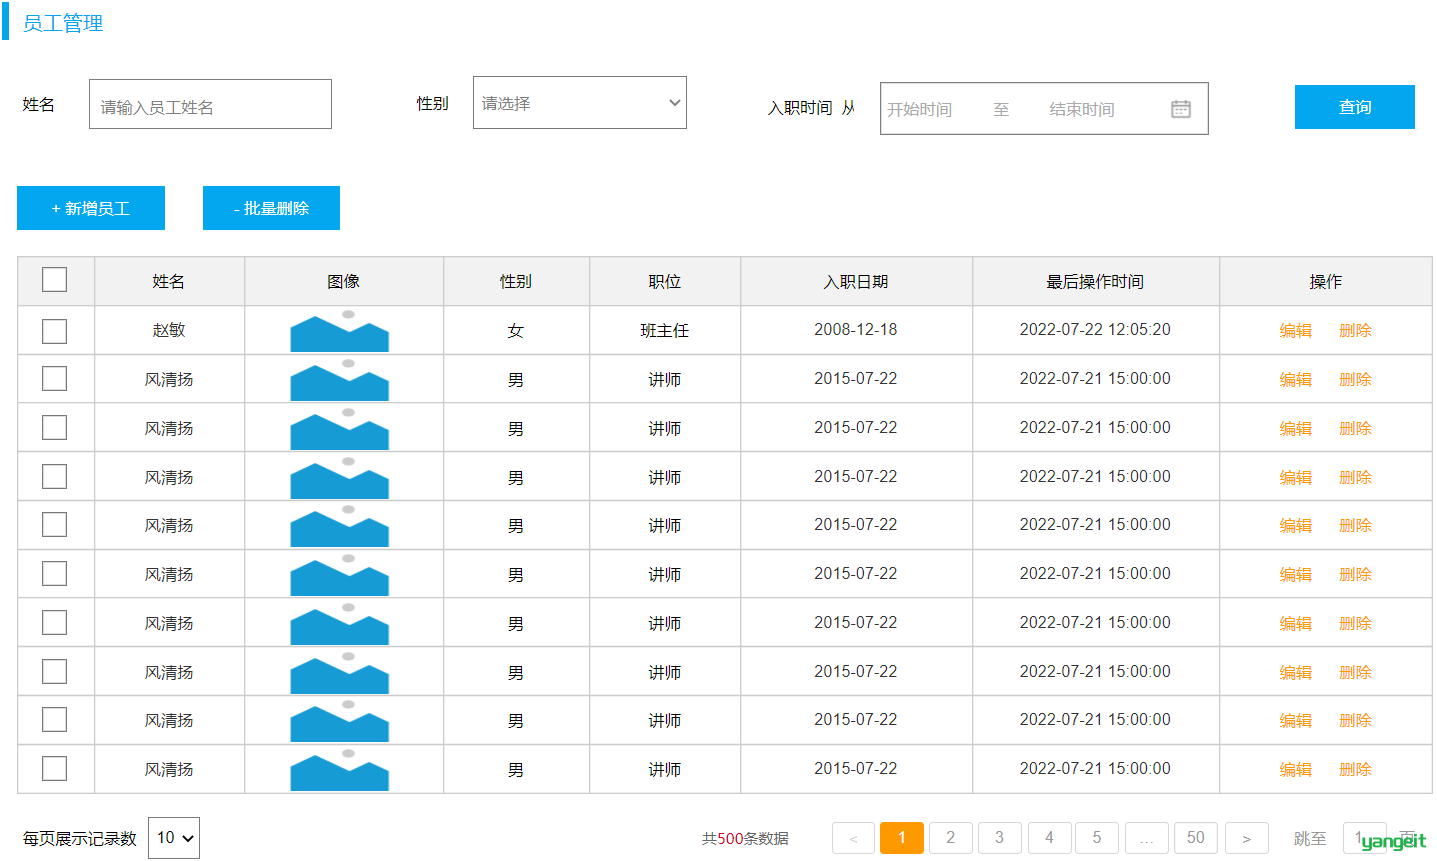
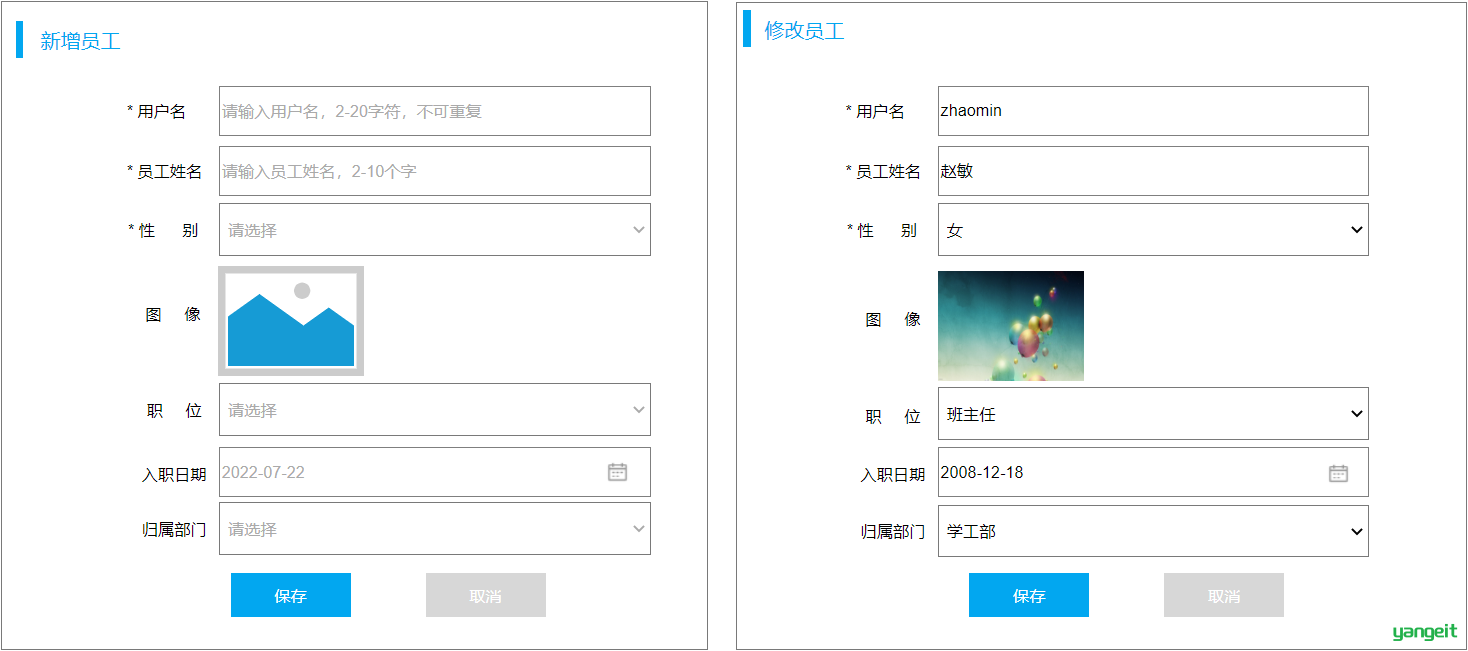

功能列表
- 查询
- 根据主键ID查询
- 条件查询
- 新增
- 更新
- 删除
- 根据主键ID删除
- 根据主键ID批量删除
实施前的准备工作
- 准备数据库表
- 创建一个新的springboot工程,选择引入对应的起步依赖(mybatis、mysql驱动、lombok)
- application.properties中引入数据库连接信息
- 创建对应的实体类 Emp(实体类属性采用驼峰命名)
- 准备Mapper接口 EmpMapper
点击查看准备数据库表
-- 部门管理
create table dept
(
    id          int unsigned primary key auto_increment comment '主键ID',
    name        varchar(10) not null unique comment '部门名称',
    create_time datetime    not null comment '创建时间',
    update_time datetime    not null comment '修改时间'
) comment '部门表';
-- 部门表测试数据
insert into dept (id, name, create_time, update_time)
values (1, '学工部', now(), now()),
       (2, '教研部', now(), now()),
       (3, '咨询部', now(), now()),
       (4, '就业部', now(), now()),
       (5, '人事部', now(), now());


-- 员工管理
create table emp
(
    id          int unsigned primary key auto_increment comment 'ID',
    username    varchar(20)      not null unique comment '用户名',
    password    varchar(32) default '123456' comment '密码',
    name        varchar(10)      not null comment '姓名',
    gender      tinyint unsigned not null comment '性别, 说明: 1 男, 2 女',
    image       varchar(300) comment '图像',
    job         tinyint unsigned comment '职位, 说明: 1 班主任,2 讲师, 3 学工主管, 4 教研主管, 5 咨询师',
    entrydate   date comment '入职时间',
    dept_id     int unsigned comment '部门ID',
    create_time datetime         not null comment '创建时间',
    update_time datetime         not null comment '修改时间'
) comment '员工表';
-- 员工表测试数据
INSERT INTO emp (id, username, password, name, gender, image, job, entrydate, dept_id, create_time, update_time)
VALUES
(1, 'jinyong', '123456', '金庸', 1, '1.jpg', 4, '2000-01-01', 2, now(), now()),
(2, 'zhangwuji', '123456', '张无忌', 1, '2.jpg', 2, '2015-01-01', 2, now(), now()),
(3, 'yangxiao', '123456', '杨逍', 1, '3.jpg', 2, '2008-05-01', 2, now(), now()),
(4, 'weiyixiao', '123456', '韦一笑', 1, '4.jpg', 2, '2007-01-01', 2, now(), now()),
(5, 'changyuchun', '123456', '常遇春', 1, '5.jpg', 2, '2012-12-05', 2, now(), now()),
(6, 'xiaozhao', '123456', '小昭', 2, '6.jpg', 3, '2013-09-05', 1, now(), now()),
(7, 'jixiaofu', '123456', '纪晓芙', 2, '7.jpg', 1, '2005-08-01', 1, now(), now()),
(8, 'zhouzhiruo', '123456', '周芷若', 2, '8.jpg', 1, '2014-11-09', 1, now(), now()),
(9, 'dingminjun', '123456', '丁敏君', 2, '9.jpg', 1, '2011-03-11', 1, now(), now()),
(10, 'zhaomin', '123456', '赵敏', 2, '10.jpg', 1, '2013-09-05', 1, now(), now()),
(11, 'luzhangke', '123456', '鹿杖客', 1, '11.jpg', 5, '2007-02-01', 3, now(), now()),
(12, 'hebiweng', '123456', '鹤笔翁', 1, '12.jpg', 5, '2008-08-18', 3, now(), now()),
(13, 'fangdongbai', '123456', '方东白', 1, '13.jpg', 5, '2012-11-01', 3, now(), now()),
(14, 'zhangsanfeng', '123456', '张三丰', 1, '14.jpg', 2, '2002-08-01', 2, now(), now()),
(15, 'yulianzhou', '123456', '俞莲舟', 1, '15.jpg', 2, '2011-05-01', 2, now(), now()),
(16, 'songyuanqiao', '123456', '宋远桥', 1, '16.jpg', 2, '2010-01-01', 2, now(), now()),
(17, 'chenyouliang', '123456', '陈友谅', 1, '17.jpg', NULL, '2015-03-21', NULL, now(), now());
点击查看新的springbootDemo工程
创建一个新的springboot工程,选择引入对应的起步依赖(mybatis、mysql驱动、lombok)
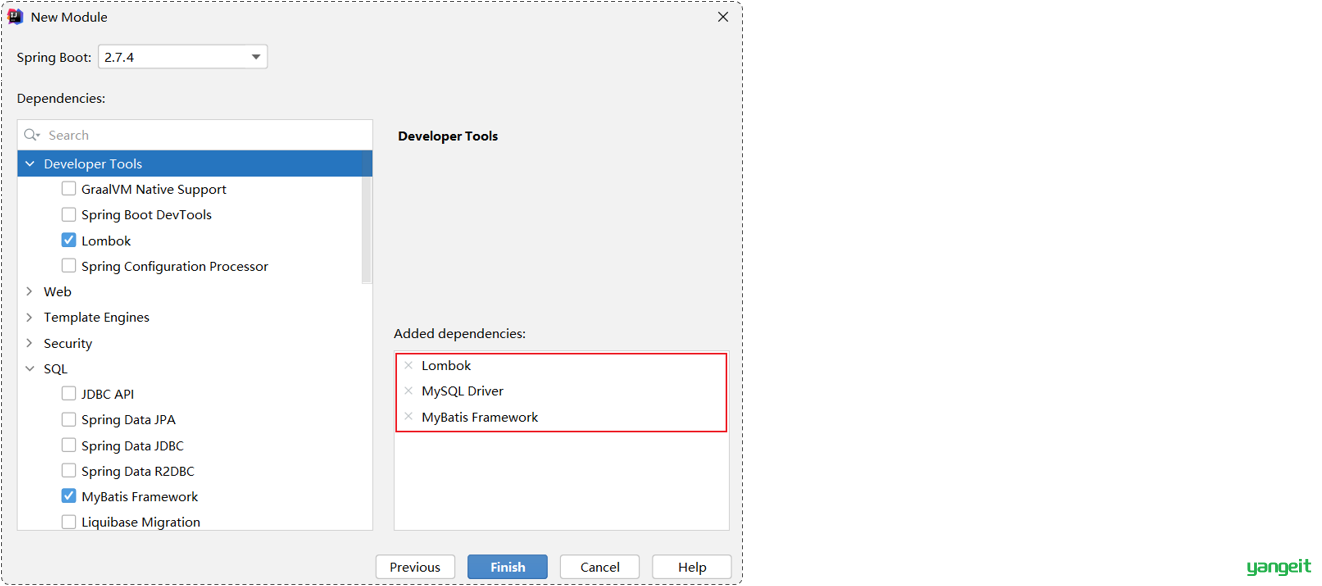
application.properties中引入数据库连接信息
提示:可以把之前项目中已有的配置信息复制过来即可
#驱动类名称
spring.datasource.driver-class-name=com.mysql.cj.jdbc.Driver
#数据库连接的url
spring.datasource.url=jdbc:mysql://localhost:3306/mybatis
#连接数据库的用户名
spring.datasource.username=root
#连接数据库的密码
spring.datasource.password=1234
创建对应的实体类Emp(实体类属性采用驼峰命名)
@Data
@NoArgsConstructor
@AllArgsConstructor
public class Emp {
    private Integer id;
    private String username;
    private String password;
    private String name;
    private Short gender;
    private String image;
    private Short job;
    private LocalDate entrydate;     //LocalDate类型对应数据表中的date类型
    private Integer deptId;
    private LocalDateTime createTime;//LocalDateTime类型对应数据表中的datetime类型
    private LocalDateTime updateTime;
}
准备Mapper接口:EmpMapper
/*@Mapper注解:表示当前接口为mybatis中的Mapper接口
  程序运行时会自动创建接口的实现类对象(代理对象),并交给Spring的IOC容器管理
*/
@Mapper
public interface EmpMapper {

}
完成以上操作后,项目工程结构目录如下:
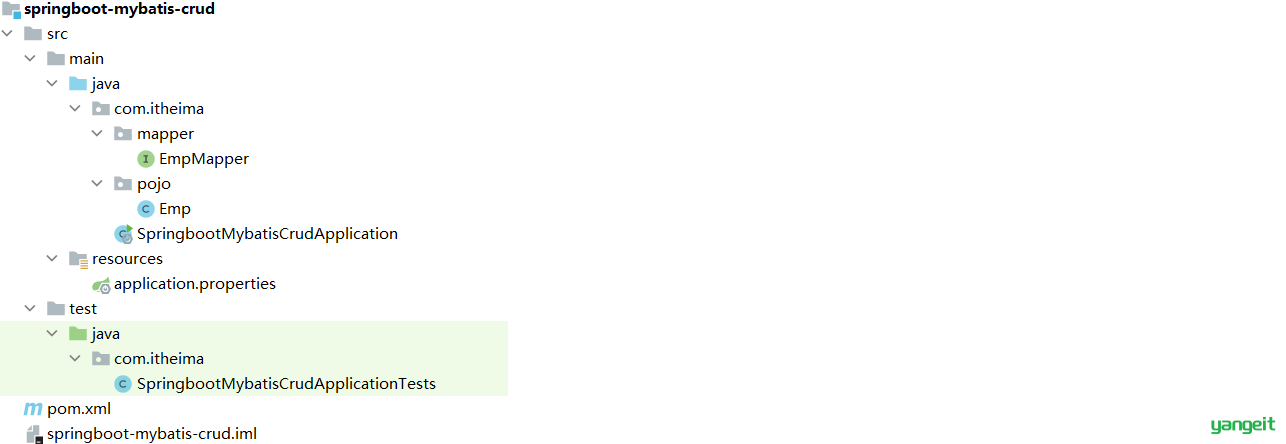
点击查看开启mybatis日志操作
在Mybatis当中我们可以借助日志,查看到sql语句的执行、执行传递的参数以及执行结果。具体操作如下:
打开application.properties文件
开启mybatis的日志,并指定输出到控制台
#指定mybatis输出日志的位置, 输出控制台
mybatis.configuration.log-impl=org.apache.ibatis.logging.stdout.StdOutImpl
开启日志之后,我们再次运行单元测试,可以看到在控制台中,输出了以下的SQL语句信息:

但是我们发现输出的SQL语句:delete from emp where id = ?,我们输入的参数16并没有在后面拼接,id的值是使用?进行占位。那这种SQL语句我们称为预编译SQL。
mybatis日志的作用
在调用方法的时候,很清晰的查看具体执行的sql情况,以及参数情况,方便排错
1️⃣1.1 删除
根据主键删除数据
-- 删除id=17的数据
delete from emp where id = 17;
页面原型:

当我们点击后面的"删除"按钮时,前端页面会给服务端传递一个参数,也就是该行数据的ID。 我们接收到ID后,根据ID删除数据即可。
👉如:localhost:8080/emps?id=1 或者使用路径参数:localhost:8080/emps/1 👈
- 接口方法
@Mapper
public interface EmpMapper {

    //@Delete("delete from emp where id = 17")
    //public void delete();
    //以上delete操作的SQL语句中的id值写成固定的17,就表示只能删除id=17的用户数据
    //SQL语句中的id值不能写成固定数值,需要变为动态的数值
    //解决方案:在delete方法中添加一个参数(用户id),将方法中的参数,传给SQL语句

    /**
     * 根据id删除数据
     * @param id    用户id
     */
    @Delete("delete from emp where id = #{id}")//使用#{key}方式获取方法中的参数值
    public void delete(Integer id);

}
@Delete注解:用于编写delete操作的SQL语句
如果mapper接口方法形参只有一个普通类型的参数,
#{…}里面的属性名可以随便写,如:#{id}、#{value}。但是建议保持名字一致。
- 测试
- 在单元测试类中通过@Autowired注解注入EmpMapper类型对象
@SpringBootTest
class SpringbootMybatisCrudApplicationTests {
    @Autowired //从Spring的IOC容器中,获取类型是EmpMapper的对象并注入
    private EmpMapper empMapper;
    @Test
    public void testDel(){
        //调用删除方法
        empMapper.delete(16);
    }
}
点击查看预编译SQL
1.3.3.1 介绍
预编译SQL有两个优势:
- 性能更高
- 更安全(防止SQL注入)

性能更高:预编译SQL,编译一次之后会将编译后的SQL语句缓存起来,后面再次执行这条语句时,不会再次编译。(只是输入的参数不同)
更安全(防止SQL注入):将敏感字进行转义,保障SQL的安全性。
点击查看SQL注入
1.3.3.2 SQL注入
SQL注入:是通过操作输入的数据来修改事先定义好的SQL语句,以达到执行代码对服务器进行攻击的方法。
由于没有对用户输入进行充分检查,而SQL又是拼接而成,在用户输入参数时,在参数中添加一些SQL关键字,达到改变SQL运行结果的目的,也可以完成恶意攻击。
测试1:使用资料中提供的程序,来验证SQL注入问题

第1步:进入到DOS


第2步:执行以下命令,启动程序
#启动存在SQL注入的程序
java -jar sql_Injection_demo-0.0.1-SNAPSHOT.jar

第3步:打开浏览器输入http://localhost:9090/login.html
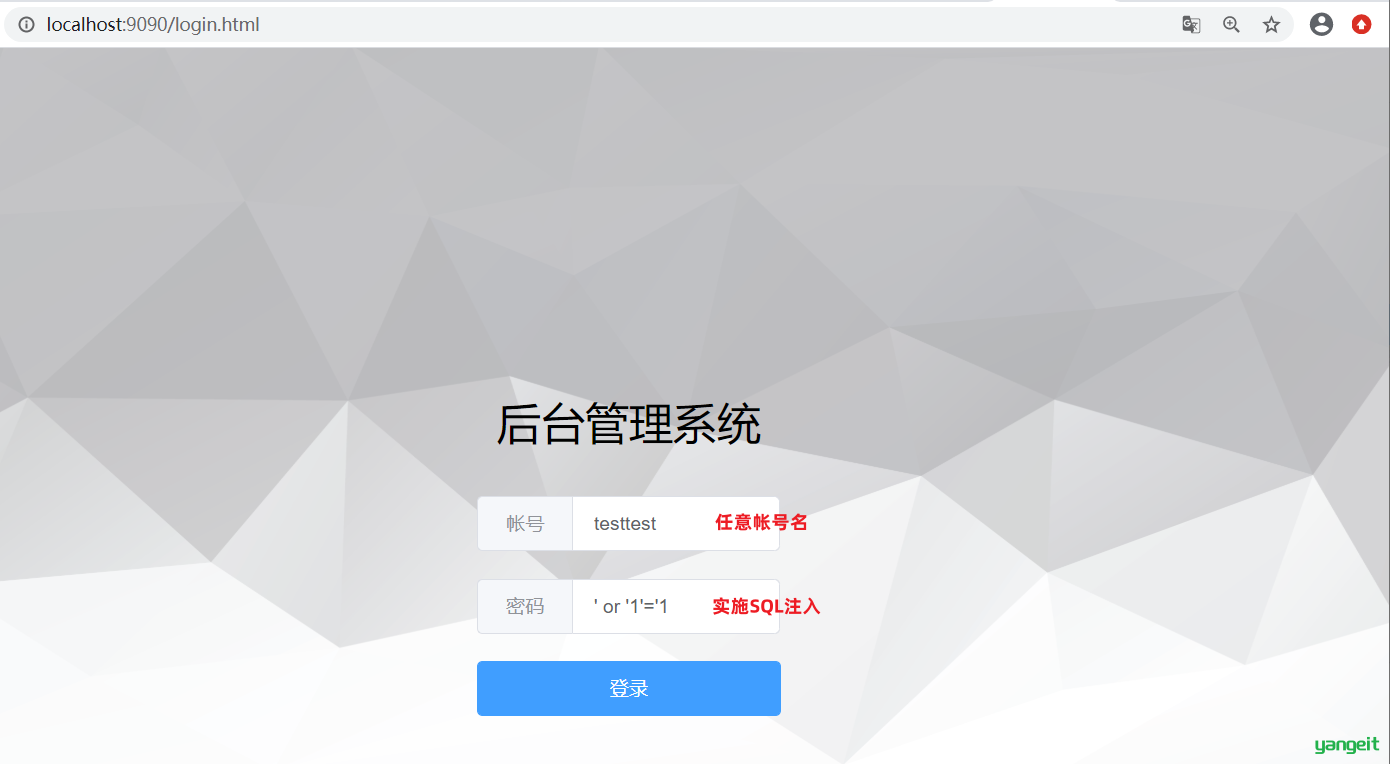
发现竟然能够登录成功:
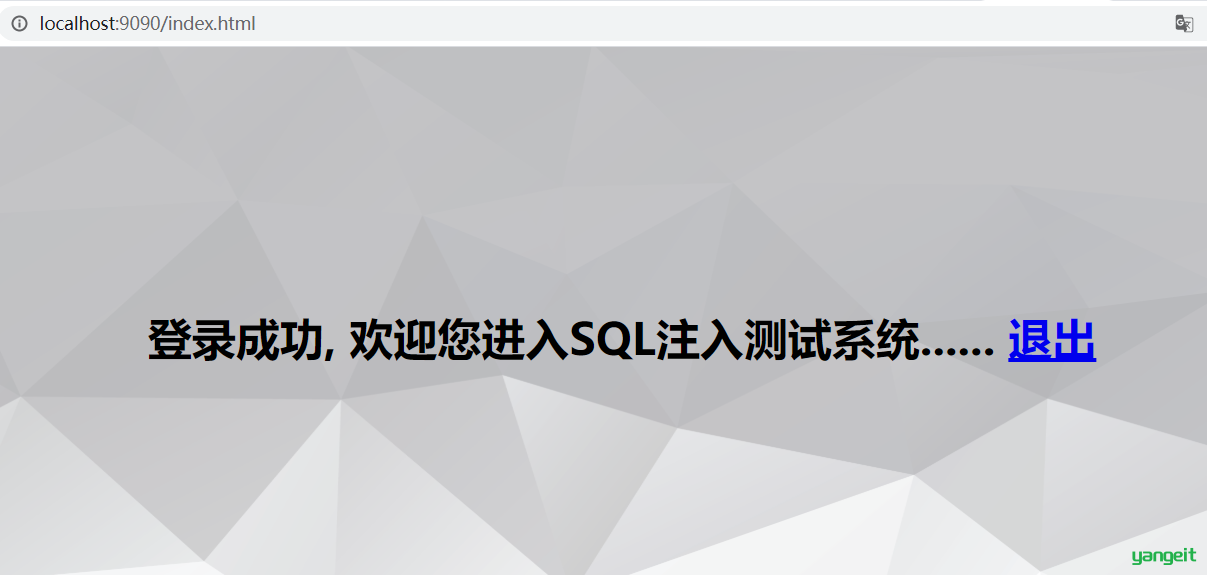
以上操作为什么能够登录成功呢?
- 由于没有对用户输入内容进行充分检查,而SQL又是字符串拼接方式而成,在用户输入参数时,在参数中添加一些SQL关键字,达到改变SQL运行结果的目的,从而完成恶意攻击。
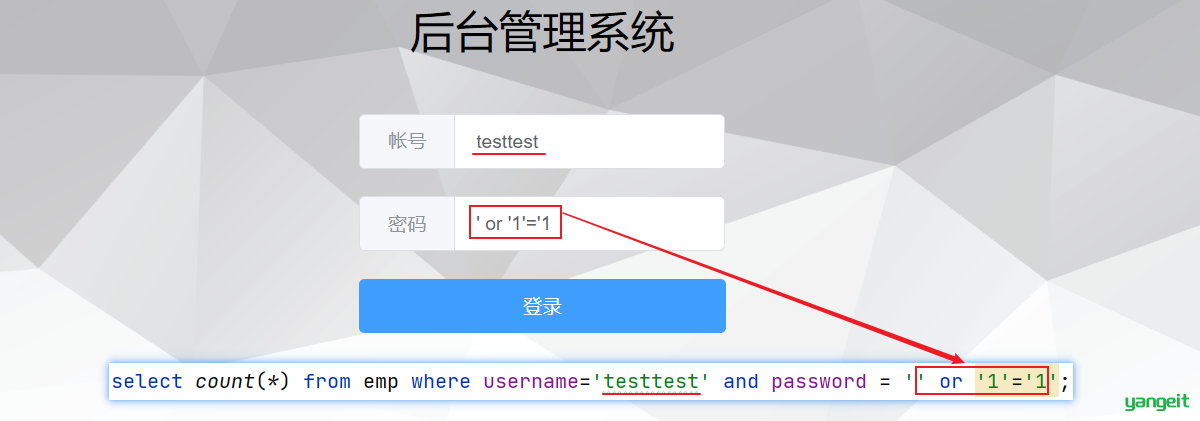
image-20221210214431228 用户在页面提交数据的时候人为的添加一些特殊字符,使得sql语句的结构发生了变化,最终可以在没有用户名或者密码的情况下进行登录。
测试2:使用资料中提供的程序,来验证SQL注入问题
第1步:进入到DOS
第2步:执行以下命令,启动程序:
#启动解决了SQL注入的程序
java -jar sql_prepared_demo-0.0.1-SNAPSHOT.jar
第3步:打开浏览器输入http://localhost:9090/login.html

发现无法登录:
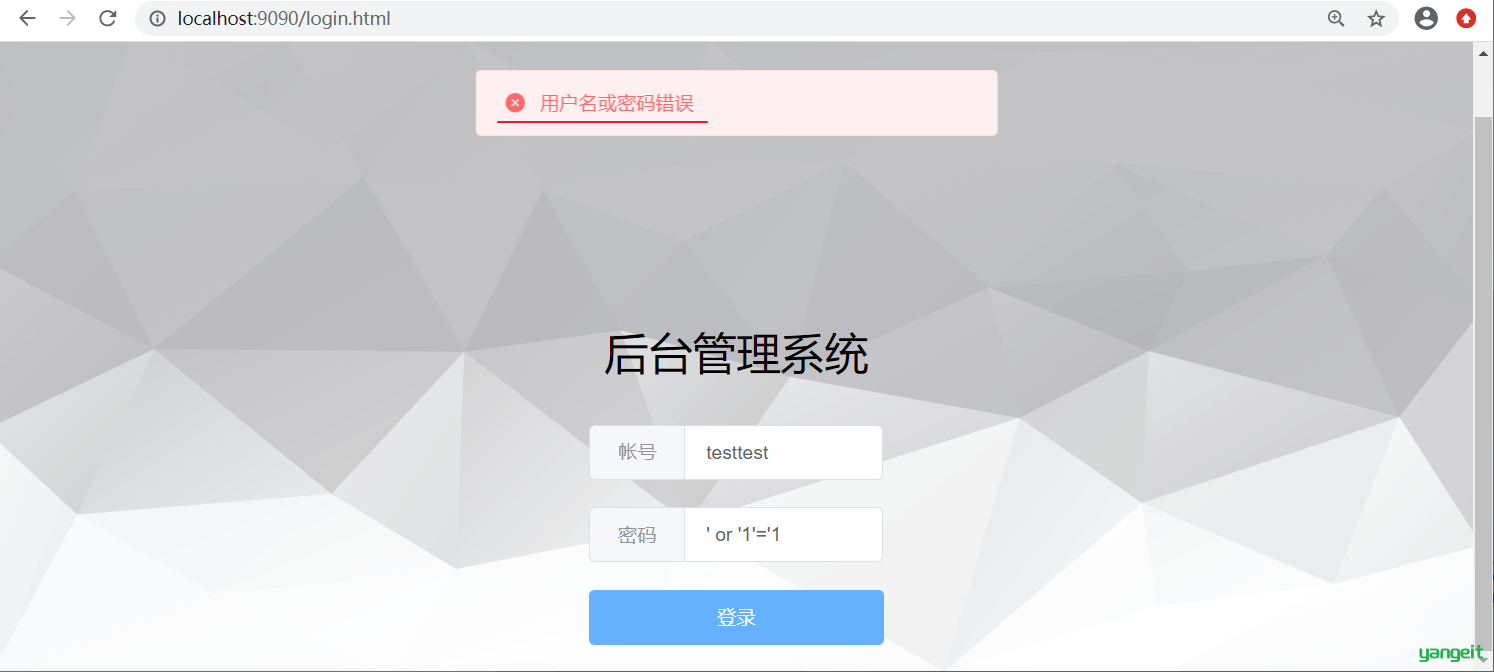
以上操作SQL语句的执行:

把整个
' or '1'='1作为一个完整的参数,赋值给第2个问号(' or '1'='1进行了转义,只当做字符串使用)
参数占位符
参数占位符
在Mybatis中提供的参数占位符有两种:${...} 、#{...}
#{...}安全,常用- 执行SQL时,会将
#{…}替换为?,生成预编译SQL,会自动设置参数值 - 使用时机:参数传递,都使用
#{…}
- 执行SQL时,会将
${...}有危险,慎用- 拼接SQL。直接将参数拼接在简单实用SQL语句中,存在SQL注入问题
- 使用时机:如果对表名、列表进行动态设置时使用
注意事项:在项目开发中,建议使用
#{...},生成预编译SQL,防止SQL注入安全。
总结
课堂作业
${...}、#{...}的区别是什么?🎤
2️⃣1.2 新增
功能:新增员工信息

基本新增
员工表结构:
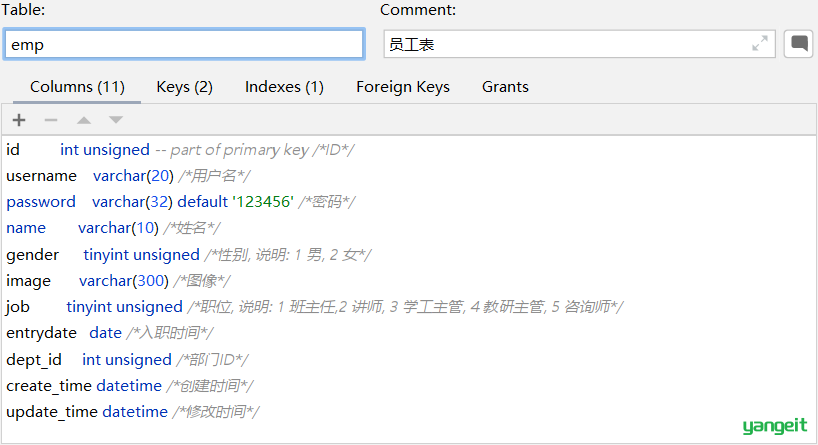
SQL语句:
insert into emp(username, name, gender, image, job, entrydate, dept_id, create_time, update_time) values ('songyuanqiao','宋远桥',1,'1.jpg',2,'2012-10-09',2,'2022-10-01 10:00:00','2022-10-01 10:00:00');
接口方法:
@Mapper
public interface EmpMapper {

    @Insert("insert into emp(username, name, gender, image, job, entrydate, dept_id, create_time, update_time) values (#{username}, #{name}, #{gender}, #{image}, #{job}, #{entrydate}, #{deptId}, #{createTime}, #{updateTime})")
    public void insert(Emp emp);

}
说明:#{...} 里面写的名称是对象的属性名
测试类:
@SpringBootTest
class SpringbootMybatisCrudApplicationTests {
    @Autowired
    private EmpMapper empMapper;

    @Test
    public void testInsert(){
        //创建员工对象
        Emp emp = new Emp();
        emp.setUsername("tom");
        emp.setName("汤姆");
        emp.setImage("1.jpg");
        emp.setGender((short)1);
        emp.setJob((short)1);
        emp.setEntrydate(LocalDate.of(2000,1,1));
        emp.setCreateTime(LocalDateTime.now());
        emp.setUpdateTime(LocalDateTime.now());
        emp.setDeptId(1);
        //调用添加方法
        empMapper.insert(emp);
    }
}
日志输出:
image-20221211140222240
主键返回
概念:在数据添加成功后,需要获取插入数据库数据的主键。
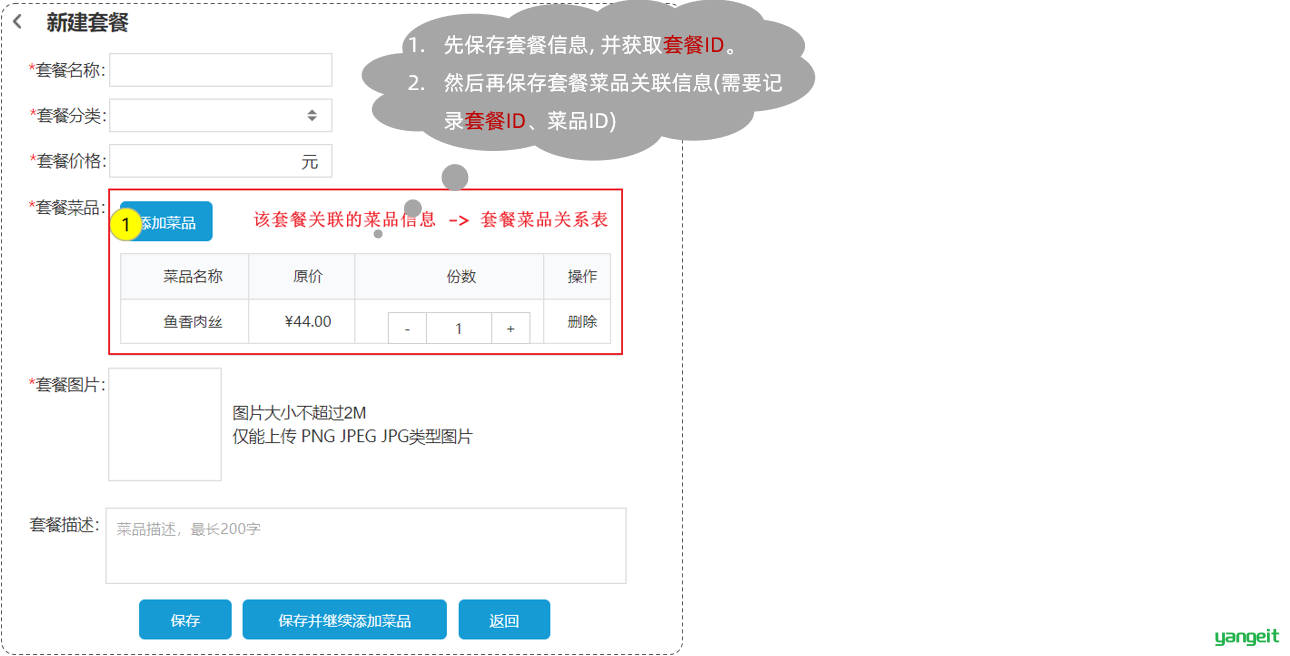
如:添加套餐数据时,还需要维护套餐菜品关系表数据。
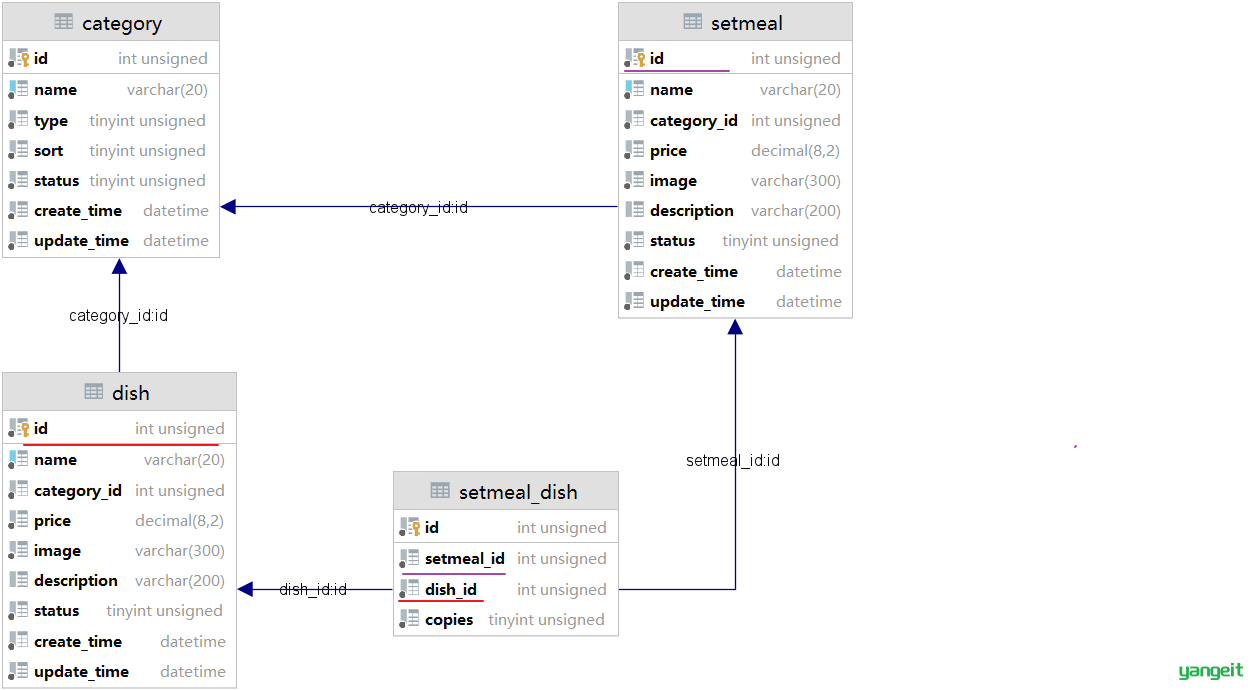
image-20221211150353385 业务场景:在前面讲解到的苍穹外卖菜品与套餐模块的表结构,菜品与套餐是多对多的关系,一个套餐对应多个菜品。既然是多对多的关系,是不是有一张套餐菜品中间表来维护它们之间的关系。
image-20221212093655389 在添加套餐的时候,我们需要在界面当中来录入套餐的基本信息,还需要来录入套餐与菜品的关联信息。这些信息录入完毕之后,我们一点保存,就需要将套餐的信息以及套餐与菜品的关联信息都需要保存到数据库当中。其实具体的过程包括两步,首先第一步先需要将套餐的基本信息保存了,接下来第二步再来保存套餐与菜品的关联信息。套餐与菜品的关联信息就是往中间表当中来插入数据,来维护它们之间的关系。而中间表当中有两个外键字段,一个是菜品的ID,就是当前菜品的ID,还有一个就是套餐的ID,而这个套餐的 ID 指的就是此次我所添加的套餐的ID,所以我们在第一步保存完套餐的基本信息之后,就需要将套餐的主键值返回来供第二步进行使用。这个时候就需要用到主键返回功能。
那要如何实现在插入数据之后返回所插入行的主键值呢?
- 默认情况下,执行插入操作时,是不会主键值返回的。如果我们想要拿到主键值,需要在Mapper接口中的方法上添加一个Options注解,并在注解中指定属性
useGeneratedKeys=true和keyProperty="实体类属性名"
主键返回代码实现:
@Mapper
public interface EmpMapper {

//会自动将生成的主键值,赋值给emp对象的id属性
@Options(useGeneratedKeys = true,keyProperty = "id")
@Insert("insert into emp(username, name, gender, image, job, entrydate, dept_id, create_time, update_time) values (#{username}, #{name}, #{gender}, #{image}, #{job}, #{entrydate}, #{deptId}, #{createTime}, #{updateTime})")
public void insert(Emp emp);

}
测试:
@SpringBootTest
class SpringbootMybatisCrudApplicationTests {
    @Autowired
    private EmpMapper empMapper;

    @Test
    public void testInsert(){
        //创建员工对象
        Emp emp = new Emp();
        emp.setUsername("jack");
        emp.setName("杰克");
        emp.setImage("1.jpg");
        emp.setGender((short)1);
        emp.setJob((short)1);
        emp.setEntrydate(LocalDate.of(2000,1,1));
        emp.setCreateTime(LocalDateTime.now());
        emp.setUpdateTime(LocalDateTime.now());
        emp.setDeptId(1);
        //调用添加方法
        empMapper.insert(emp);

        System.out.println(emp.getDeptId());
    }
}
总结
课堂作业
- 主键返回有什么应用场景?🎤
- 主键返回需要配置什么注解?🎤
- 如果不配置主键返回,能获得主键吗?🍐
3️⃣ 1.3 更新
功能:修改员工信息
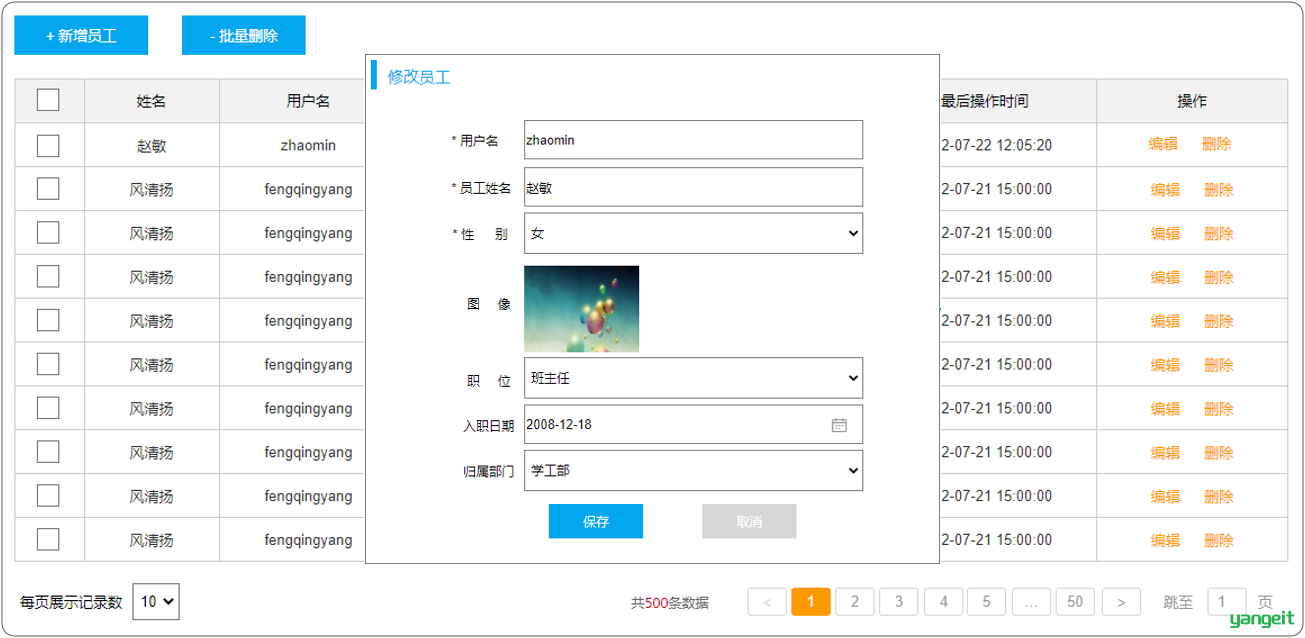
点击"编辑"按钮后,会查询所在行记录的员工信息,并把员工信息回显在修改员工的窗体上(下个知识点学习)
在修改员工的窗体上,可以修改的员工数据:用户名、员工姓名、性别、图像、职位、入职日期、归属部门
思考:在修改员工数据时,要以什么做为条件呢?
答案:员工id
SQL语句:
update emp set
    username = 'linghushaoxia',
    name = '令狐少侠',
    gender = 1 ,
    image = '1.jpg' ,
    job = 2,
    entrydate = '2012-01-01',
    dept_id = 2,
    update_time = '2022-10-01 12:12:12'
  where id = 18;
点击查看代码
接口方法:
@Mapper
public interface EmpMapper {
/**
    * 根据id修改员工信息
    * @param emp
    */
@Update("update emp set username=#{username}, name=#{name}, gender=#{gender}, image=#{image}, job=#{job}, entrydate=#{entrydate}, dept_id=#{deptId}, update_time=#{updateTime} where id=#{id}")
public void update(Emp emp);

}
测试类:
@SpringBootTest
class SpringbootMybatisCrudApplicationTests {
    @Autowired
    private EmpMapper empMapper;

    @Test
    public void testUpdate(){
        //要修改的员工信息
        Emp emp = new Emp();
        emp.setId(23);
        emp.setUsername("songdaxia");
        emp.setPassword(null);
        emp.setName("老宋");
        emp.setImage("2.jpg");
        emp.setGender((short)1);
        emp.setJob((short)2);
        emp.setEntrydate(LocalDate.of(2012,1,1));
        emp.setCreateTime(null);
        emp.setUpdateTime(LocalDateTime.now());
        emp.setDeptId(2);
        //调用方法,修改员工数据
        empMapper.update(emp);
    }
}
4️⃣1.4 查询
查询需求
- 根据ID查询
- 结果封装
- 条件查询
- 参数名说明
根据ID查询
在员工管理点击进入原型图的页面中,当我们进行更新数据时,会点击 “编辑” 按钮,然后此时会发送一个请求到服务端,会根据Id查询该员工信息,并将员工数据回显在页面上。
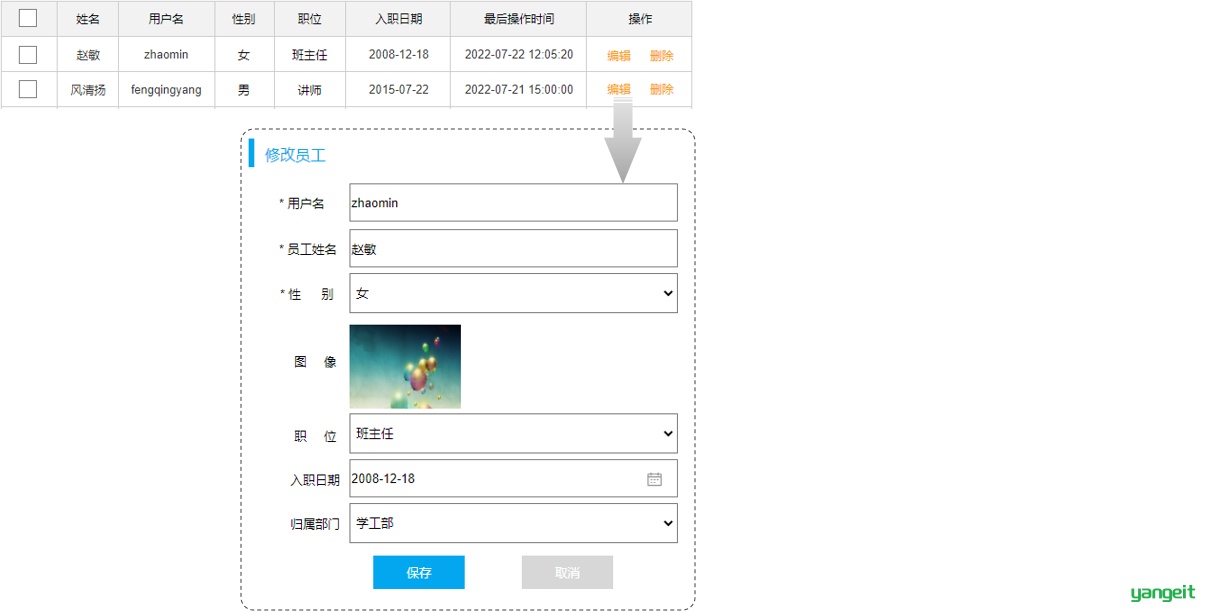
SQL语句:
select id, username, password, name,
gender, image, job, entrydate, dept_id,
create_time, update_time from emp;
接口方法:
写在mapper包下
@Mapper
public interface EmpMapper {
    @Select("select id, username, password, name, gender, image, job, entrydate, dept_id, create_time, update_time from emp where id=#{id}")
    public Emp getById(Integer id);
}
测试类:
写在test包下
@SpringBootTest
class SpringbootMybatisCrudApplicationTests {
    @Autowired
    private EmpMapper empMapper;

    @Test
    public void testGetById(){
        Emp emp = empMapper.getById(1);
        System.out.println(emp);
    }
}
执行结果:
image-20221212103004961 而在测试的过程中,我们会发现有几个字段(deptId、createTime、updateTime)是没有数据值的
数据封装
我们看到查询返回的结果中大部分字段是有值的,但是deptId,createTime,updateTime 这几个字段是没有值的,而数据库中是有对应的字段值的,这是为什么呢?
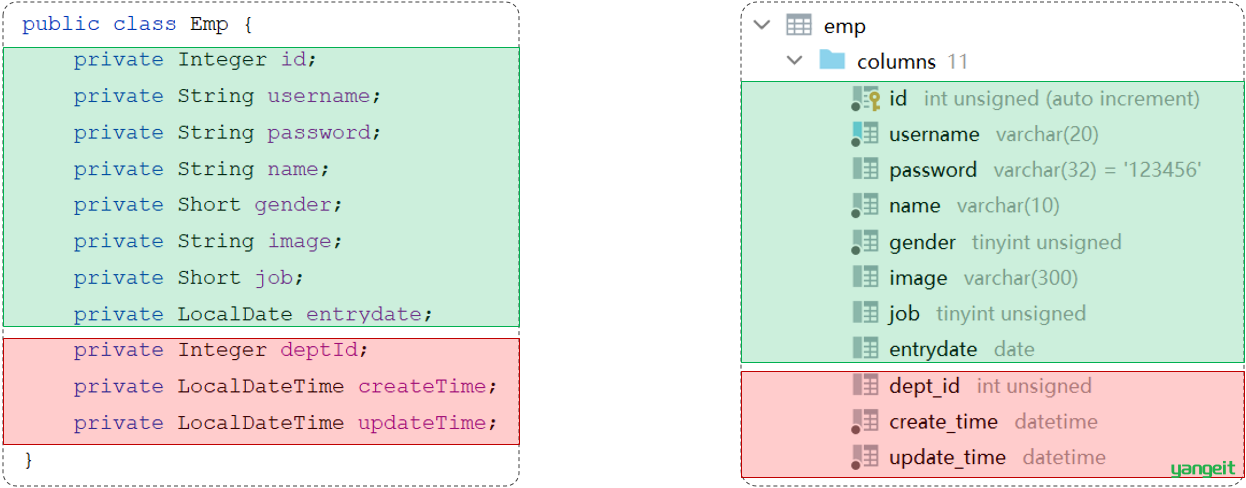
原因如下:
- 实体类属性名和数据库表查询返回的字段名一致,mybatis会自动封装。
- 如果实体类属性名和数据库表查询返回的字段名不一致,不能自动封装。
解决方案:
- 起别名适用字段较少
- 结果映射应用灵活
- 开启驼峰命名企业常用
起别名:在SQL语句中,对不一样的列名起别名,别名和实体类属性名一样
@Select("select id, username, password, name, gender, image, job, entrydate, " +
        "dept_id AS deptId, create_time AS createTime, update_time AS updateTime " +
        "from emp " +
        "where id=#{id}")
public Emp getById(Integer id);
再次执行测试类:
image-20221212111027396
手动结果映射:通过 @Results及@Result 进行手动结果映射
@Results({@Result(column = "dept_id", property = "deptId"),
          @Result(column = "create_time", property = "createTime"),
          @Result(column = "update_time", property = "updateTime")})
@Select("select id, username, password, name, gender, image, job, entrydate, dept_id, create_time, update_time from emp where id=#{id}")
public Emp getById(Integer id);
@Results源代码:
@Documented
@Retention(RetentionPolicy.RUNTIME)
@Target({ElementType.METHOD})
public @interface Results {
 String id() default "";

 Result[] value() default {};  //Result类型的数组
}
@Result源代码:
@Documented
@Retention(RetentionPolicy.RUNTIME)
@Target({ElementType.METHOD})
@Repeatable(Results.class)
public @interface Result {
 boolean id() default false;//表示当前列是否为主键(true:是主键)

 String column() default "";//指定表中字段名

 String property() default "";//指定类中属性名

 Class<?> javaType() default void.class;

 JdbcType jdbcType() default JdbcType.UNDEFINED;

 Class<? extends TypeHandler> typeHandler() default UnknownTypeHandler.class;

 One one() default @One;

 Many many() default @Many;
}
开启驼峰命名推荐:如果字段名与属性名符合驼峰命名规则,mybatis会自动通过驼峰命名规则映射
驼峰命名规则: abc_xyz => abcXyz
- 表中字段名:abc_xyz
- 类中属性名:abcXyz
# 在application.properties中添加:
mybatis.configuration.map-underscore-to-camel-case=true
要使用驼峰命名前提是 实体类的属性 与 数据库表中的字段名严格遵守驼峰命名。
条件查询
在员工管理的列表页面中,我们需要根据条件查询员工信息,查询条件包括:姓名、性别、入职时间。
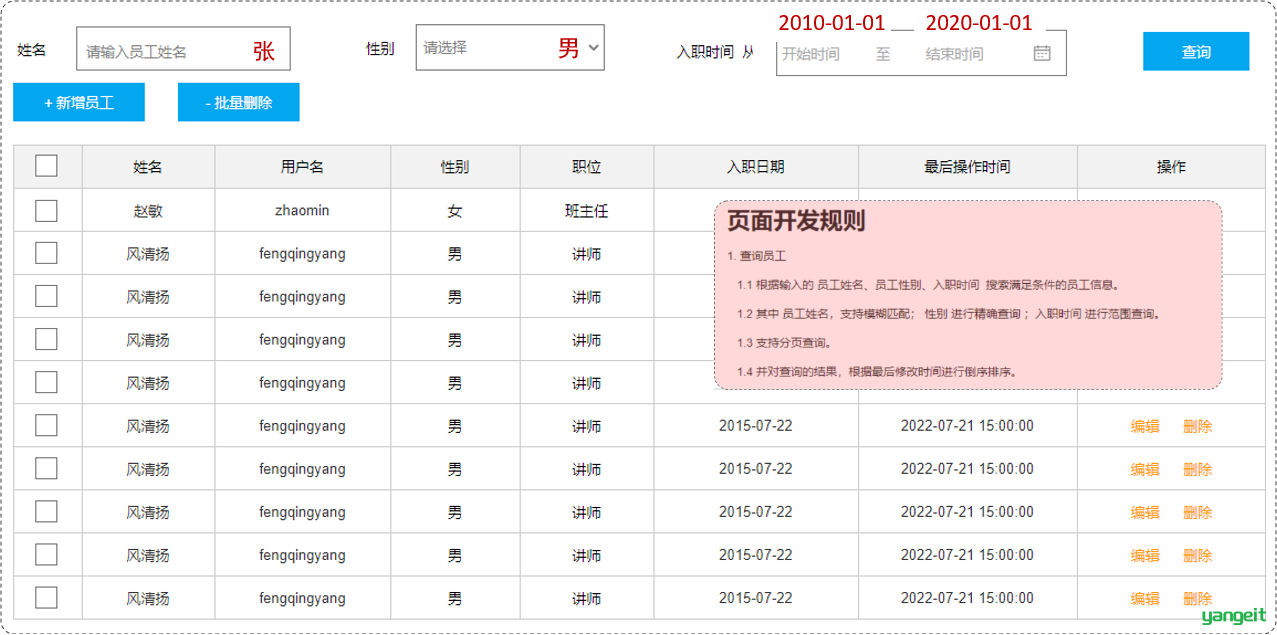
通过页面原型以及需求描述我们要实现的查询:
- 姓名:要求支持模糊匹配
- 性别:要求精确匹配
- 入职时间:要求进行范围查询
- 根据最后修改时间进行降序排序
SQL语句:
select id, username, password, name, gender, image, job, entrydate, dept_id, create_time, update_time
from emp
where name like '%张%'
      and gender = 1
      and entrydate between '2010-01-01' and '2020-01-01 '
order by update_time desc;
接口方法:
- 方式一(解决SQL注入风险)推荐使用
- 使用MySQL提供的字符串拼接函数:
concat('%' , '关键字' , '%')
- 使用MySQL提供的字符串拼接函数:
@Mapper
public interface EmpMapper {

    @Select("select * from emp " +
            "where name like concat('%',#{name},'%') " +
            "and gender = #{gender} " +
            "and entrydate between #{begin} and #{end} " +
            "order by update_time desc")
    public List<Emp> list(String name, Short gender, LocalDate begin, LocalDate end);

}
执行结果:生成的SQL都是预编译的SQL语句(性能高、安全)
image-20221212120006242
- 方式二有风险,慎用
@Mapper
public interface EmpMapper {
    @Select("select * from emp " +
            "where name like '%${name}%' " +
            "and gender = #{gender} " +
            "and entrydate between #{begin} and #{end} " +
            "order by update_time desc")
    public List<Emp> list(String name, Short gender, LocalDate begin, LocalDate end);
}
image-20221212115149151 以上方式注意事项:
方法中的形参名和SQL语句中的参数占位符名保持一致
模糊查询使用
${...}进行字符串拼接,这种方式呢,由于是字符串拼接,并不是预编译的形式,所以效率不高、且存在sql注入风险。
1.5.4 参数名说明
在上面我们所编写的条件查询功能中,我们需要保证接口中方法的形参名和SQL语句中的参数占位符名相同。
当方法中的形参名和SQL语句中的占位符参数名不相同时,就会出现以下问题:
image-20221212150611796
参数名在不同的SpringBoot版本中,处理方案还不同:
- 在springBoot的2.x版本(保证参数名一致)

springBoot的父工程对compiler编译插件进行了默认的参数parameters配置,使得在编译时,会在生成的字节码文件中保留原方法形参的名称,所以
#{…}里面可以直接通过形参名获取对应的值image-20221212151411154
- 在springBoot的1.x版本/单独使用mybatis(使用@Param注解来指定SQL语句中的参数名)

在编译时,生成的字节码文件当中,不会保留Mapper接口中方法的形参名称,而是使用var1、var2、...这样的形参名字,此时要获取参数值时,就要通过@Param注解来指定SQL语句中的参数名
image-20221212151736274
课堂作业
🎻 1.练习上述增删改查案例,并且使用驼峰命名
思考:实体类中的字段是否和表中的字段要一模一样?
使用maven方式创建SpringBoot集成Mybatis工程 ❤️ 🍐
使用maven方式创建SpringBoot集成Mybatis工程
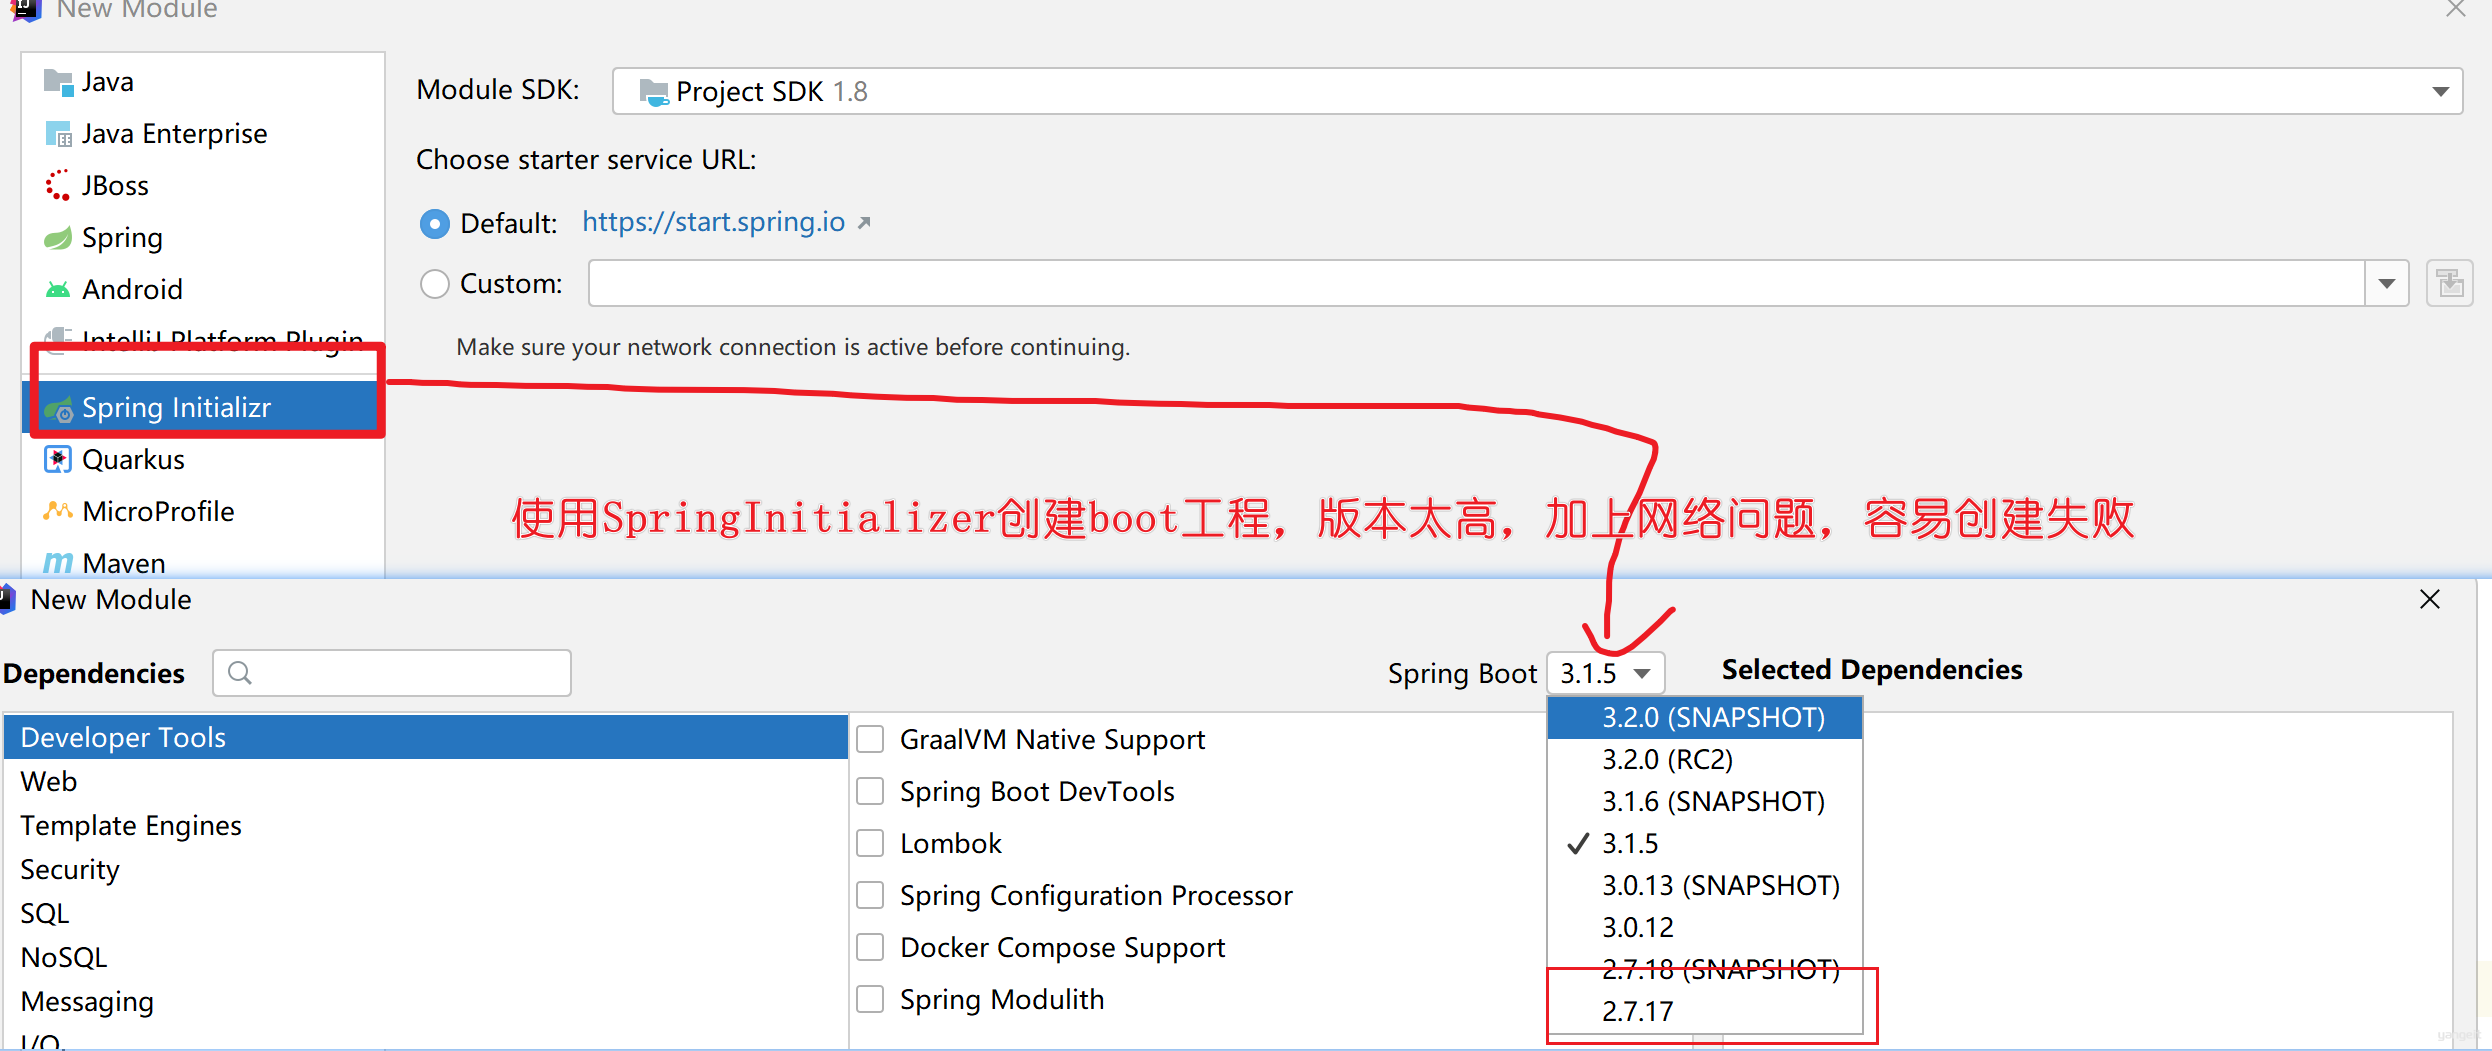
因此,需要使用maven方式创建Boot工程并且导入mybatis依赖和配置
代码操作
- 创建maven工程
springboot-mybatis-demo3 - 成功后,在pom.xml中添加
<parent></parent>父依赖,企业中使用2.7.4以下版本较多
<parent>
    <artifactId>spring-boot-starter-parent</artifactId>
    <groupId>org.springframework.boot</groupId>
    <version>2.7.4</version>
    <relativePath/>
</parent>
<groupId>org.example</groupId>
<artifactId>springboot-mybatis-demo3</artifactId>
<version>1.0-SNAPSHOT</version>
- 在
<dependencies>依次导入web、test、mysql驱动、mybatis起步依赖、lombok、hutool等依赖,然后点击右上角的小圆圈刷新maven
    <dependencies>

<!--        web开发-->
        <dependency>
            <groupId>org.springframework.boot</groupId>
            <artifactId>spring-boot-starter-web</artifactId>
        </dependency>

<!--        测试-->
        <dependency>
            <groupId>org.springframework.boot</groupId>
            <artifactId>spring-boot-starter-test</artifactId>
        </dependency>


<!--        mysql驱动-->
        <dependency>
            <groupId>mysql</groupId>
            <artifactId>mysql-connector-java</artifactId>
            <version>5.1.47</version>
        </dependency>

<!--        mybatis起步依赖-->
        <dependency>
            <groupId>org.mybatis.spring.boot</groupId>
            <artifactId>mybatis-spring-boot-starter</artifactId>
            <version>2.3.1</version>
        </dependency>

<!--        lombok依赖-->
        <dependency>
            <groupId>org.projectlombok</groupId>
            <artifactId>lombok</artifactId>
            <version>1.18.28</version>
        </dependency>

<!--        hutool工具包-->
        <dependency>
            <groupId>cn.hutool</groupId>
            <artifactId>hutool-all</artifactId>
            <version>5.8.16</version>
        </dependency>

    </dependencies>

    <build>
        <plugins>
            <plugin>
                <groupId>org.springframework.boot</groupId>
                <artifactId>spring-boot-maven-plugin</artifactId>
            </plugin>

            <plugin>
                <groupId>org.apache.maven.plugins</groupId>
                <artifactId>maven-resources-plugin</artifactId>
                <!--修改版本-->
                <version>3.1.0</version>
            </plugin>

        </plugins>
    </build>
下来在java和test2个包中,分别创建包如下图:
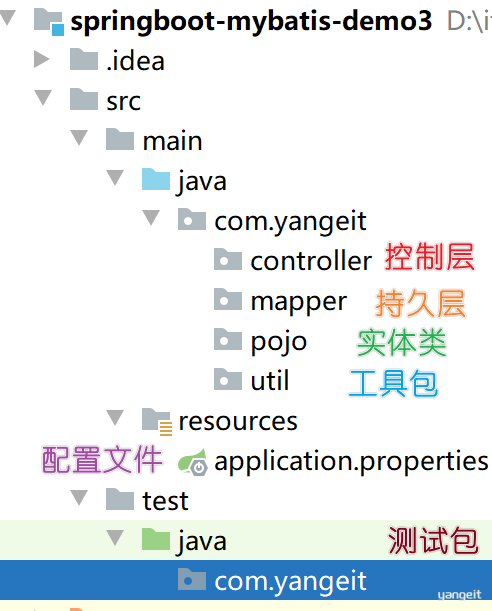
在com.yangeit下创建MybatisSpringBootApplication.java启动类,并且在里面补充如下代码:
/**
 * @author yangeit
 * @date 2023年11月01日
 * @Description boot工程入口类和配置类
 */
@SpringBootApplication
public class MybatisSpringBootApplication {

    public static void main(String[] args) {
        SpringApplication.run(MybatisSpringBootApplication.class,args);
    }

}
- 在application.properties文件中配置数据库链接信息,如下:
#驱动类名称
spring.datasource.driver-class-name=com.mysql.jdbc.Driver
#数据库连接的url
spring.datasource.url=jdbc:mysql://localhost:3306/java84?useUnicode=true&characterEncoding=UTF-8&zeroDateTimeBehavior=convertToNull&serverTimezone=Asia/Shanghai&useSSL=false
#连接数据库的用户名
spring.datasource.username=root
#连接数据库的密码
spring.datasource.password=1234

#开启mybatis日志
mybatis.configuration.log-impl=org.apache.ibatis.logging.stdout.StdOutImpl
#开启mybatis驼峰命名
mybatis.configuration.map-underscore-to-camel-case=true
- 安装mybatisX/lombok/Maven Helper等插件
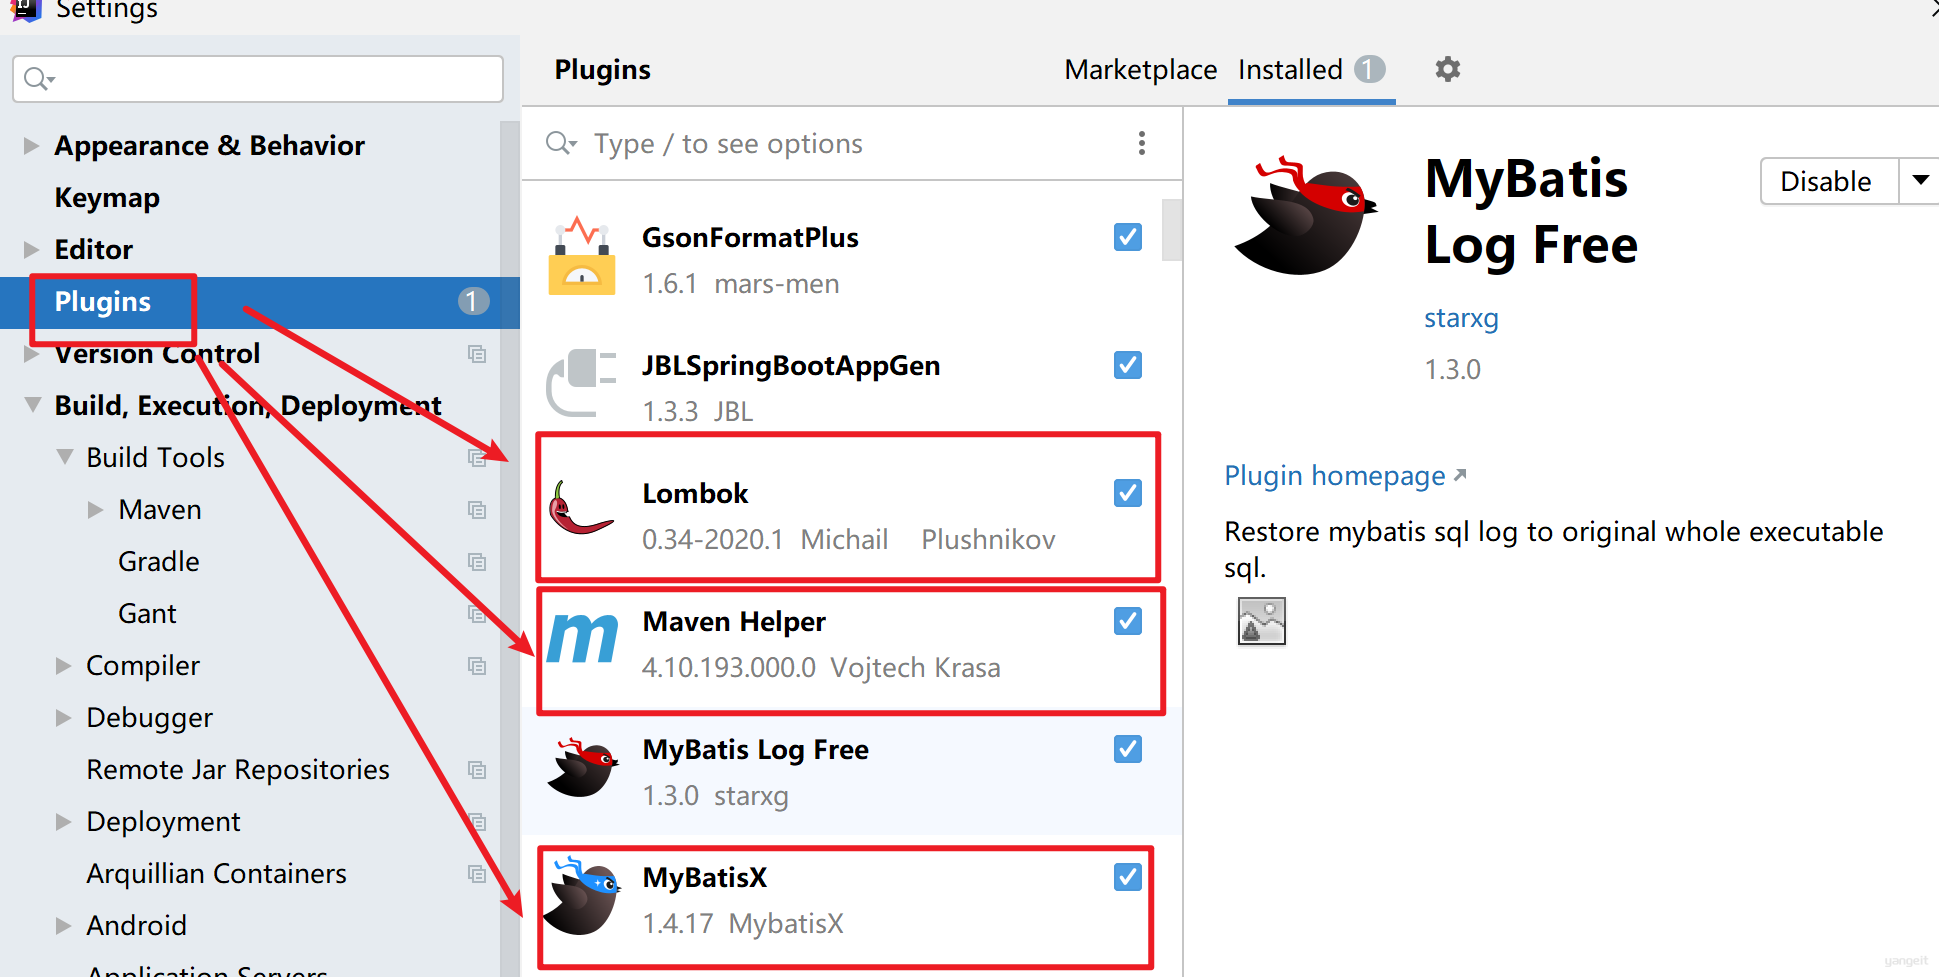
- 接下来运行启动类,观察工程是否启动

- 导入初始数据到数据库中
-- 部门管理
create table dept
(
    id          int unsigned primary key auto_increment comment '主键ID',
    name        varchar(10) not null unique comment '部门名称',
    create_time datetime    not null comment '创建时间',
    update_time datetime    not null comment '修改时间'
) comment '部门表';
-- 部门表测试数据
insert into dept (id, name, create_time, update_time)
values (1, '学工部', now(), now()),
       (2, '教研部', now(), now()),
       (3, '咨询部', now(), now()),
       (4, '就业部', now(), now()),
       (5, '人事部', now(), now());


-- 员工管理
create table emp
(
    id          int unsigned primary key auto_increment comment 'ID',
    username    varchar(20)      not null unique comment '用户名',
    password    varchar(32) default '123456' comment '密码',
    name        varchar(10)      not null comment '姓名',
    gender      tinyint unsigned not null comment '性别, 说明: 1 男, 2 女',
    image       varchar(300) comment '图像',
    job         tinyint unsigned comment '职位, 说明: 1 班主任,2 讲师, 3 学工主管, 4 教研主管, 5 咨询师',
    entrydate   date comment '入职时间',
    dept_id     int unsigned comment '部门ID',
    create_time datetime         not null comment '创建时间',
    update_time datetime         not null comment '修改时间'
) comment '员工表';
-- 员工表测试数据
INSERT INTO emp (id, username, password, name, gender, image, job, entrydate, dept_id, create_time, update_time)
VALUES
(1, 'jinyong', '123456', '金庸', 1, '1.jpg', 4, '2000-01-01', 2, now(), now()),
(2, 'zhangwuji', '123456', '张无忌', 1, '2.jpg', 2, '2015-01-01', 2, now(), now()),
(3, 'yangxiao', '123456', '杨逍', 1, '3.jpg', 2, '2008-05-01', 2, now(), now()),
(4, 'weiyixiao', '123456', '韦一笑', 1, '4.jpg', 2, '2007-01-01', 2, now(), now()),
(5, 'changyuchun', '123456', '常遇春', 1, '5.jpg', 2, '2012-12-05', 2, now(), now()),
(6, 'xiaozhao', '123456', '小昭', 2, '6.jpg', 3, '2013-09-05', 1, now(), now()),
(7, 'jixiaofu', '123456', '纪晓芙', 2, '7.jpg', 1, '2005-08-01', 1, now(), now()),
(8, 'zhouzhiruo', '123456', '周芷若', 2, '8.jpg', 1, '2014-11-09', 1, now(), now()),
(9, 'dingminjun', '123456', '丁敏君', 2, '9.jpg', 1, '2011-03-11', 1, now(), now()),
(10, 'zhaomin', '123456', '赵敏', 2, '10.jpg', 1, '2013-09-05', 1, now(), now()),
(11, 'luzhangke', '123456', '鹿杖客', 1, '11.jpg', 5, '2007-02-01', 3, now(), now()),
(12, 'hebiweng', '123456', '鹤笔翁', 1, '12.jpg', 5, '2008-08-18', 3, now(), now()),
(13, 'fangdongbai', '123456', '方东白', 1, '13.jpg', 5, '2012-11-01', 3, now(), now()),
(14, 'zhangsanfeng', '123456', '张三丰', 1, '14.jpg', 2, '2002-08-01', 2, now(), now()),
(15, 'yulianzhou', '123456', '俞莲舟', 1, '15.jpg', 2, '2011-05-01', 2, now(), now()),
(16, 'songyuanqiao', '123456', '宋远桥', 1, '16.jpg', 2, '2010-01-01', 2, now(), now()),
(17, 'chenyouliang', '123456', '陈友谅', 1, '17.jpg', NULL, '2015-03-21', NULL, now(), now());
- 根据ddl语句,创建实体类Emp和Dept
@Data
@NoArgsConstructor
@AllArgsConstructor
public class Emp {
    private Integer id;
    private String username;
    private String password;
    private String name;
    private Short gender;
    private String image;
    private Short job;
    private LocalDate entrydate;     //LocalDate类型对应数据表中的date类型
    private Integer deptId;
    private LocalDateTime createTime;//LocalDateTime类型对应数据表中的datetime类型
    private LocalDateTime updateTime;
}
@Data
@NoArgsConstructor
@AllArgsConstructor
public class Dept {
    private Integer id;
    private String name;
    private LocalDateTime createTime;//LocalDateTime类型对应数据表中的datetime类型
    private LocalDateTime updateTime;
}
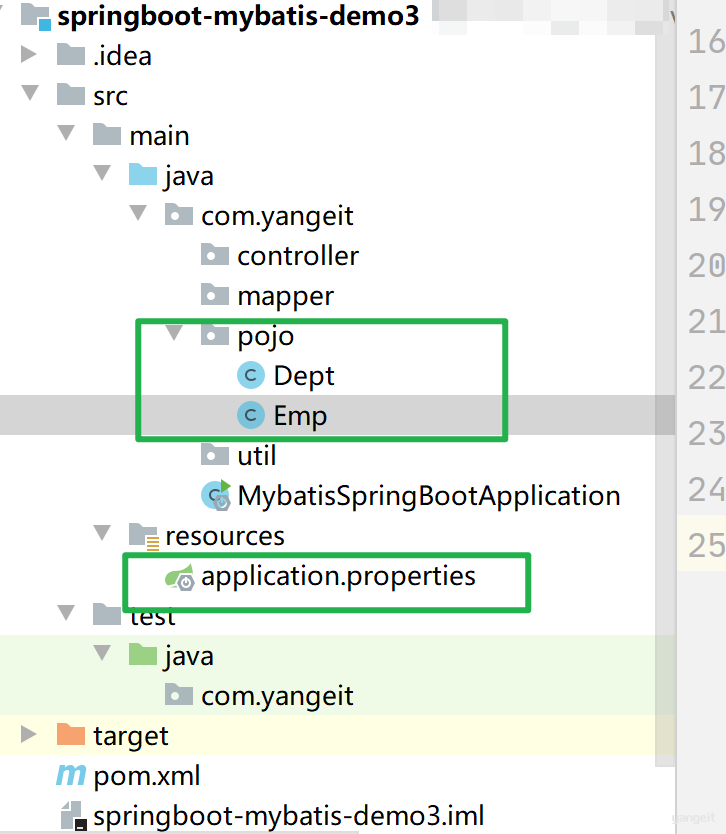
- 在java下的mapper包下创建EmpMapper.java接口,并定义一个方法
@Mapper
public interface EmpMapper {
    //查询所有员工
    public List<Emp> listEmp();

}
- 在resources下的创建和接口同名文件夹com.yangeit.mapper,注意这里要用斜杠
com/yangeit/mapper才能创建多级目录

- 并且在mapper文件夹下创建接口同名的EmpMapper.xml文件,粘贴如下代码:
<?xml version="1.0" encoding="UTF-8" ?>
<!DOCTYPE mapper
        PUBLIC "-//mybatis.org//DTD Mapper 3.0//EN"
        "https://mybatis.org/dtd/mybatis-3-mapper.dtd">
<mapper namespace="com.yangeit.mapper.EmpMapper">


</mapper>
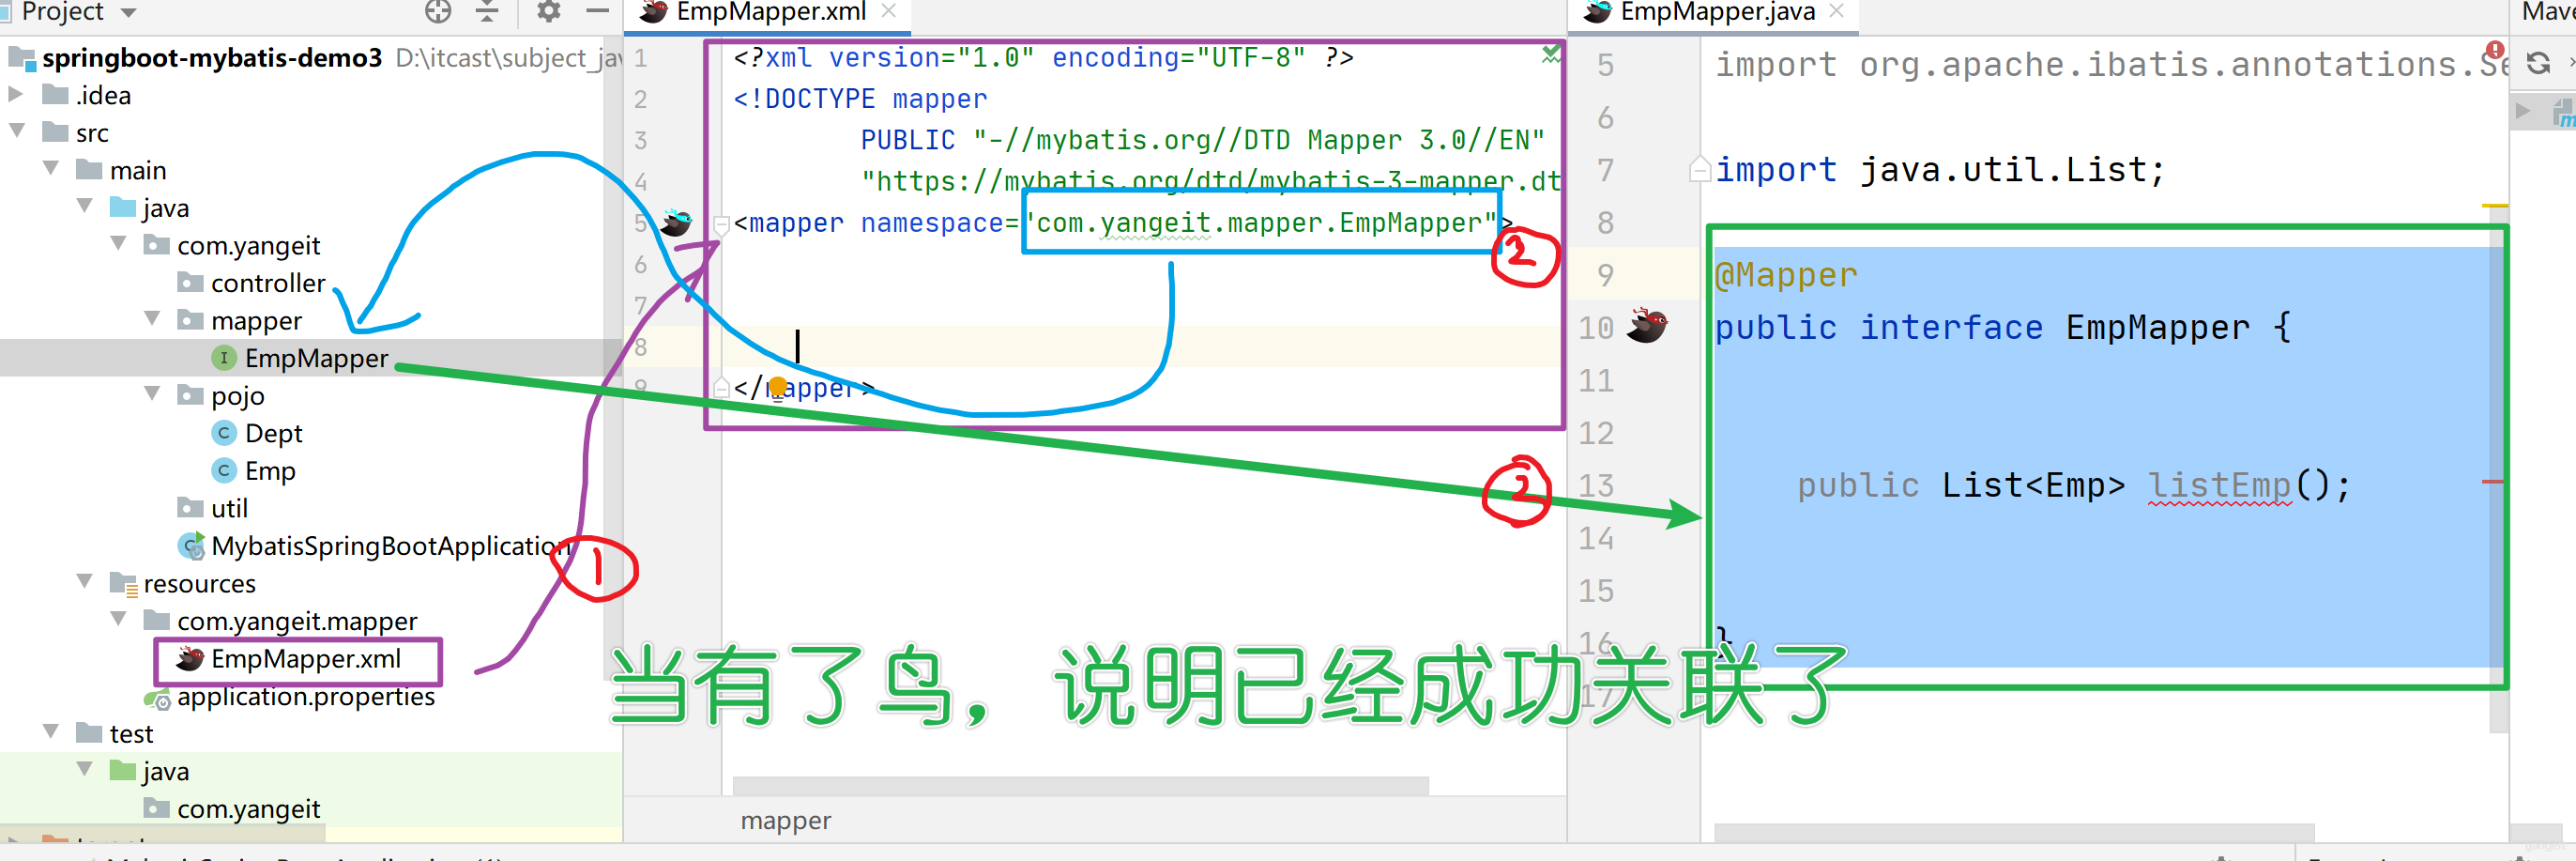
- 在接口EmpMapper点击方法回车,自动补全,如图:

- 在test下创建测试类MybatisSpringBootApplicationTest,并配置注解,如下:
/**
 * @author yangeit
 * @date 2023年11月01日
 * @Description
 */
@SpringBootTest
public class MybatisSpringBootApplicationTest {

    @Autowired
    EmpMapper empMapper;

    @Test
    public void listEmpTest(){

        List<Emp> emps = empMapper.listEmp();
        System.out.println(emps);

    }

}
点击测试:

如果出现问题: 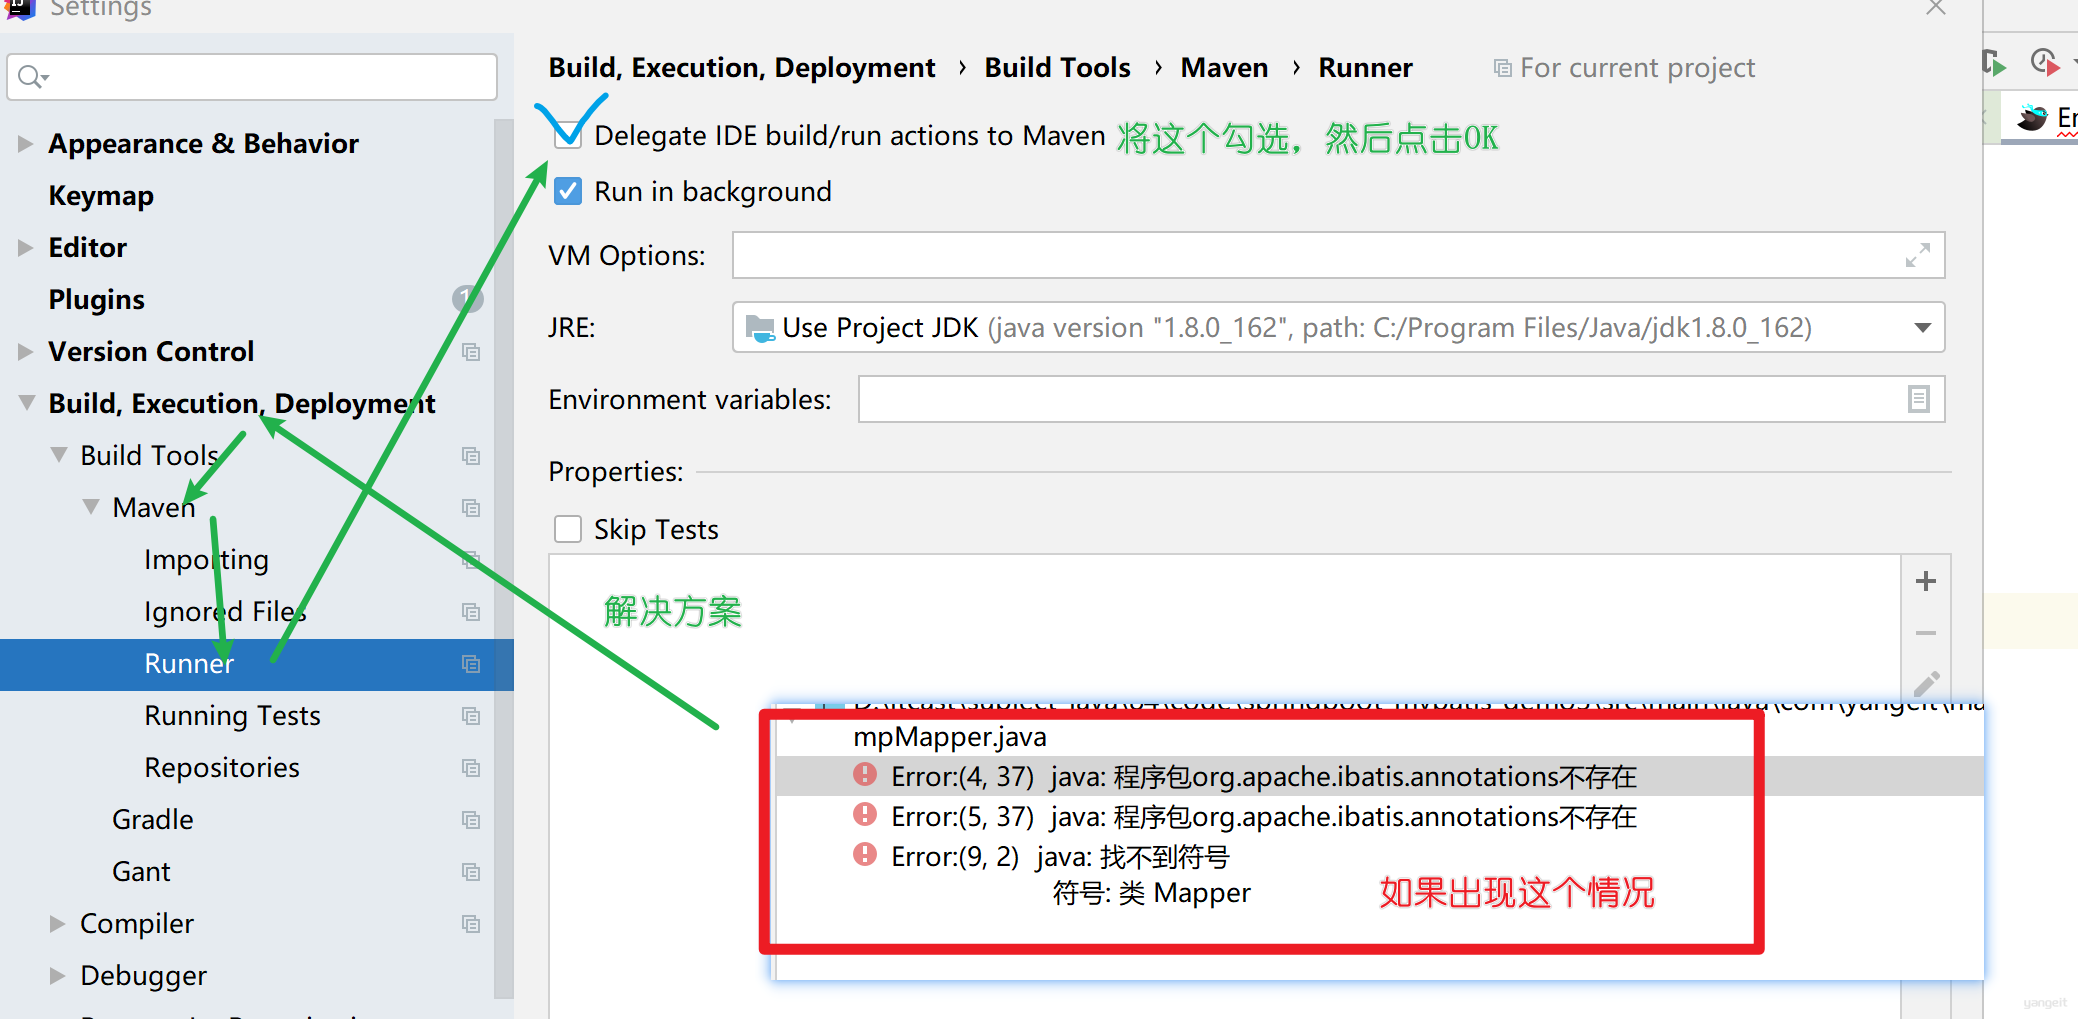
2. Mybatis的XML配置文件 ❤️ 🍐
Mybatis的开发有两种方式:
- 注解简单场景,复杂sql不适用
- XML 复杂sql适用,灵活实用
使用Mybatis的注解方式,主要是来完成一些简单的增删改查功能。如果需要实现复杂的SQL功能,建议使用XML来配置映射语句,也就是将SQL语句写在XML配置文件中。
2.1 XML配置文件规范
在Mybatis中使用XML映射文件方式开发,需要符合一定的规范:
- XML映射文件的名称与Mapper接口名称一致,并且将XML映射文件和Mapper接口放置在相同包下(同包同名)
- XML映射文件的namespace属性为Mapper接口全限定名一致
- XML映射文件中sql语句的id与Mapper接口中的方法名一致,并保持返回类型一致。

<select>标签:就是用于编写select查询语句的。
- resultType属性,指的是查询返回的单条记录所封装的类型。
XML配置文件实现
第1步:创建XML映射文件
在resources创建Mapper包名同名的文件夹
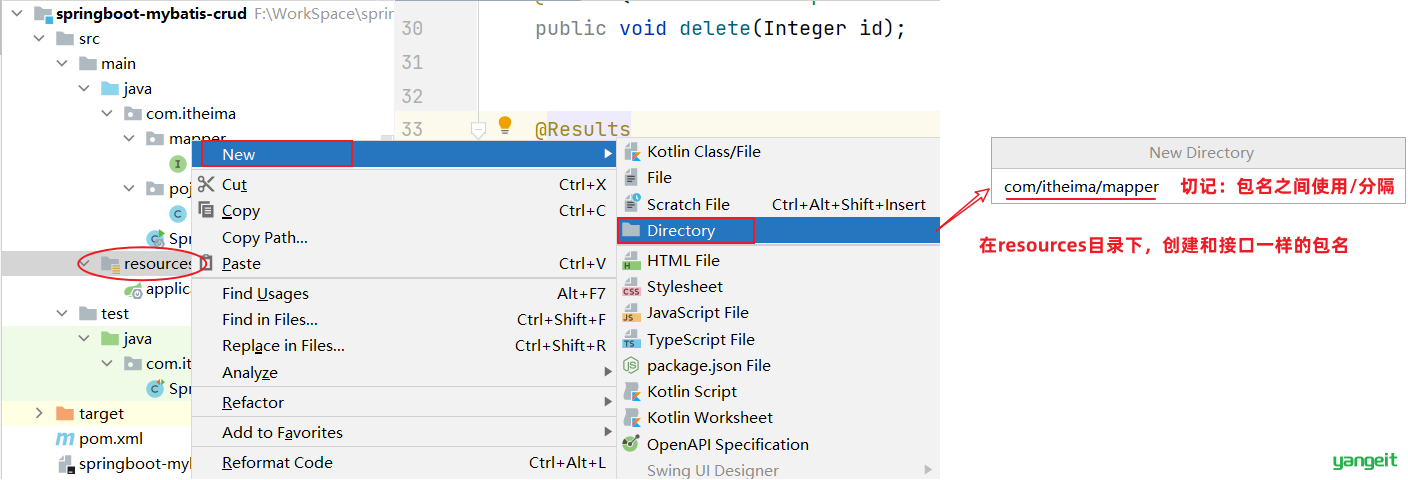

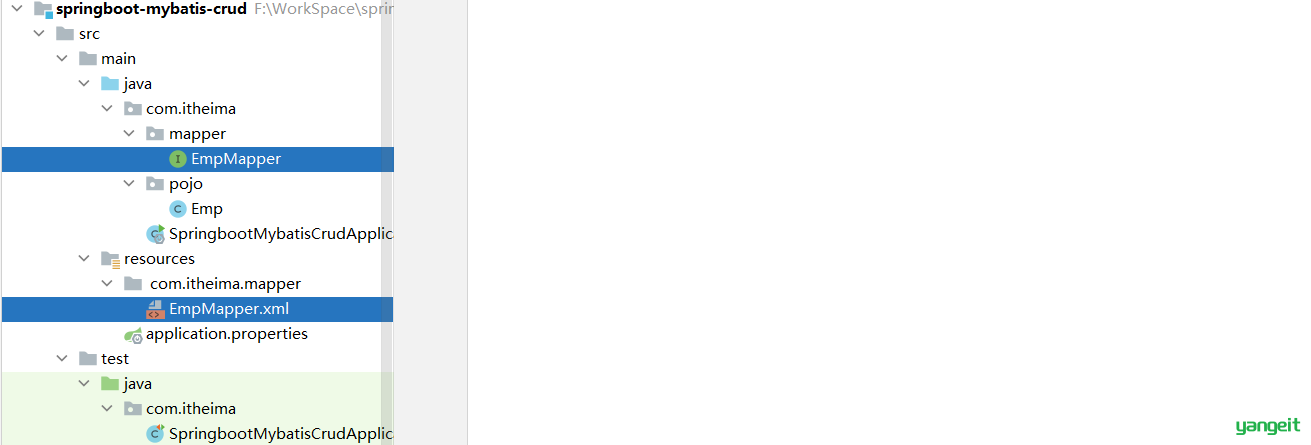
第2步:编写XML映射文件
xml映射文件中的dtd约束,直接从mybatis官网复制即可
<?xml version="1.0" encoding="UTF-8" ?>
<!DOCTYPE mapper
  PUBLIC "-//mybatis.org//DTD Mapper 3.0//EN"
  "https://mybatis.org/dtd/mybatis-3-mapper.dtd">
<mapper namespace="">

</mapper>
配置:XML映射文件的namespace属性为Mapper接口全限定名
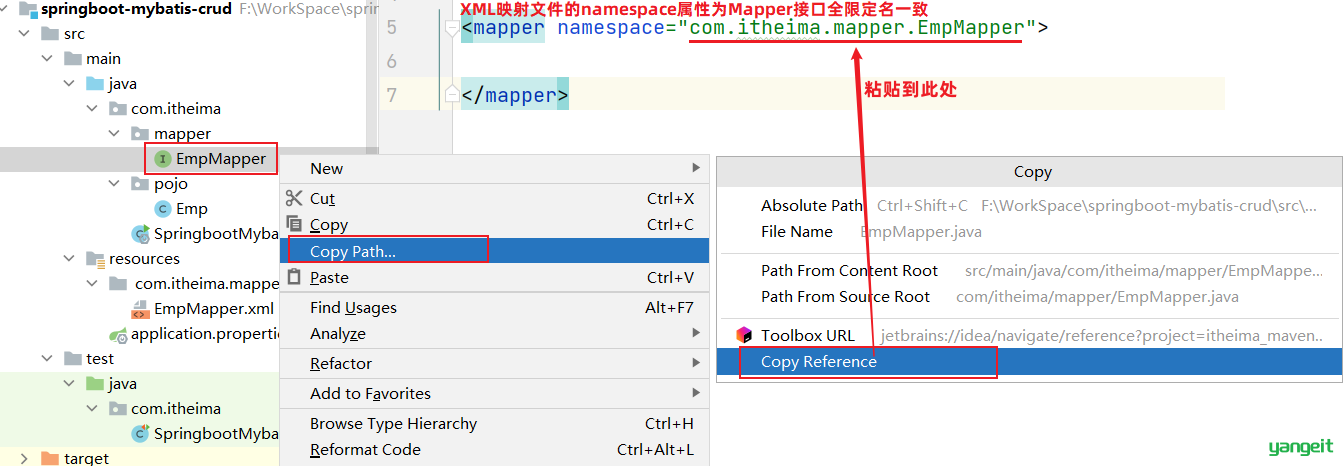
<?xml version="1.0" encoding="UTF-8" ?>
<!DOCTYPE mapper
        PUBLIC "-//mybatis.org//DTD Mapper 3.0//EN"
        "https://mybatis.org/dtd/mybatis-3-mapper.dtd">
<mapper namespace="com.yangeit.mapper.EmpMapper">

</mapper>
配置:XML映射文件中sql语句的id与Mapper接口中的方法名一致,并保持返回类型一致
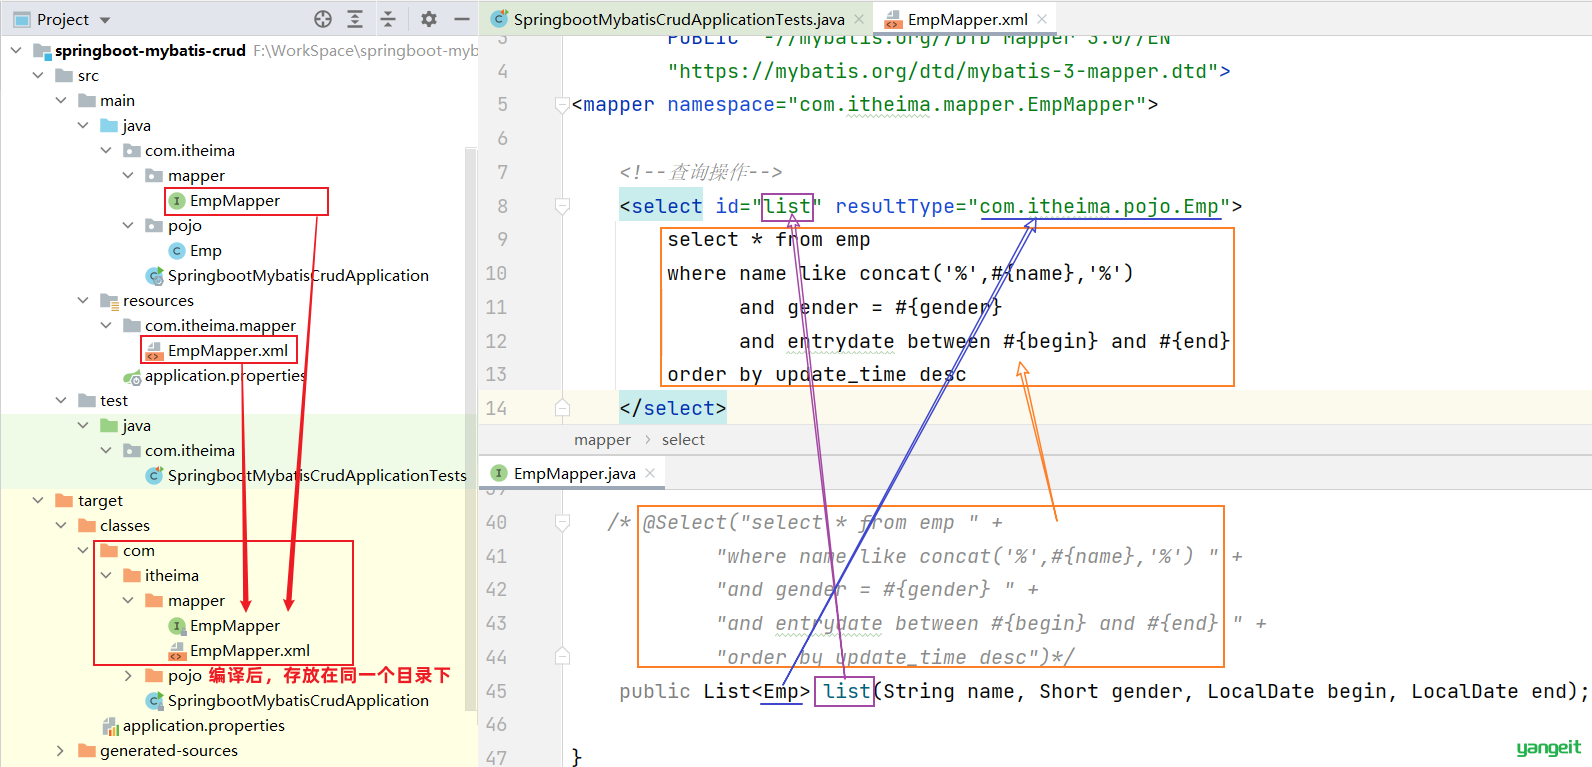
<?xml version="1.0" encoding="UTF-8" ?>
<!DOCTYPE mapper
        PUBLIC "-//mybatis.org//DTD Mapper 3.0//EN"
        "https://mybatis.org/dtd/mybatis-3-mapper.dtd">
<mapper namespace="com.itheima.mapper.EmpMapper">

    <!--查询操作-->
    <select id="list" resultType="com.itheima.pojo.Emp">
        select * from emp
        where name like concat('%',#{name},'%')
              and gender = #{gender}
              and entrydate between #{begin} and #{end}
        order by update_time desc
    </select>
</mapper>
运行测试类,执行结果:
image-20221212163719534
MybatisX插件自动检查规则
MybatisX是一款基于IDEA的快速开发Mybatis的插件,为效率而生。
MybatisX的安装:

可以通过MybatisX快速定位:
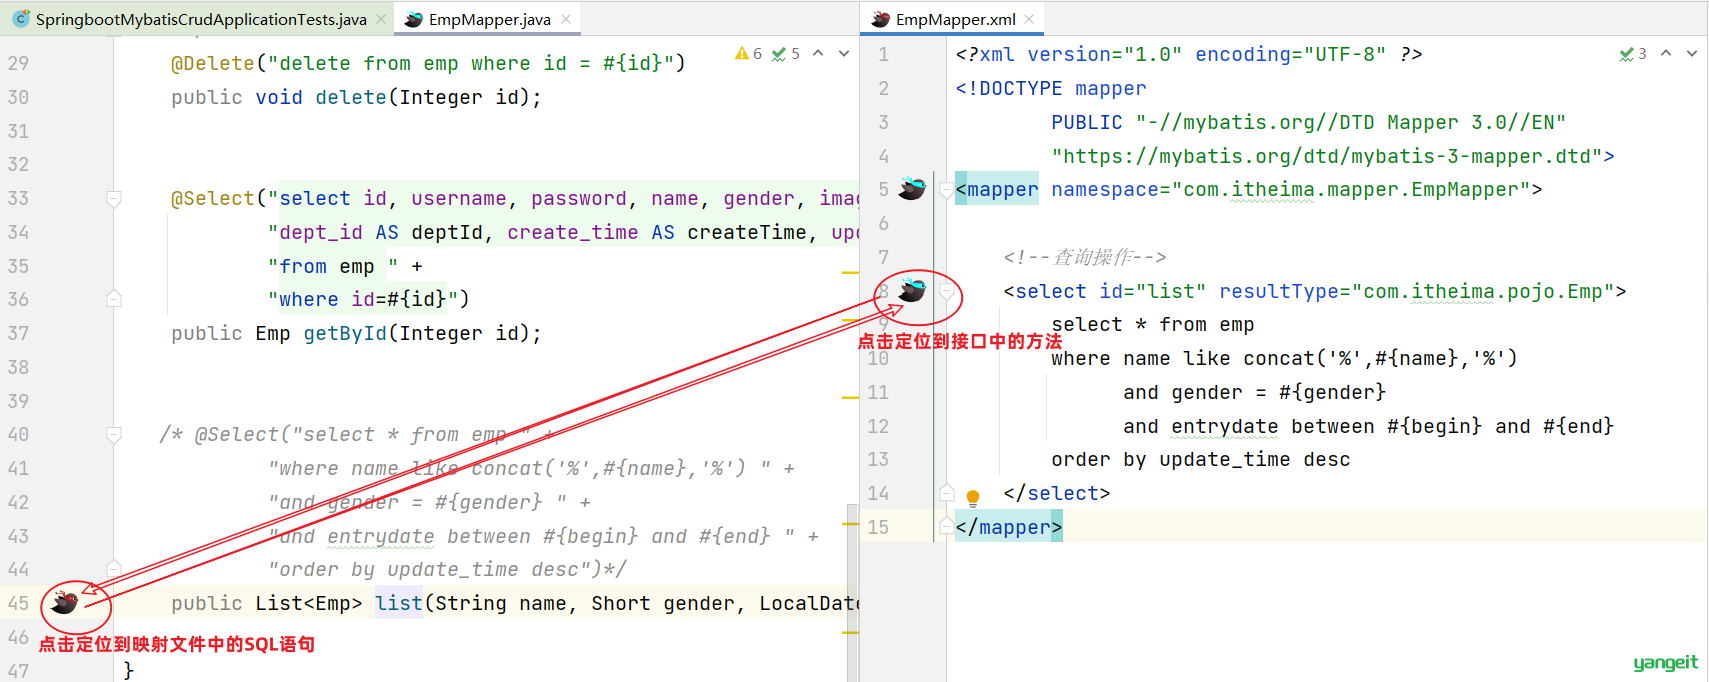
MybatisX的使用在后续学习中会继续分享
学习了Mybatis中XML配置文件的开发方式了,大家可能会存在一个疑问:到底是使用注解方式开发还是使用XML方式开发?
官方说明:https://mybatis.net.cn/getting-started.html
image-20220901173948645
结论: 使用Mybatis的注解,主要是来完成一些简单的增删改查功能。如果需要实现复杂的SQL功能,建议使用XML来配置映射语句。
课堂作业
🎻 1.练习MybatisXML配置文件中书写sql语句
步鄹提示:严格执行xml配置文件规范(建议安装MybatisX插件后练习,借助小鸟插件助力编程)
3. Mybatis动态SQL 🍐 ✏️ ❤️
动态SQL
在页面原型中,列表上方的条件是动态的,是可以不传递的,也可以只传递其中的1个或者2个或者全部。
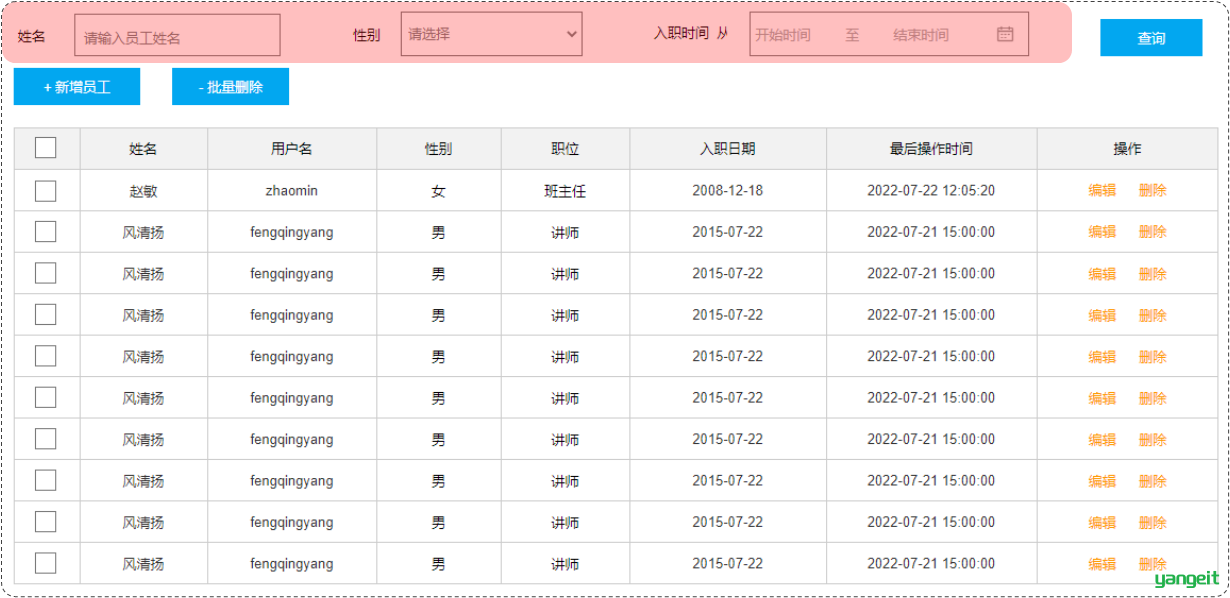

而在我们刚才编写的SQL语句中,我们会看到,我们将三个条件直接写死了。 如果页面只传递了参数姓名name 字段,其他两个字段 性别 和 入职时间没有传递,那么这两个参数的值就是null。
此时,执行的SQL语句为:

这个查询结果是不正确的。正确的做法应该是:传递了参数,再组装这个查询条件;如果没有传递参数,就不应该组装这个查询条件。
比如:如果姓名输入了"张", 对应的SQL为:
select * from emp where name like '%张%' order by update_time desc;
如果姓名输入了"张",,性别选择了"男",则对应的SQL为:
select * from emp where name like '%张%' and gender = 1 order by update_time desc;
SQL语句会随着用户的输入或外部条件的变化而变化,我们称为:动态SQL。 🎯

在Mybatis中提供了很多实现动态SQL的标签,我们学习Mybatis中的动态SQL就是掌握这些动态SQL标签。
1️⃣ 3.1 动态SQL-条件查询
动态SQL-条件查询
<if>:用于判断条件是否成立。使用test属性进行条件判断,如果条件为true,则拼接SQL。
<if test="条件表达式">
   要拼接的sql语句
</if>
示例:把SQL语句改造为动态SQL方式
代码操作
- 原有的SQL语句
<select id="list" resultType="com.itheima.pojo.Emp">
        select * from emp
        where name like concat('%',#{name},'%')
              and gender = #{gender}
              and entrydate between #{begin} and #{end}
        order by update_time desc
</select>
- 动态SQL语句 🎯
<select id="list" resultType="com.itheima.pojo.Emp">
        select * from emp
        where

             <if test="name != null">
                 name like concat('%',#{name},'%')
             </if>
             <if test="gender != null">
                 and gender = #{gender}
             </if>
             <if test="begin != null and end != null">
                 and entrydate between #{begin} and #{end}
             </if>

        order by update_time desc
</select>
测试方法:
@Test
public void testList(){
    //性别数据为null、开始时间和结束时间也为null
    List<Emp> list = empMapper.list("张", null, null, null);
    for(Emp emp : list){
        System.out.println(emp);
    }
}
执行的SQL语句:
image-20221213140353285
下面呢,我们修改传入参数,再次进行测试,观察执行情况: 👇 👇 👇
@Test
public void testList(){
    //姓名为null
    List<Emp> list = empMapper.list(null, (short)1, null, null);
    for(Emp emp : list){
        System.out.println(emp);
    }
}
执行结果:


再次修改测试方法中的代码,再次进行测试:
@Test
public void testList(){
    //传递的数据全部为null
    List<Emp> list = empMapper.list(null, null, null, null);
    for(Emp emp : list){
        System.out.println(emp);
    }
}
执行的SQL语句:

以上问题的解决方案:使用<where>标签代替SQL语句中的where关键字
<where>只会在子元素有内容的情况下才插入where子句,而且会自动去除子句的开头的AND或OR
<select id="list" resultType="com.itheima.pojo.Emp">
        select * from emp
        <where>
             <!-- if做为where标签的子元素 -->
             <if test="name != null">
                 and name like concat('%',#{name},'%')
             </if>
             <if test="gender != null">
                 and gender = #{gender}
             </if>
             <if test="begin != null and end != null">
                 and entrydate between #{begin} and #{end}
             </if>
        </where>
        order by update_time desc
</select>
测试方法:
@Test
public void testList(){
    //只有性别
    List<Emp> list = empMapper.list(null, (short)1, null, null);
    for(Emp emp : list){
        System.out.println(emp);
    }
}
执行的SQL语句:
image-20221213141909455
课堂作业
🎻 1.将上述的动态查询案例练习一遍,并且使用<if></if> <where> </where> 等标签
注意:理解if和where2个标签的作用
2️⃣3.2 动态SQL-更新员工
前言
案例:完善更新员工功能,修改为动态更新员工数据信息
- 动态更新员工信息,如果更新时传递有值,则更新;如果更新时没有传递值,则不更新
- 解决方案:动态SQL
代码操作
修改Mapper接口:
@Mapper
public interface EmpMapper {
    //删除@Update注解编写的SQL语句
    //update操作的SQL语句编写在Mapper映射文件中
    public void update(Emp emp);
}
修改Mapper映射文件:
<?xml version="1.0" encoding="UTF-8" ?>
<!DOCTYPE mapper
        PUBLIC "-//mybatis.org//DTD Mapper 3.0//EN"
        "https://mybatis.org/dtd/mybatis-3-mapper.dtd">
<mapper namespace="com.itheima.mapper.EmpMapper">

    <!--更新操作-->
    <update id="update">
        update emp
        set
            <if test="username != null">
                username=#{username},
            </if>
            <if test="name != null">
                name=#{name},
            </if>
            <if test="gender != null">
                gender=#{gender},
            </if>
            <if test="image != null">
                image=#{image},
            </if>
            <if test="job != null">
                job=#{job},
            </if>
            <if test="entrydate != null">
                entrydate=#{entrydate},
            </if>
            <if test="deptId != null">
                dept_id=#{deptId},
            </if>
            <if test="updateTime != null">
                update_time=#{updateTime}
            </if>
        where id=#{id}
    </update>

</mapper>
测试方法:
@Test
public void testUpdate2(){
        //要修改的员工信息
        Emp emp = new Emp();
        emp.setId(20);
        emp.setUsername("Tom111");
        emp.setName("汤姆111");

        emp.setUpdateTime(LocalDateTime.now());

        //调用方法,修改员工数据
        empMapper.update(emp);
}
执行的SQL语句:
image-20221213152533851
仔细观察截图,有何隐患?
再次修改测试方法,观察SQL语句执行情况:
@Test
public void testUpdate2(){
        //要修改的员工信息
        Emp emp = new Emp();
        emp.setId(20);
        emp.setUsername("Tom222");

        //调用方法,修改员工数据
        empMapper.update(emp);
}
执行的SQL语句:
image-20221213152850322
以上问题的解决方案:使用<set>标签代替SQL语句中的set关键字
<set>:动态的在SQL语句中插入set关键字,并会删掉额外的逗号。(用于update语句中)
<?xml version="1.0" encoding="UTF-8" ?>
<!DOCTYPE mapper
        PUBLIC "-//mybatis.org//DTD Mapper 3.0//EN"
        "https://mybatis.org/dtd/mybatis-3-mapper.dtd">
<mapper namespace="com.itheima.mapper.EmpMapper">

    <!--更新操作-->
    <update id="update">
        update emp
        <!-- 使用set标签,代替update语句中的set关键字 -->
        <set>
            <if test="username != null">
                username=#{username},
            </if>
            <if test="name != null">
                name=#{name},
            </if>
            <if test="gender != null">
                gender=#{gender},
            </if>
            <if test="image != null">
                image=#{image},
            </if>
            <if test="job != null">
                job=#{job},
            </if>
            <if test="entrydate != null">
                entrydate=#{entrydate},
            </if>
            <if test="deptId != null">
                dept_id=#{deptId},
            </if>
            <if test="updateTime != null">
                update_time=#{updateTime}
            </if>
        </set>
        where id=#{id}
    </update>
</mapper>
再次执行测试方法,执行的SQL语句:
image-20221213153329553
小结
<if>- 用于判断条件是否成立,如果条件为true,则拼接SQL
- 形式:
<if test="name != null"> … </if>
<where>where元素只会在子元素有内容的情况下才插入where子句,而且会自动去除子句的开头的AND或OR
   <where>
         <if test="name != null">
             and name like concat('%',#{name},'%')
         </if>
         <if test="gender != null">
             and gender = #{gender}
         </if>
    </where>
<set>- 动态地在行首插入 SET 关键字,并会删掉额外的逗号。(用在update语句中)
课堂作业
🎻 1. 练习下上述的案例,理解<set></set>标签的作用
3️⃣动态SQL-foreach
案例:员工删除功能(既支持删除单条记录,又支持批量删除)
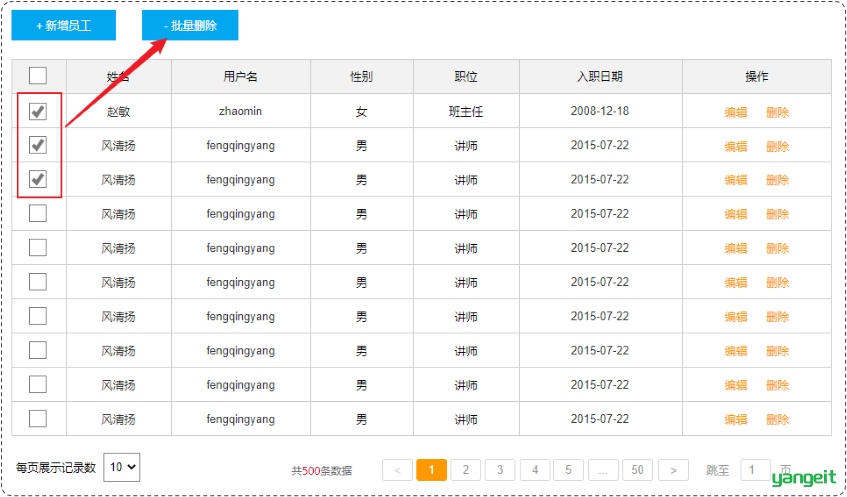
SQL语句:
delete from emp where id in (1,2,3);
代码具体实现
Mapper接口:
@Mapper
public interface EmpMapper {
    //批量删除
    public void deleteByIds(List<Integer> ids);
}
XML映射文件:
- 使用
<foreach>遍历deleteByIds方法中传递的参数ids集合
<foreach collection="集合名称" item="集合遍历出来的元素/项" separator="每一次遍历使用的分隔符"
         open="遍历开始前拼接的片段" close="遍历结束后拼接的片段">
</foreach>
<?xml version="1.0" encoding="UTF-8" ?>
<!DOCTYPE mapper
        PUBLIC "-//mybatis.org//DTD Mapper 3.0//EN"
        "https://mybatis.org/dtd/mybatis-3-mapper.dtd">
<mapper namespace="com.itheima.mapper.EmpMapper">
    <!--删除操作-->
    <delete id="deleteByIds">
        delete from emp where id in
        <foreach collection="ids" item="id" separator="," open="(" close=")">
            #{id}
        </foreach>
    </delete>
</mapper>
image-20221213165710141
执行的SQL语句:
image-20221213164957636
总结
- 如果传入的是集合或者数组,可以使用foreach标签拼接参数
课堂作业
- 1.将上述案例练习一下,主要理解 foreach标签以及属性的含义,并体会批量删除的业务场景?🎤
4️⃣动态SQL-fsql&include
前言
问题分析:在xml映射文件中配置的SQL,有时可能会存在很多重复的片段,此时就会存在很多冗余的代码
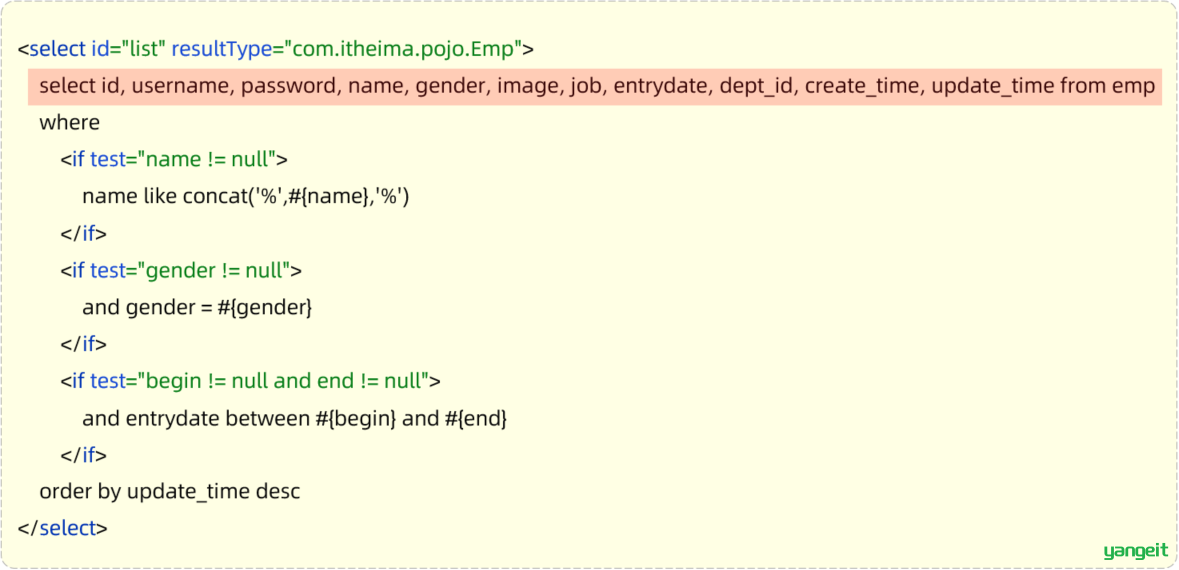

解决方案
解决方案
我们可以对重复的代码片段进行抽取,将其通过<sql>标签封装到一个SQL片段,然后再通过<include>标签进行引用。
<sql>:定义可重用的SQL片段<include>:通过属性refid,指定包含的SQL片段
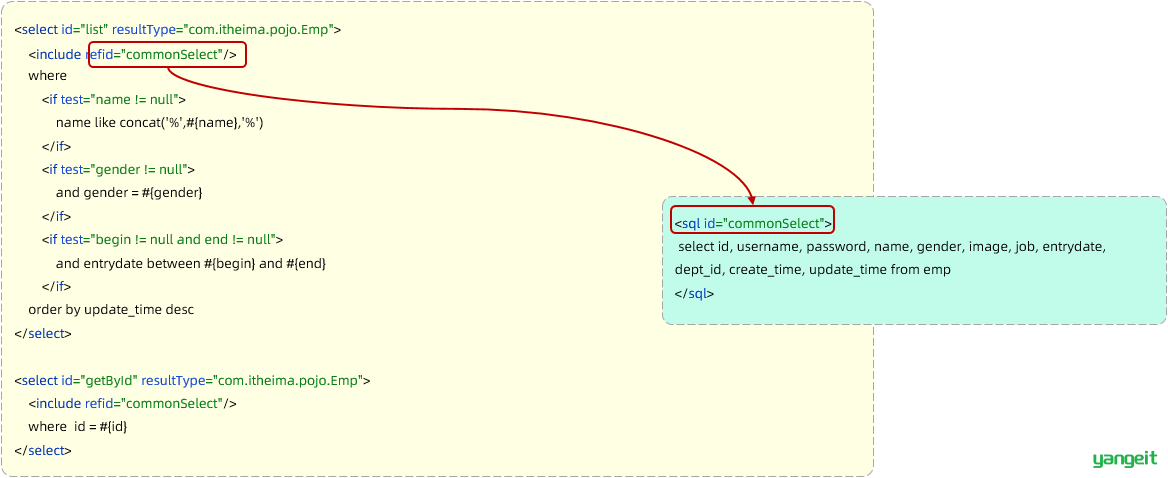
SQL片段: 抽取重复的代码 👇
<sql id="commonSelect">
  select id, username, password, name, gender, image, job, entrydate, dept_id, create_time, update_time from emp
</sql>
然后通过<include> 标签在原来抽取的地方进行引用。操作如下:
<select id="list" resultType="com.itheima.pojo.Emp">
    <include refid="commonSelect"/>
    <where>
        <if test="name != null">
            name like concat('%',#{name},'%')
        </if>
        <if test="gender != null">
            and gender = #{gender}
        </if>
        <if test="begin != null and end != null">
            and entrydate between #{begin} and #{end}
        </if>
    </where>
    order by update_time desc
</select>
总结
课堂作业
- 如果mapper文件中存在多个重复片段,使用什么标签抽取sql?
- 对比注解和mapper映射文件,谈谈优缺点?🎤
课后作业
🚩 1. 重点完成上述的课堂作业
晚自习第一节课的前30分钟,总结完毕之后,每个同学先必须梳理今日知识点 (记得写不知道的,以及感恩三件事);整理好的笔记可以发给组长,组长交给班长,意在培养大家总结的能力)
晚自习第一节课的后30分钟开始练习(记住:程序员是代码堆起来的):
- 先要把今天的所有案例或者课堂练习,如果没练完的,练完他
- 独立书写今日作业 Day09作业👈
剩余的时间:预习第二天的知识,预习的时候一定要注意:
- 预习不是学习,不要死看第二天的视频(很容易出现看了白看,为了看视频而看视频)
- 预习看第二天的笔记,把笔记中标注重要的知识,可以找到预习视频,先看一遍,如果不懂的 ,记住做好标注。


